Sustained power on gravel isn’t about hitting your road numbers; it’s about mastering the physics of a constantly changing surface to deliver efficient, usable watts.
- The « Roughness Tax » means holding 250 watts on a fire road is physiologically harder than on a trainer, requiring specific adaptation.
- Traction is king: Smooth, seated power maintains grip on loose climbs, while out-of-the-saddle sprinting causes wheel spin and wasted energy.
Recommendation: Shift your focus from chasing instantaneous power targets to developing a smooth ‘torque signature’ and banking momentum to build a true ‘diesel engine’ for long gravel days.
As a gravel racer, you know the goal: build a bigger engine. You’ve heard the advice—do your intervals, get your hours in, and focus on your power zones. Many athletes simply take their road or indoor training plans and try to execute them on the nearest fire road, chasing the same watt targets and interval structures. They end up frustrated, battling for traction on climbs, getting rattled on descents, and wondering why their power numbers are so erratic compared to the smooth tarmac.
The common wisdom says to just ‘get stronger’ or ‘practice more,’ but this overlooks the fundamental difference in the terrain. The truth is, a fire road is not a trainer. Applying power effectively in a low-traction, high-vibration environment is a completely different skill. It’s a constant negotiation with physics where raw power is often less important than how smoothly it’s delivered.
What if the key to unlocking double-track speed wasn’t just about pushing harder, but about training smarter by understanding the unique demands of the surface? This guide moves beyond generic advice to focus on the specific physiology and physics of sustained power on forestry roads. We’ll deconstruct the challenges—from the ‘Roughness Tax’ that saps your energy, to the delicate balance of traction on a steep, loose climb.
We will break down how to hold consistent power on undulating terrain, manage high-speed stability, maintain traction, and build the specific core strength required. We will then connect these on-the-bike skills to proven training methodologies like Sweet Spot and polarized plans, showing you how to adapt them for maximum effectiveness on a time-crunched schedule. This is your blueprint for building a true diesel engine, not just for the road, but for the challenging beauty of the fire road.
Summary: A Gravel Racer’s Blueprint for Fire Road Power
- The Diesel Engine: How to Hold Sweet Spot Power on Undulating Fire Roads?
- The Speed Wobble: How to Stay Loose at 40mph on Loose Surfaces?
- Traction Control: Why You Can’t Sprint Out of the Saddle on Loose Climbs?
- The Dust Cloud: How to Draft Safely on a Dry Fire Road?
- The Numb Core: Strengthening Your Lower Back for Long Gravel Days
- Sweet Spot Training: The Most Efficient Way to Push Your Threshold Up from Below
- Spinning Out: Why Road Gearing Is Too High for 20% Gravel Climbs?
- How to boost FTP on 6 Hours a Week Without Burnout?
The Diesel Engine: How to Hold Sweet Spot Power on Undulating Fire Roads?
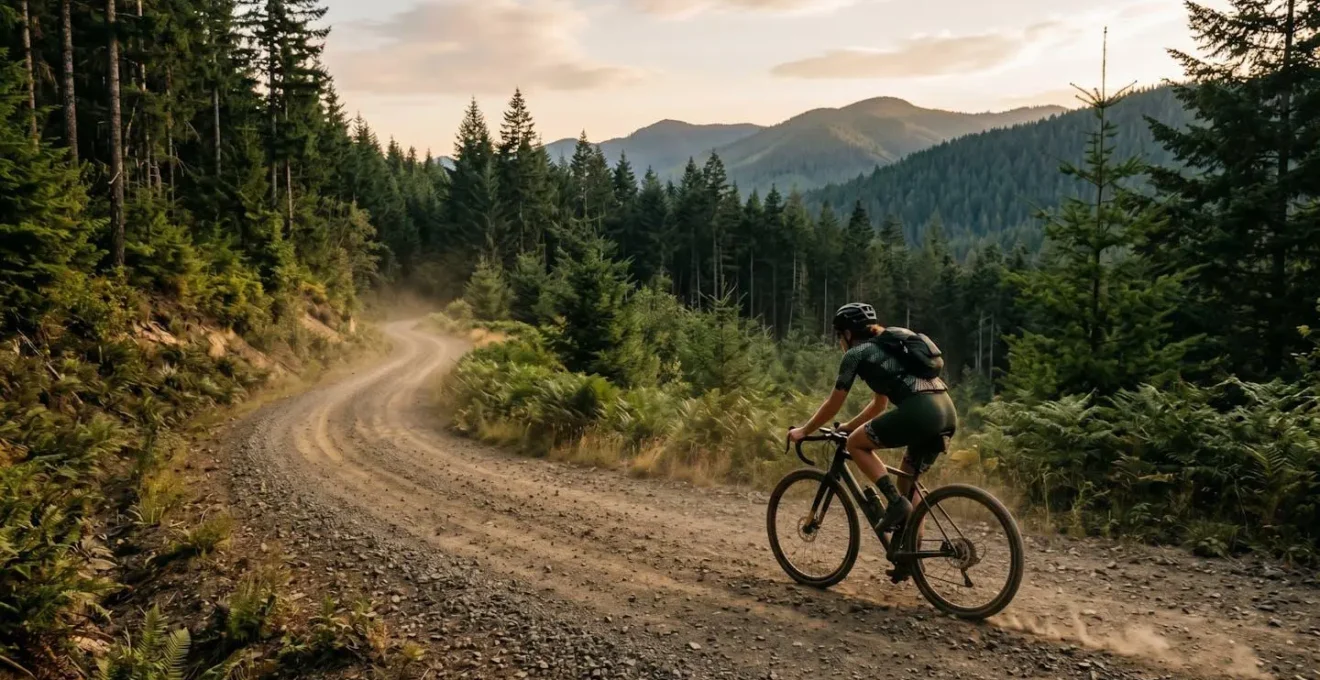
Holding steady Sweet Spot power on a perfectly smooth road is a mental challenge. On an undulating, loose fire road, it’s a physical and technical one. The constant small gradient changes, bumps, and loose patches create massive fluctuations in resistance, making your power file look like a seismograph. The key is not to chase a perfect number but to manage your average power by focusing on momentum and cadence.
Instead of trying to hold, say, 280 watts every second, think about holding a 280-watt average for the entire interval. This means using small downhill sections to recover slightly while keeping speed high, and applying smooth power surges to get over short, steep kickers without blowing up. Your primary tool for this is your gearing and cadence. Maintaining a higher cadence provides a buffer; research on Sweet Spot training indicates that a range of 90-110 RPM is highly efficient. This allows you to absorb small increases in gradient by slightly dropping cadence without having to immediately shift or spike your power.
This technique, what I call ‘momentum banking’, is about reading the terrain 20-30 meters ahead. See a short rise? Shift one gear easier just before you hit it and spin up. See a small dip? Stay in a slightly bigger gear and pedal through it to carry speed onto the next flat or rise. This smooths out your effort and reduces the high-torque, muscle-damaging spikes that come from grinding at a low cadence. It transforms the interval from a fight against the terrain into a dance with it.
Here is a simple technique to practice for maintaining power on this type of variable terrain:
- Establish a baseline cadence of 90-95rpm to serve as your momentum buffer against fluctuations in the gradient.
- Concentrate on your lap average power in your head unit, not the instantaneous wattage, to decrease mental fatigue during long intervals.
- Execute anticipatory shifting by reading the terrain 20-30 meters ahead, changing gears just before the gradient changes, not during.
- Utilize seated power surges of 3-5 seconds to conquer short, steep sections, preventing the need to stand and disrupt your rhythm.
This approach requires focus but ultimately conserves more energy, allowing you to complete high-quality intervals and build that reliable diesel engine that will carry you through a long gravel day.
The Speed Wobble: How to Stay Loose at 40mph on Loose Surfaces?
Power gets you up the hill, but speed on the descent is where races can be won or lost. Hitting 40mph on a loose fire road is exhilarating but terrifying if you’re fighting the bike. Many riders instinctively tense up, death-gripping the bars and locking their elbows. This is the single biggest mistake. Rigidity amplifies every vibration and bump, turning a minor deflection into a major speed wobble. The secret to high-speed stability on gravel is counterintuitive: you must stay loose.
Think of your body as the bike’s primary suspension system. Your arms and legs should be bent and relaxed, absorbing impacts rather than transmitting them through the frame. This concept of ‘active stability’ means you are constantly making micro-adjustments. A light touch on the handlebars is crucial. As expert coach Chris Miller notes, this is not just about comfort. The Red Bull Cycling Descending Guide reinforces this critical point.
A tight grip can lead to fatigue and reduces your ability to make fine adjustments.
– Chris Miller, Red Bull Cycling Descending Guide
Your hands should be in the drops for a lower center of gravity. Your weight should be centered, with light pressure on the pedals (at 3 and 9 o’clock) to help balance. Gently squeeze the top tube with your knees; this connects you to the bike and allows you to feel what it’s doing underneath you, giving you the feedback needed to steer with your hips and body weight rather than just your hands.
As the image above details, this relaxed but connected posture allows the bike to move underneath you. It will skate and drift slightly—that’s normal on a loose surface. By staying loose, you allow the bike to find its own path of least resistance instead of fighting it. This not only increases your speed and safety but also conserves a tremendous amount of mental and physical energy that you’ll need for the next climb.
Traction Control: Why You Can’t Sprint Out of the Saddle on Loose Climbs?
You hit a steep, loose 15% kicker and your road instincts scream: « Get out of the saddle and punch it! » You shift your weight forward, stand up, and stomp on the pedals. The result? Your rear wheel spins out, you lose all momentum, and you’re forced to unclip. The problem isn’t your power; it’s your physics. On loose surfaces, traction is a finite resource, and out-of-the-saddle sprinting is the fastest way to waste it.
The core of the issue is weight distribution. When you stand and lurch forward, you dramatically unweight the rear wheel. With less vertical force pressing the tire into the gravel, the friction required to transfer your power is lost. Your power « spikes » from the standing effort, and this uneven ‘torque signature’ easily overcomes the available grip, causing the slip. This is where gravel climbing fundamentally diverges from road climbing. On pavement, traction is almost a given. On gravel, it must be earned with every pedal stroke.
Weight Distribution Impact on Traction During Loose Surface Climbing
Analysis of experienced riders confirms a critical difference between surfaces. On pavement, cyclists can shift their center of mass far forward while standing to generate power without losing traction. However, as documented in field reports on loose surface climbing, this same forward weight shift drastically reduces the vertical force on the rear tire’s contact patch. This unweighting is the direct cause of immediate wheel slip. The solution is twofold: either remain seated and focus on a smooth, circular pedal stroke to deliver consistent torque, or, if standing is necessary, consciously keep the center of mass further back than on the road to maintain pressure on the rear wheel.
The most effective technique for steep, loose climbs is to stay seated for as long as possible. Scoot back slightly on the saddle, keep your chest low, and focus on driving your heels down through the bottom of the pedal stroke. This creates a smoother, more consistent application of power—a better ‘torque signature’—that the tire can handle. You’re not just pushing down; you’re ‘scraping mud off your shoe’ on the upstroke to maintain constant pressure on the drivetrain.
By remaining seated and delivering power smoothly, you keep your weight over the rear wheel, maximizing the vertical force and, therefore, the available traction. It might feel slower in the moment than a powerful road sprint, but it’s infinitely faster than spinning out and walking.
The Dust Cloud: How to Draft Safely on a Dry Fire Road?
Drafting on a paved road is about getting as close as possible to the wheel in front. On a dry, dusty fire road, this strategy is a recipe for disaster. The dust cloud kicked up by the lead rider can create a total whiteout, obscuring rocks, ruts, and braking cues. Safe and effective drafting in these conditions requires a different approach, prioritizing visibility and communication over maximum aerodynamic benefit.
The first step is to read the dust. A low, tight cloud that settles quickly usually indicates a harder, more predictable surface. A large, billowing cloud that hangs in the air signals deep, loose gravel or silt—a high-risk environment. Your following distance must adapt to these conditions. The standard two-second rule is a starting point, but in dusty conditions, the rule becomes: « If you can’t see the lead rider’s rear hub, you’re too close. »
Instead of riding directly behind, adopt a slightly offset, staggered echelon position. This moves your line of sight out of the thickest part of the dust cloud, allowing you to see both the wheel in front and the terrain coming up. You’ll still get a significant drafting benefit, but with a much greater safety margin. This position also makes you more visible to the rider behind you, creating a safer paceline for everyone.
Clear, exaggerated communication is paramount. Since verbal cues can be lost in the wind and dust, a system of non-verbal signals is essential. Weight shifts, hand signals for obstacles, and pointing out good or bad lines become your primary language. Following this protocol ensures the group can work together efficiently without compromising safety:
- Analyze the dust signature: Low, tight clouds mean hardpack; high, billowing clouds signal deep loose terrain. Adjust your strategy accordingly.
- Adopt a staggered echelon: Offset from the direct line to maintain visual contact through the dust while retaining a partial aero benefit.
- Apply a variable 2-second rule: If the lead rider’s rear hub is not clearly visible through the dust, increase your following distance immediately.
- Establish non-verbal communication: Use clear hand signals and exaggerated body weight shifts to indicate obstacles and line choices, as they are more visible through dust.
The Numb Core: Strengthening Your Lower Back for Long Gravel Days
After three hours on a rattling fire road, it’s rarely your legs that give out first. It’s the dull, aching pain in your lower back. This isn’t just a sign of fatigue; it’s a signal that your core—your body’s chassis—is failing. On gravel, your core does double duty: it stabilizes your pelvis for power transfer and acts as a suspension system to absorb relentless vibrations. A weak core leads to a numb back, wasted energy, and a breakdown in form.
Many cyclists think of core work as endless crunches, but this is ineffective for cycling stability. Your core on the bike is primarily an anti-movement system. It works to prevent unwanted flexion (rounding your back), extension (arching your back), and rotation. Therefore, your training should focus on resisting these forces. Exercises like planks, dead bugs, and Pallof presses are far more effective than sit-ups because they train your core to stay rigid while your limbs are in motion—exactly what happens on the bike.
To be effective, this training needs to be consistent. Just like your on-bike intervals, your core work requires a dedicated schedule. According to sports science resources, to see real gains in stability and endurance, research on core stability training indicates that cyclists should train their core a minimum of three times per week. These don’t need to be long sessions; 15-20 minutes of focused, high-quality work is all it takes to build the foundation for a stronger, more resilient back.
Your Action Plan: Anti-Movement Core Protocol
- Anti-Extension: Perform Dead Bugs. Lie face up with arms to the ceiling and knees at 90 degrees. Slowly lower the opposite arm and leg, focusing on keeping your lower back pressed to the floor to maintain a neutral spine.
- Anti-Rotation: Execute the Pallof Press. Stand sideways to a cable or band at chest height. Press the handle straight out from your chest, actively resisting the rotational pull and keeping your torso perfectly square.
- Anti-Lateral Flexion: Practice the Suitcase Carry. Hold a single heavy weight (kettlebell or dumbbell) in one hand and walk, focusing on keeping your torso upright and resisting the urge to bend to the side. Engage your obliques.
- On-Bike Integration: Drill neuromuscular control on smooth road sections. Ride in your normal position and hover your hands one inch above the handlebars for 15-30 seconds, forcing your core to stabilize your upper body.
- Consistency Check: Audit your training log. Are you completing at least three dedicated core sessions per week? If not, schedule them now as non-negotiable appointments.
A strong, stable core is the linchpin of effective gravel riding. It’s the ‘physiological damping’ that mitigates the ‘Roughness Tax,’ allowing your legs to do what they do best: put power to the pedals.
Sweet Spot Training: The Most Efficient Way to Push Your Threshold Up from Below
Sweet Spot training is the cornerstone for any endurance athlete looking to raise their functional threshold power (FTP). It offers the maximum physiological benefit for a manageable amount of strain, making it incredibly time-efficient. Formally, Sweet Spot training is defined as intervals at 88-94% of FTP. This intensity is just below your threshold, allowing for longer, repeatable efforts that stimulate adaptation without the deep fatigue of true threshold work. It’s the perfect tool for building your ‘diesel engine’.
However, there’s a critical caveat for gravel racers: the ‘Roughness Tax’. Holding a 20-minute Sweet Spot interval on a smooth road or indoor trainer is not the same as holding it on a bumpy, vibrating fire road. The constant need to stabilize your body, absorb impacts, and navigate loose terrain adds a significant physiological and cognitive cost. As FasCat Coaching aptly states, this changes the nature of the effort entirely.
Holding 250 watts on a bumpy fire road requires more physiological and cognitive effort than on a trainer.
– FasCat Coaching, Gravel Power Workout Training Guide
Because of this Roughness Tax, you cannot simply replicate your indoor interval structure outdoors. Instead of rigid 2×20 minute blocks, it’s more effective to adopt a terrain-based approach. Find a fire road with a series of climbs that allow you to accumulate 40-60 minutes of total time in the Sweet Spot zone over the course of a ride. This approach is not only more specific to the demands of gravel racing but also develops crucial bike handling and pacing skills under load.
The table below, based on an analysis of gravel training structures, illustrates how to think about adapting your intervals to the demands of the terrain.
| Structure Type | Format | Total Time in Zone | Best For | Cognitive Load |
|---|---|---|---|---|
| Traditional Indoor | 2 x 20 min | 40 minutes | Controlled environment, precise power targets | Low – monotonous |
| Terrain-Based Outdoor | 4-6 climbs totaling 40-60 min | 40-60 minutes | Gravel/fire roads, skill development | Moderate – engaging |
| Gravel Power Simulation | 3 x 15 min with terrain variation | 45 minutes | Race-specific preparation | High – dynamic |
| Modified for Roughness Tax | 2 x 20 min at 85-91% FTP | 40 minutes | Very rough surfaces | High – physical demands |
By embracing a terrain-based structure, you train the specific demands of your sport. You learn to produce power while navigating challenges, which is the very definition of gravel racing.
Spinning Out: Why Road Gearing Is Too High for 20% Gravel Climbs?
You can have the biggest FTP in the world, but it’s useless if you can’t transfer that power to the ground. On the brutally steep, loose pitches common in gravel racing, your gearing is the critical link. Attempting a 20% gravel climb with a standard road compact (50/34 crankset and an 11-28 cassette) is a recipe for failure. You’ll quickly run out of gears, your cadence will plummet, and your legs will be forced into a high-torque, low-cadence grind.
This isn’t just inefficient; it’s physiologically detrimental. Your aerobic system works best within a specific cadence range. While it varies, research shows that cadence dropping below 60-65 RPM shifts the workload from your aerobic cardiovascular system to your anaerobic muscular system. This produces power through strength, not endurance, leading to rapid muscle fatigue, lactate accumulation, and a massive spike in your heart rate. You’re effectively doing a heavy leg press instead of a cycling workout.
This problem is magnified during structured training. If you’re trying to execute a Sweet Spot interval on a climb and your gearing forces you into a 55 RPM grind, you’re no longer achieving the intended stimulus of the workout. You’re simply surviving, and the quality of your training is severely compromised.
Impact of Inadequate Gearing on Interval Session Quality
Field testing clearly demonstrates the workout-destroying effect of improper gearing. Grinding a 20% pitch at a low cadence of 50-60rpm for just two minutes can flood the leg muscles with lactate, completely compromising the physiological quality of the remaining 18 minutes of a Sweet Spot interval. As detailed by experienced coaches, riders targeting 90-105% FTP on gravel climbs found that appropriate sub-compact gearing (like a 46/30 crankset) or « mullet » setups (a single 42t chainring with a wide-range 10-52 cassette) were essential. This proper gearing allowed them to maintain their target cadence zones, resulting in successfully completed intervals versus abandoned sessions common with standard road gearing.
The solution is to ensure you have gearing that allows you to maintain a comfortable, efficient cadence (ideally 70 RPM or higher) on the steepest climbs you’ll encounter. This often means investing in a sub-compact crankset, a wider-range cassette, or a gravel-specific groupset. It’s not about being « weak »; it’s about being smart. Proper gearing allows you to stay in your aerobic zone, conserve muscular energy, and actually complete the high-quality training that will make you faster in the long run.
Key takeaways
- Sustained power on gravel requires shifting focus from hitting precise watt numbers to maintaining a smooth average power by managing momentum and cadence.
- Stability at speed is achieved through ‘active stability’—a relaxed, loose body position that absorbs vibrations, rather than a rigid grip that amplifies them.
- Traction on loose climbs is maximized by staying seated and delivering a smooth ‘torque signature’, as out-of-the-saddle efforts unweight the rear wheel and cause spinout.
How to boost FTP on 6 Hours a Week Without Burnout?
For the time-crunched athlete, every training minute counts. Boosting your FTP on just six hours a week seems like a tall order, but it’s entirely achievable with a focused, high-quality approach. The key is to eliminate « junk miles » and embrace a polarized or pyramidal training model where your hard days are very hard and your easy days are genuinely easy. Fire roads and gravel tracks are the perfect arena for this, offering a high-quality training environment away from traffic and interruptions.
A successful 6-hour week revolves around two key high-intensity sessions and one longer endurance ride. The two intensity sessions are where you’ll drive adaptation. One should be dedicated to Sweet Spot or threshold work, like the terrain-based intervals we’ve discussed, to push your FTP up from below. The other should target your VO2max or supra-threshold systems with shorter, harder efforts. This combination builds both your sustainable power and your ability to handle the punchy, above-threshold surges common in gravel racing.
The third ride is a longer, low-intensity endurance ride in Zone 2. The purpose of this ride is not to build fitness through intensity but to improve your aerobic efficiency, fat metabolism, and durability. It’s also the perfect opportunity to practice your on-bike fueling, hydration, and technical skills under low stress. This balanced structure ensures you get the potent training stimulus you need without accumulating the systemic fatigue that leads to burnout. As CTS Coaching emphasizes, the environment is key to maximizing these limited hours.
These environments allow for uninterrupted, high-quality intensity without the stops, starts, and dangers of road riding, maximizing the effectiveness of every training minute.
– CTS Coaching, Gravel Race Training Guide
Here is a sample structure for a highly effective 6-hour week using fire roads as your primary training ground:
- Session 1 (90 minutes): High-intensity Sweet Spot intervals on fire road climbs. Warm-up, then perform 2×20 minutes at 88-94% FTP using a terrain-based structure, focusing on smooth power. Cool down.
- Session 2 (90 minutes): VO2max or supra-threshold work. Warm-up, then perform 5-6 repetitions of 6-minute intervals at 102-108% FTP on loose, off-road climbs to integrate skill development. Cool down.
- Session 3 (3 hours): Low-intensity endurance ride. Maintain a steady Zone 2 heart rate or power, focusing on consistent pedaling, bike handling, and practicing your race-day nutrition and hydration strategy.
- Weekly Balance: This structure aligns with the proven 80/20 polarized training model, with roughly 80% of your time at low intensity and 20% at high intensity, maximizing adaptation while minimizing burnout risk.
This isn’t about finding more time to train; it’s about maximizing the quality of the time you have. By focusing your efforts, you can make significant FTP gains and become a stronger, more resilient gravel racer, even on a limited schedule.