In summary:
- Riding steep, technical terrain is a mental skill built on a physical foundation; it’s about deconstructing fear, not ignoring it.
- Mastering your « grip budget » is key. Learn to feather your brakes to control speed without locking wheels, especially in mud or on roots.
- A fully dropped saddle is non-negotiable. It creates space for « rider-bike separation, » allowing you to control your center of gravity and prevent over-the-bars crashes.
- Commitment happens before the drop. Use mental tricks like the « 3-Second Rule » to override your brain’s hesitation and enter features with intention.
- True flow comes from braking strategically in safe zones and rolling through technical sections, not from constantly dragging your brakes.
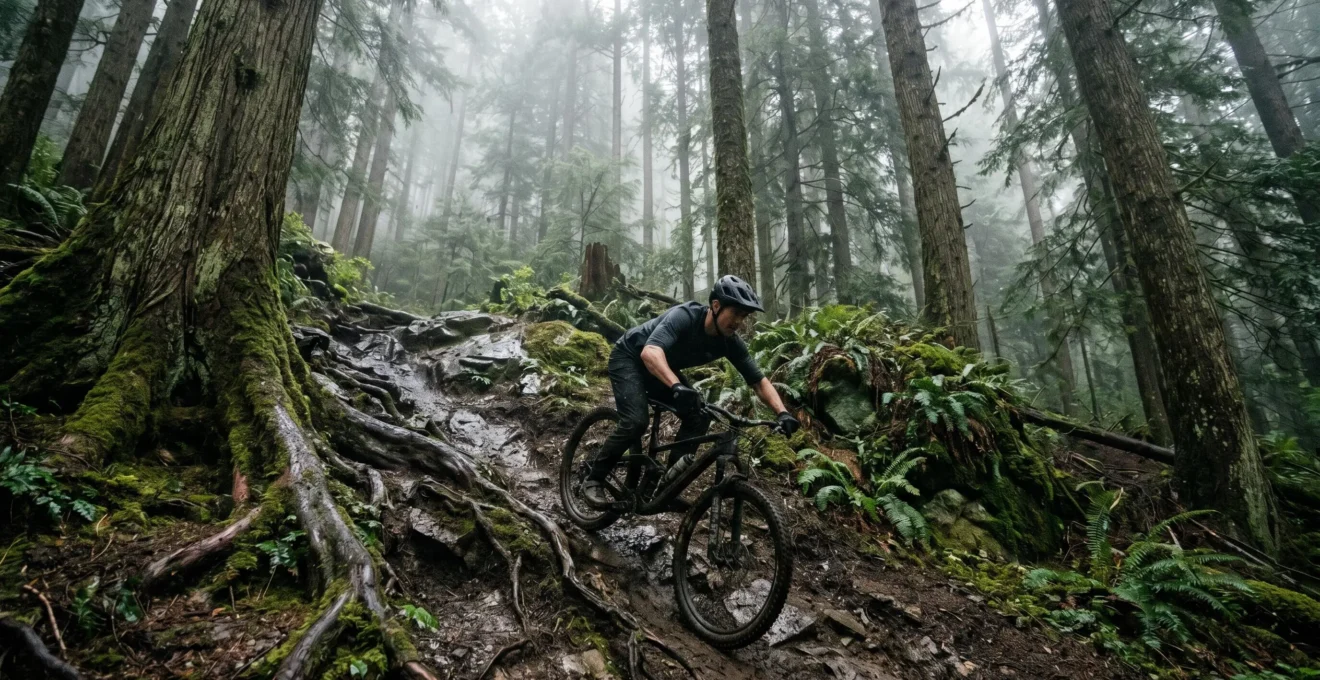
There’s a feeling every mountain biker knows: staring down a steep, slippery chute, a tangled mess of roots and mud. Your friends glide down, but your hands clamp the brakes. Your brain screams « NO, » and the familiar, embarrassing walk of shame begins. You’re not alone in that moment. The common advice— »just let go of the brakes, » « get your weight back, » « stay loose »—feels impossible when your survival instincts have taken over. It’s advice for a rider who is already confident, not for one whose mind and body have frozen.
The truth is, conquering these features isn’t about a sudden surge of bravery. It’s a skill, and like any skill, it can be broken down, learned, and mastered. The problem isn’t your courage; it’s your process. Most riders focus on the « what » (go faster, brake less) without ever understanding the « why » (the physics of grip) or the « how » (the mental steps to bypass fear). This is where we need to shift our focus.
This guide takes a different approach. We’re going to act as your confidence coach, deconstructing the fear and the technique into manageable, actionable steps. Instead of fighting your fear, we will learn to work with it. We’ll explore the unseen forces at play, from the micro-texture of a wet root to the psychological battle that happens in the three seconds before you drop in. We will reframe braking not as a sign of fear, but as a strategic tool for control.
By breaking down everything from brake modulation and suspension setup to line choice and mental commitment, you will build a system. This system will become your new instinct, replacing the freeze response with a deliberate, controlled, and confident process. It’s time to stop walking and start riding.
This comprehensive guide will walk you through the essential physical and mental skills required to transform your riding. We will dissect each component, from braking mechanics to the psychology of commitment, providing a clear roadmap to navigate challenging descents.
Summary: A Systematic Approach to Riding Steep Chutes
- Feathering vs. Grabbing: How to Brake effectively on Wet Mud?
- Why Failing to Drop Your Saddle Is the #1 Cause of Over-the-Bars Crashes
- High Line or Low Line: Where to Place Your Tyres on Off-Camber Roots?
- The 3-Second Rule: How to Commit to a Drop Before Your Brain Says No
- Pre-Loading: How to Use Your Suspension to Float Over Drop-Offs?
- Bucking Bronco: How to Tame Your Rebound for Controlled Landings?
- The Dark Place: Mental Tricks to Keep Pedaling When Your Legs Scream Stop
- How to maintain Flow on Rocky Lake District Trails Without Braking Constantly?
Feathering vs. Grabbing: How to Brake effectively on Wet Mud?
The first instinct on a steep, slippery surface is to grab a handful of brake. This is also the fastest way to lose control. The key to effective braking in low-traction environments like wet mud isn’t power, but modulation. Think of your tyre’s grip as a finite resource, a « grip budget. » You can spend it on braking, or on steering, but if you try to do too much of either at once, you go bankrupt—and you crash. Grabbing the brakes instantly spends your entire budget, locking the wheel and eliminating any chance of steering or maintaining control.
This is where « feathering » comes in. Instead of a single, hard pull, feathering involves applying and releasing the brakes in a light, rhythmic pulse. This technique keeps the wheel rotating, which is essential for maintaining traction and control. A rolling tyre can find purchase between slippery spots, while a skidding tyre is just a passenger. In muddy conditions, your rear brake is your best friend. A rear-wheel skid is often recoverable (a controlled failure), whereas a front-wheel skid almost always results in a crash. Focus on using your rear brake for primary speed control and your front brake sparingly, and only when the bike is upright and rolling in a straight line.
As experts in braking technique confirm, your « braking power is limited by grip rather than brake power, particularly on steep or slippery surfaces. » This means the most powerful brakes in the world are useless if your technique doesn’t preserve what little traction you have. Learning to brake *before* the sketchiest sections and feathering your speed *through* them is the first fundamental step to building confidence.
Your Action Plan: 5-Step Mud Braking Protocol
- Start braking earlier: Grip is scarce in the wet, so begin to slow down well before you normally would in dry conditions to retain traction.
- Brake before, not in: Identify harder-packed sections for heavy braking. Modulate your speed through the soft mud to keep wheels rolling and searching for grip.
- Stay loose on the bike: A stiff body amplifies every slip. Loosen your posture to allow the bike to move beneath you and find traction independently.
- Emphasize the rear brake: In slippery sections, prioritize the rear brake. A rear skid is manageable; a front slide is a high-risk situation.
- Practice the ‘feathering’ technique: Use light, rhythmic taps on the brake levers to control speed without locking the wheels, ensuring continuous contact with the trail.
Why Failing to Drop Your Saddle Is the #1 Cause of Over-the-Bars Crashes
If there is one piece of technology that has revolutionized technical mountain biking, it’s the dropper seatpost. Yet, many riders still fail to use it to its full potential, a mistake with serious consequences. When your saddle is high, it acts as a physical barrier, preventing you from lowering your center of gravity and moving your body rearward. On a steep descent, as your front wheel drops, your body’s momentum continues forward. If the saddle is in the way, it can effectively trip you, catapulting you over the handlebars in a classic « OTB » crash.
This isn’t just anecdotal evidence. The danger is so significant that, according to one study, a systematic video analysis of 534 mountain bike crashes revealed that 55.2% involved an over-the-bars mechanism. Many of these could be mitigated by proper body position, which is made possible by a lowered saddle. A dropped saddle creates a large, open space above the bike frame for you to move within. This is the key to « rider-bike separation. »
Rider-bike separation is the concept of you and your bike moving as two distinct but connected entities. You are the pilot, not a passenger. With the saddle out of the way, you can keep your body weight low and centered while you push the bike forward into the downslope of a chute. Your hips can move far behind the saddle, keeping your weight biased to the rear and preventing the front wheel from digging in and stopping abruptly. Dropping your saddle isn’t just a convenience; it’s the single most important action you can take to unlock dynamic body movement and prevent the most common type of serious crash.
High Line or Low Line: Where to Place Your Tyres on Off-Camber Roots?
Wet roots are the nemesis of many riders. They seem to offer zero traction, sending your wheels skittering sideways without warning. The secret to conquering them lies in a combination of line choice and a complete absence of braking. When approaching a section of off-camber roots, you have two primary choices: the high line or the low line. The choice depends entirely on the condition of the roots and the surrounding dirt.
The high line involves intentionally riding on the upper side of the root, using it as a small berm to support your tyres. This only works if the root is relatively dry or has enough bark texture to offer some grip. The low line is the safer bet in most wet conditions. Here, you aim for the patch of dirt just below the root. This dirt is often compressed and offers more purchase than the slick, wet wood. The absolute rule for riding roots is to do all your braking *before* you get to them. Hitting your brakes while a tyre is on a wet root spends your entire grip budget and guarantees a slide-out.
At a microscopic level, your tyre’s ability to grip a root is a battle of friction and pressure. Lowering your tyre pressure by even 2-3 PSI can make a significant difference, as it allows the tyre casing to deform and wrap around the root’s surface, increasing the contact patch.
As this image illustrates, grip is about maximizing contact. A softer tyre can conform to the irregular surface of the wood. The most critical skill, however, is to hit the root as squarely as possible. Approaching a root at a perpendicular (90-degree) angle gives your tyre the best chance to roll over it without deflecting. An angled approach will almost certainly cause the front wheel to wash out. Your strategy should be: slow down before the root section, pick your line (usually low and on the dirt), and roll through with commitment and zero brakes.
The 3-Second Rule: How to Commit to a Drop Before Your Brain Says No
The physical skills of riding a steep chute are only half the battle. The other half is fought in your mind, in the few seconds before you drop in. This is where « The Freeze Point » occurs—that moment your brain’s self-preservation instinct overrides your desire to ride. To overcome this, you need a mental system. The « 3-Second Rule » is a powerful tool for this, a form of mental pre-load.
The rule is simple: once you’ve assessed a feature and decided you can ride it, give yourself three seconds—and only three seconds—to commit and go. Don’t stand at the edge, staring into the abyss. The longer you wait, the more time you give your fear to build. Hesitation is the enemy of commitment. In that moment of doubt, your focus shifts from the process of riding to the consequences of failing. As sports psychologist Dr. Paul McCarthy notes, « Almost every time athletes fail to build on a strong start, it’s because they’re too worried about what comes next. »
This anxiety is a well-documented phenomenon. Research on athletes and fear of failure shows that the more committed an athlete is, the more intensely they can suffer from « fear hypersensitivity. » They build unrealistic expectations and become overwhelmed by worry. The 3-Second Rule short-circuits this process. It forces you to switch from an analytical, fearful mindset to an executive, action-oriented one. Look at the entrance, spot your line through the feature, visualize yourself riding it successfully, take a deep breath, count to three, and roll in. It’s not about being reckless; it’s about making a conscious decision to trust your skills and your initial assessment, before your primitive brain can sabotage you.
Pre-Loading: How to Use Your Suspension to Float Over Drop-Offs?
On smaller, steeper drops, you often see advanced riders looking like they ‘float’ off the lip, landing with smoothness and control. This isn’t magic; it’s a technique called pre-loading the suspension. It’s a dynamic move that uses the energy stored in your fork and shock to help you manage the bike’s trajectory, a prime example of advanced rider-bike separation.
The standard, passive way to go off a drop is to simply roll off it, letting gravity do the work. With pre-loading, you actively compress your suspension just before the front wheel reaches the edge of the drop. You do this by pushing down hard through your feet and hands. Then, as the suspension rebounds, you extend your arms and legs, effectively ‘popping’ or ‘lifting’ the bike up and forward. This unweights the bike at the critical moment, allowing it to travel further horizontally before it begins to drop. The result is a smoother arc, a gentler landing, and more control, as you are dictating the bike’s path rather than just following it.
This technique is particularly useful for drops with rough or awkward transitions, as it helps you clear the initial chaos at the bottom and land on a smoother section of trail. It requires precise timing and a good feel for your suspension, but it transforms you from a passenger into a pilot. The following table breaks down the key differences between the two approaches.
| Aspect | Pre-Loading Technique | Passive/Standard Technique |
|---|---|---|
| Body Motion | Dynamic push-and-extend with legs and arms at lip | Static position maintained through drop |
| Suspension State | Pre-compressed then absorbed on extension | Full travel available, compresses on landing |
| Rebound Usage | Controlled absorption prevents ‘pop’ | Rebound energy uncontrolled |
| Bike Position | Pushed forward and down transition | Follows natural arc |
| Landing Impact | Distributed, suspension mid-travel | Full impact, suspension bottoming risk |
| Rider Center | Stays centered, bike moves independently | Follows bike trajectory |
| Best For | Steep technical drops, rough landings | Smooth flow jumps, moderate drops |
Bucking Bronco: How to Tame Your Rebound for Controlled Landings?
Your suspension is there to absorb impacts, but its job is only half-done after it compresses. The other half—and arguably the more critical part for control—is how it returns. This is controlled by your rebound damping. If your rebound is set too fast (too open), your suspension will spring back like a pogo stick, bucking you and kicking the wheel off the ground. If it’s too slow (too closed), the suspension won’t recover in time for the next hit, « packing down » into its travel and becoming harsh. Getting this setting right is vital for a controlled, predictable ride.
Before you even touch your rebound, you must set your sag correctly. For most trail and enduro bikes, mountain bike suspension experts recommend aiming for 20% sag on the fork and 30% on the rear shock. This initial setup ensures the suspension is in its optimal working range. Once sag is set, you can fine-tune the rebound using a bracketing method on a familiar test section of trail.
Follow these steps to dial in your rebound:
- Find your baseline: Start with the manufacturer’s recommended rebound setting for your weight.
- Ride your test section: Choose a short, repeatable loop with a mix of bumps, roots, and small compressions.
- Assess bucking: Does the bike feel nervous or harsh? Is it kicking back after a hit? If so, your rebound is too fast. Add two clicks of damping (turn the dial toward the tortoise/slower).
- Check for pack-down: Does the bike feel sluggish and dead? Does it seem to sink lower into its travel over repeated hits? If so, your rebound is too slow. Remove two clicks of damping (turn the dial toward the hare/faster).
- Balance front and rear: The goal is for the front and rear of the bike to recover at the same rate, feeling like a single cohesive unit. A faster rear rebound can pitch you forward, while a faster front can make the bike feel unbalanced.
- Apply the rule of thumb: A good final setting is as fast as possible without the wheel feeling like it’s bouncing or losing contact with the ground after a compression.
The Dark Place: Mental Tricks to Keep Pedaling When Your Legs Scream Stop
While the title suggests physical exertion, the real « dark place » for a rider struggling with steep descents is mental. It’s the internal monologue of doubt, fear, and self-criticism that plays on a loop at the top of a challenging feature. Your legs aren’t screaming to stop; your brain is. Overcoming this requires more than just physical skill; it demands mental fortitude and a new way of thinking about fear.
The goal is not to eliminate fear. Fear is a natural and useful response that keeps you safe. The goal is to change your relationship with it. You must learn to acknowledge it, listen to what it’s telling you (Is this feature truly beyond my skill? Or am I just anxious?), and then make a conscious decision to proceed with a plan. This is where focus becomes your greatest weapon against fear’s paralyzing effects. Instead of letting your mind spiral into « what if » scenarios, you must deliberately channel all your mental energy into the immediate process: Where are my eyes looking? Where is my body positioned? How am I breathing?
As sports psychologist Dr. Paul McCarthy explains, it’s a fundamental reframing of the challenge. His advice is a powerful mantra for any rider facing a daunting section of trail:
becoming skilled at handling fear in sports isn’t about getting rid of these feelings—it’s about learning to work with them
– Dr. Paul McCarthy, Sports Psychologist, How to Master Fear in Sport guide
This is the essence of confidence coaching. You accept the feeling of fear as a passenger, but you don’t let it grab the steering wheel. You work with it by focusing so intensely on the technical execution of riding—your braking points, your line choice, your body English—that there is no mental bandwidth left for the fear to take hold.
Key takeaways
- Master Your Grip Budget: Your tyres have a finite amount of grip. Use it for braking OR turning. Feathering your brakes preserves this budget; grabbing them spends it all at once.
- Embrace Rider-Bike Separation: Drop your saddle to create space. This allows you to move independently from the bike, keeping your center of gravity low and back to prevent over-the-bars crashes.
- Commit Before the Edge: Hesitation breeds fear. Use the « 3-Second Rule » to make a decision and act on it, overriding your brain’s impulse to freeze. Mental pre-load is as important as physical technique.
How to maintain Flow on Rocky Lake District Trails Without Braking Constantly?
The ultimate goal of all these techniques is to achieve « flow »—that sublime state where you and the bike move effortlessly down the trail. Paradoxically, achieving flow on technical, rocky terrain requires a deep understanding of when *not* to brake. Constantly dragging your brakes makes you stiff, kills your momentum, and ironically, reduces your control because it eats into your grip budget when you need it most for steering.
The key is to replace constant braking with strategic, high-intensity braking in designated « safe zones. » This approach, often called the « scrub and roll » technique, is the culmination of all the skills we’ve discussed. It involves a deliberate pattern of intense deceleration followed by complete brake release.
Case Study: The Scrub and Roll Braking Strategy
Expert coaching analysis reveals that effective flow through rock gardens is achieved by braking hard on the smoother, straighter sections of trail *before* the technical chaos. This is « scrubbing speed. » Then, the rider completely releases the brakes to « roll » through the rock garden. As described in a detailed analysis of steep descent techniques, this method preserves crucial momentum and prevents arm pump and fatigue. Every time you pull the brakes in a technical section, your tyres are more likely to slip, and your body must tense up to fight the forward momentum. By braking in a safe zone and then adopting a low, loose body position through the rocks, you maintain far better grip and control while expending significantly less energy.
This is where it all comes together. You use your braking modulation (Section 1) in the scrub zone. Your dropped saddle (Section 2) gives you the space to get low and loose for the roll. Your line choice (Section 3) helps you navigate the rocks with minimal input. Your commitment (Section 4) gets you into the section without hesitation. And your properly tuned suspension (Sections 5 & 6) absorbs the impacts, keeping the bike stable. Flow isn’t about being fearless; it’s about being so proficient in the component skills that they weave together into a seamless, controlled, and fast descent.
Now is the time to put this knowledge into practice. Start small. Find a safe, short section of trail and practice just one of these skills, like brake feathering or the 3-second rule. As each skill becomes second nature, you’ll build a foundation of confidence that will allow you to stop walking and start flowing down the features that once intimidated you.