The key to solving knee pain isn’t just « spinning more » or hitting 90 RPM; it’s learning to interpret the biomechanical dialogue between your brain, muscles, and joints to find a cadence that respects your body’s limits.
- Low-cadence « grinding » creates high-torque spikes that overload the patellofemoral joint and prematurely exhaust fast-twitch muscle fibers.
- Higher cadences reduce peak joint forces, but require specific neuromuscular training (not just willpower) to execute smoothly and efficiently.
Recommendation: Use the targeted tests in this guide to find your personal, efficient cadence range and build the neurological pathways to sustain it, effectively turning your pedal stroke into a source of power, not pain.
For the cyclist plagued by knee pain, the feeling is all too familiar: that grinding sensation in the joints, the burning in the quads on a moderate incline, the feeling that every pedal stroke is a battle. The common advice echoes from every corner of the cycling world: « You’re grinding! Spin faster, aim for 90 RPM! » While well-intentioned, this advice often misses the fundamental point. It treats cadence as a simple input, a number to be achieved, rather than the complex output of your entire biomechanical system.
The truth is, your cadence is a conversation. It’s a dialogue between your brain’s ability to fire muscles in sequence, your muscles’ metabolic efficiency, and your joints’ capacity to handle stress. Pushing big gears at a low cadence isn’t just « bad form »; it’s a specific type of physiological stress that sends clear signals of distress—if you know how to listen. Chasing a magic RPM number without understanding the underlying mechanics can be just as counterproductive, leading to bouncing in the saddle and a feeling of inefficiency.
But what if the real key to saving your knees wasn’t just forcing yourself to spin faster, but systematically re-educating your body to prefer it? What if you could decode the language of your own physiology to find a powerful, sustainable, and—most importantly—pain-free pedal stroke? This guide moves beyond the platitudes. We will dissect the neuromuscular, muscular, and mechanical forces at play. We will explore how to train your nervous system, why your equipment choices create hard limits, and how to conduct a personal audit to find the cadence that works for your unique biomechanics, not just for a textbook.
This article provides a complete framework for understanding and optimizing your pedaling cadence. We will break down each component, from the neural pathways that control muscle firing to the equipment choices that can make or break your knee health, providing you with actionable strategies at every step.
Summary: A Biomechanical Guide to Cadence and Knee Health
- Spin-Ups: How to Train Your Brain to Fire Muscles Faster?
- The 80 RPM Target: Why Grinding Below 60 RPM Kills Your Legs for the Flat?
- Patellar Pressure: How Increasing Cadence Reduces Torque on Your Joints
- Running Out of Gears: Why Your Cassette Choice Dictates Your Cadence
- Is 90 RPM a Myth? Finding Your Personal Self-Selected Cadence
- Fixed vs. Floating Cleats: Why 0-Degree Float Might Destroy Your Cartilage
- Why Does a Stiff Frame Feel Faster Even If You Aren’t Sprinter?
- Look, Shimano, or Speedplay: Which Carbon Pedal System Saves Your Knees?
Spin-Ups: How to Train Your Brain to Fire Muscles Faster?
The ability to pedal at a high cadence isn’t just about leg strength; it’s a skill rooted in your central nervous system. Your brain must learn to send signals to your muscles rapidly and in a perfectly coordinated sequence. This is the essence of neuromuscular coordination. For riders accustomed to grinding, the neural pathways for slow, forceful contractions are well-developed, while those for rapid, smooth spinning are not. The feeling of « bouncing » in the saddle at high RPM is a classic sign that your nervous system can’t keep up, causing antagonistic muscle groups to fire out of sync.
To overcome this, you must train the brain, not just the muscles. Spin-up drills are the most effective tool for this. By intentionally and progressively pushing your cadence into zones you can’t yet hold smoothly, you force your brain to build more efficient firing patterns. It’s like learning a new, faster language. While elite track sprinters can sustain up to 200 RPM, the goal for an endurance rider is to become comfortable and efficient in the 80-100 RPM range. These drills pave the way.
A structured approach is key to developing this skill without reinforcing bad habits. Follow this progressive protocol to build your high-cadence capabilities:
- Week 1-2: Perform 4-6 spin-ups of 20-30 seconds each. In a moderate gear, increase your cadence until you reach 100-110 RPM, focusing on a smooth pedal stroke. Recover with 90 seconds of easy spinning.
- Week 3-4: Increase the duration to 30-second spin-ups, aiming for 110-120 RPM. Incorporate single-leg drills (30 seconds per leg) during your warm-up to highlight and correct imbalances in your pedal stroke.
- Week 5-6: Introduce descending cadence sets. Start at 110 RPM and hold for one minute, then decrease by 10 RPM every minute down to 70 RPM. This builds control across your entire cadence spectrum.
By consistently practicing these drills, you are not just pedaling faster; you are fundamentally upgrading your body’s control system for a smoother, more efficient, and ultimately more powerful output.
The 80 RPM Target: Why Grinding Below 60 RPM Kills Your Legs for the Flat?
Pedaling below 60 RPM, often referred to as « grinding, » feels powerful because it relies heavily on muscular force. Each pedal stroke is a distinct, high-torque push. However, this strategy comes at a significant and unsustainable metabolic cost. From a biomechanical perspective, grinding forces a disproportionate recruitment of your Type II fast-twitch muscle fibers. These fibers are built for explosive, short-term power—think sprinting or lifting heavy weights—but they fatigue quickly and consume vast amounts of glycogen.
When you grind, you are essentially performing hundreds of single-leg presses with every mile. This depletes your anaerobic reserves, leaving you with nothing in the tank for actual climbs or attacks. According to muscle physiology research, once these fast-twitch fibers are exhausted, your performance drops off a cliff, forcing you to rely on your more endurance-oriented but less powerful Type I fibers. This is why your legs feel « dead » after a long, low-cadence effort on a flat road, even if your heart rate was low.
Conversely, pedaling at a higher cadence (80+ RPM) shifts the workload from the muscular system to the cardiovascular system. It demands less peak force per revolution, allowing you to rely primarily on your highly efficient, fatigue-resistant Type I slow-twitch fibers. This preserves your precious fast-twitch resources for when you truly need them. By increasing cadence, you are trading a small number of very costly, high-torque pedal strokes for a larger number of metabolically cheaper, low-torque revolutions. This is the secret to endurance: conserving muscular energy over the long haul.
The 80 RPM target isn’t arbitrary; it represents a biomechanical sweet spot where you begin to meaningfully offload muscular strain and engage the more sustainable aerobic engine, saving your legs for the challenges ahead.
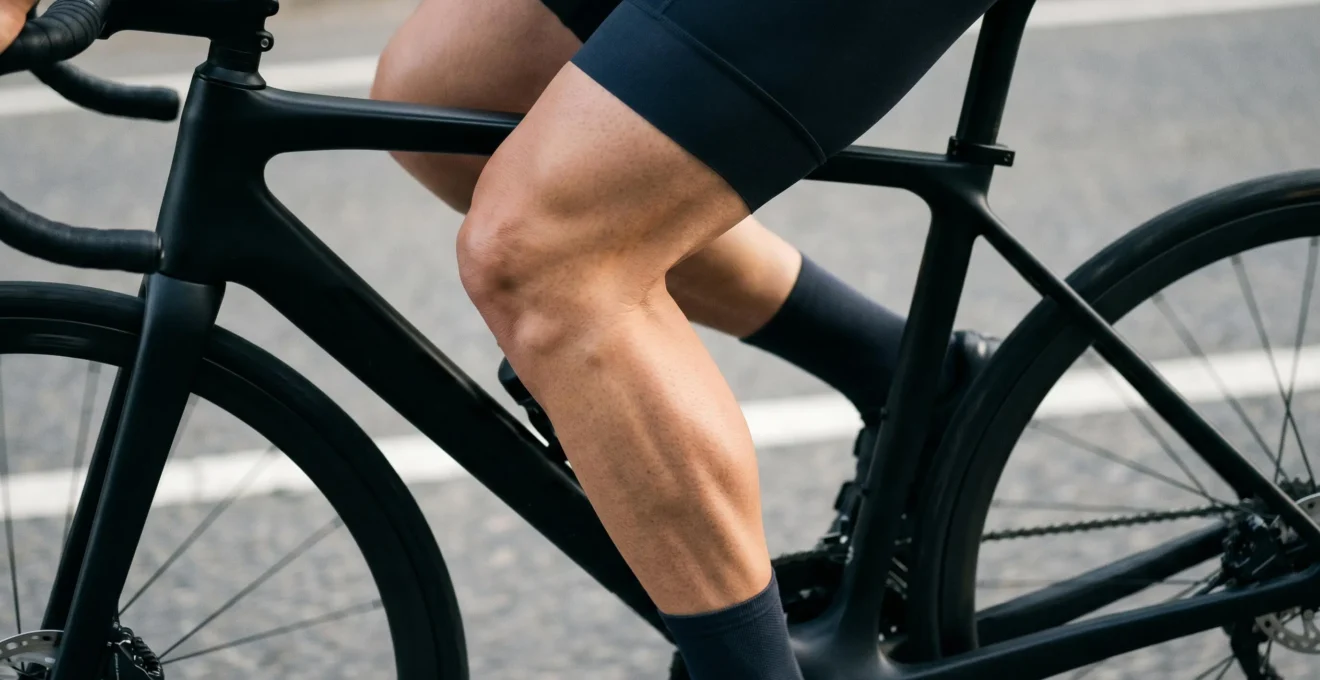
Patellar Pressure: How Increasing Cadence Reduces Torque on Your Joints
For any cyclist experiencing anterior knee pain, the primary culprit is often excessive pressure on the patellofemoral joint—the interface between your kneecap (patella) and femur. This pressure is a direct result of the force required to turn the pedals. When you « grind » a big gear at a low cadence, you are maximizing the peak torque applied during each downstroke. This high torque translates directly into massive compressive forces that squeeze the patella against the femur, irritating cartilage and leading to inflammation and pain.
This is where cadence becomes your most powerful tool for joint health. By increasing your cadence, you fundamentally change the force profile of your pedal stroke. To produce the same power output (e.g., 200 watts), a higher cadence requires significantly less force per revolution. Instead of a few heavy, jarring pushes, you are making many lighter, smoother circles. This dramatically reduces the peak compressive forces on your joints. In fact, specific biomechanical research demonstrates that a 29% smaller peak patellofemoral compressive force is experienced at 90 RPM compared to 70 RPM for the same power output.
This isn’t just theory; it’s a measurable, physical reality confirmed by in-vivo studies. As a leading research team noted, the relationship is clear:
Higher cadences led to smaller forces. The lowest forces can be expected while cycling at a low power level, a high cadence, and a high seat height.
– Journal of Orthopaedic & Sports Physical Therapy Research Team, Loading of the Knee Joint During Ergometer Cycling: Telemetric In Vivo Data
Essentially, by choosing to spin a smaller gear more quickly, you are making a conscious decision to distribute the workload over time, protecting your cartilage from the damaging peaks of high-torque, low-cadence pedaling. It is the single most effective, non-invasive change a rider can make to alleviate and prevent patellofemoral pain.
Every pedal stroke is a choice: you can either hammer your joints with high force or caress them with smooth, efficient motion. For the sake of your knees, the choice is clear.
Running Out of Gears: Why Your Cassette Choice Dictates Your Cadence
A cyclist’s ability to maintain an optimal cadence is not solely a matter of training or preference; it is often constrained by a very physical limitation: their gearing. You can have the most well-trained neuromuscular system in the world, but if you don’t have the right gear for the gradient and your power output, you will be forced out of your efficient cadence zone. This is especially true for riders who « grind »—they often find themselves running out of easier gears on climbs, forcing their cadence even lower and exacerbating joint and muscle strain.
The design of your cassette plays a crucial role in this dynamic. A cassette with large jumps between cogs (e.g., a 11-28t) can create « gaps » in your ideal cadence range. You might find one gear is too easy, forcing you to spin uncomfortably fast, while the next one up is too hard, causing your cadence to plummet. This forces a compromise that pushes you away from your most efficient state. Modern drivetrains with wider range cassettes (e.g., 11-32t or 10-36t) and more cogs offer a significant advantage by providing a greater number of smaller, more progressive steps.
Case Study: Cassette Resolution and Cadence Optimization
Laboratory studies consistently show that when given a wide and granular choice of gears, trained cyclists will naturally gravitate towards a cadence of 90-100 RPM to maintain a given power output, as this is where they are most metabolically efficient. However, when their equipment is changed to a cassette with larger jumps between gears, they are no longer able to hold this optimal cadence. They are forced to either increase muscular strain by pushing a harder gear at a lower RPM, or increase cardiovascular strain by spinning a lighter gear at a higher RPM. This demonstrates that the cassette’s « resolution » is a critical factor that can either enable or prevent a rider from accessing their own physiologically optimal cadence.
For a rider trying to escape the grinding habit, choosing the right cassette is a non-negotiable part of the solution. Opting for a cassette with a larger easiest cog (e.g., 32t or 34t) provides the « bailout » gears needed to maintain a healthy spinning motion on steep climbs, preventing the knee-straining torque that comes from being over-geared.
Before blaming your legs, take a hard look at your cassette. It might be the single biggest barrier preventing you from finding your ideal cadence.
Is 90 RPM a Myth? Finding Your Personal Self-Selected Cadence
The « 90 RPM » rule has become so ingrained in cycling culture that many riders treat it as an absolute truth. While it serves as a useful benchmark to move riders away from destructive low-cadence grinding, it is not a magic number. The truly optimal cadence is highly individual, influenced by factors like muscle fiber composition, limb length, fitness level, and even the type of effort. Insisting on a rigid 90 RPM target can be just as suboptimal as grinding at 50 RPM if it doesn’t align with your unique physiology. In fact, field data analysis reveals that power output reduces by approximately 6% for cadences that are 20 RPM above or below a rider’s personal optimum.
The goal, therefore, is not to blindly hit 90 RPM, but to find your personal self-selected cadence—the RPM range where you are most metabolically efficient for a given power output. This is typically indicated by the lowest stable heart rate for a steady wattage. Finding this range requires a simple but structured testing protocol, which is best performed on an indoor trainer to control variables.
This test will provide you with a data-driven understanding of your personal biomechanics, moving you from guessing to knowing. It empowers you to listen to the « biomechanical dialogue » your body is having, using heart rate as the translator. Once you identify your efficient range, you can use it as a target during training and racing, confident that you are operating at your peak physiological efficiency.
Action Plan: Test Your Personal Cadence Profile
- Setup: Use an indoor trainer with a power meter and a heart rate monitor. Warm up, then select a steady endurance power target (e.g., Zone 2, or around 200W for many riders).
- Test Intervals: Perform a 3-minute interval at 70 RPM, holding the power target constant. Note your average heart rate and Rate of Perceived Exertion (RPE on a 1-10 scale).
- Recovery and Repeat: Spin easy for 2 minutes to recover. Repeat the 3-minute test interval at 80, 90, 100, and 110 RPM, recording HR and RPE for each.
- Analysis: Plot your heart rate against each cadence. Your optimal cadence for that power level is typically where your heart rate is lowest, indicating the best metabolic efficiency.
- Validation: Repeat the test at your identified optimal cadence ±5 RPM to confirm the sweet spot. You can also perform this test at different power levels (e.g., threshold) to see how your optimal range shifts with intensity.
This data-driven approach transforms cadence from a rigid rule into a personalized tool for maximizing performance and preserving your joints.
Fixed vs. Floating Cleats: Why 0-Degree Float Might Destroy Your Cartilage
While cadence is central to knee health, the interface between your foot and the pedal is an equally critical, and often overlooked, factor. The « float » of a clipless pedal system refers to the small amount of rotational freedom your foot has while clipped in. This freedom is not a sign of a loose connection; it’s a crucial biomechanical feature that allows your knee, ankle, and hip to find their natural alignment during the 360-degree pedal circle. Insisting on a 0-degree float cleat (a fixed cleat) is akin to putting your knee in a vise for thousands of revolutions per hour.
A fixed cleat locks your foot into a single, rigid position. If this position is not absolutely, perfectly aligned with your unique biomechanics—which is almost impossible to achieve without professional analysis—it forces your knee to absorb any rotational stress. Every single pedal stroke, your knee will be twisted slightly to compensate, leading to cumulative microtrauma. At a cadence of 90 RPM, this adds up to 5,400 repetitive, damaging stresses on your cartilage and ligaments every hour.
Case Study: Repetitive Strain from Fixed Cleats
At 90 RPM, cyclists perform 5,400 pedal revolutions per hour. Clinical observations consistently show that riders using 0-degree float cleats, even with what seems like a minor biomechanical misalignment, experience significant cumulative microtrauma. The repetitive nature of high-cadence pedaling magnifies these tiny alignment issues into major overuse injuries, most commonly affecting the cartilage and soft tissue structures around the knee joint. This is a classic case where a seemingly small setup error is amplified by high repetition into a chronic, debilitating injury.
Choosing a cleat with an appropriate amount of float (typically 4-9 degrees for most riders) provides an essential « escape valve. » It allows your foot to rotate slightly during the pedal stroke, letting your knee track in its preferred natural plane. This simple feature is incredibly effective; biomechanical studies indicate that float can reduce internal rotation moments by up to 50%, dramatically easing pressure on the patellofemoral joint. For any rider concerned with knee health, especially those adopting a higher cadence, cleats with float are not optional—they are essential protective equipment.
Unless you are a track sprinter with a professionally perfected pedal stroke, embracing float is a simple and powerful way to give your knees the freedom they need to thrive.
Why Does a Stiff Frame Feel Faster Even If You Aren’t Sprinter?
The concept of frame stiffness is often associated with elite sprinters who need a rigid platform to handle explosive, 1500-watt efforts without the bike flexing like a noodle. However, the benefits of a stiff frame extend to all cyclists, even those who never contest a finish line. The « fast » feeling of a stiff frame is not just perception; it’s a tangible result of superior power transfer efficiency. When you push on the pedal, you want 100% of that energy to go into turning the rear wheel. A flexible frame, particularly around the bottom bracket area, acts like a spring, absorbing and wasting a small percentage of that energy as frame flex with every single pedal stroke.
While the amount of energy lost per pedal stroke is tiny, it adds up over thousands of revolutions. This wasted energy must be replaced, leading to a higher metabolic cost for the same speed. A stiff frame eliminates this energy leak, ensuring that the power you produce is transmitted directly to the road. This improved efficiency allows you to maintain a given speed with less effort, or go faster for the same effort. It directly impacts your economy of motion, a key determinant of endurance performance.
World class cyclists have an exceptionally high economy of motion, which is usually determined by calculation of the gross efficiency.
– Research Team on Quadriceps Femoris Motor Patterns, A quadriceps femoris motor pattern for efficient cycling – PMC Study
For a rider working on their cadence, this is particularly relevant. A stiff, responsive frame provides a stable platform that makes it easier to produce a smooth, circular pedal stroke. The immediate feedback from the bike encourages a more connected feeling, which is conducive to maintaining a higher, more consistent cadence. You’re not fighting the bike’s flex; you’re working with a solid, predictable base. This is why even non-sprinters benefit from a frame that efficiently translates their effort into forward motion.
Ultimately, a stiff frame respects your energy. It doesn’t waste the precious watts you’re working so hard to produce, whether you’re spinning at 90 RPM or grinding up a climb.
Key Takeaways
- High cadence is a neuromuscular skill that must be trained with drills like spin-ups; it’s not just about trying harder.
- Grinding below 60 RPM creates high-torque spikes that damage knee cartilage and prematurely exhaust fast-twitch muscle fibers, killing your endurance.
- Finding your personal optimal cadence via a structured test is superior to blindly chasing the generic « 90 RPM » rule.
Look, Shimano, or Speedplay: Which Carbon Pedal System Saves Your Knees?
The final piece of the knee-health puzzle is the pedal system itself. While cleat float is a critical concept, the way each major pedal system—Look, Shimano, and Speedplay (now Wahoo Speedplay)—implements that float has significant biomechanical implications. Choosing the right system can provide a stable, efficient platform that accommodates your natural movement, while the wrong one can lock you into a pattern that causes strain. The debate is not just about weight or aerodynamics, but about which system’s philosophy best matches your body’s needs.
The three systems offer distinct approaches to float. Shimano SPD-SL and Look Keo systems use a « centering » float; the cleat is spring-loaded to return to a neutral, forward-facing position. This provides a very stable and connected feel, which many riders prefer for high-power efforts. However, it constantly fights your foot’s desire to rotate naturally. Wahoo Speedplay, on the other hand, offers « free float, » where the foot can rotate within a defined range (adjustable from 0 to 15 degrees) without any re-centering force. This offers maximum freedom but can feel less stable to riders accustomed to a more « locked-in » sensation.
As the following comparative analysis shows, the best system for your knees depends on your individual biomechanics and preferences. There is no single « best » pedal, only the best pedal for you.
| Pedal System | Float Range | Float Type | Stack Height | Biomechanical Philosophy | Best For |
|---|---|---|---|---|---|
| Speedplay | 0° to 15° | Non-centering (free float) | Low (closer to axle) | Maximum freedom of movement, accommodates natural foot rotation | Riders learning high cadence, those with knee issues, long endurance events |
| Look Keo | 0° to 9° | Centering (returns to neutral) | Medium | Predictable platform with controlled movement | Riders with stable pedaling form, those wanting connected feel at high cadence |
| Shimano SPD-SL | 0° to 6° | Centering (returns to neutral) | Medium-High | Solid connection with moderate adjustment tolerance | Riders prioritizing power transfer stability over maximum float |
For a rider transitioning from grinding to spinning and dealing with knee pain, a system like Speedplay often offers the most forgiving platform. The free float allows the knee to find its happy place without resistance, and the ability to precisely dial in the float range is a powerful tuning tool. However, a rider with a very stable, well-practiced pedal stroke may prefer the connected feel of Look or Shimano with a 6-degree float cleat.
Your choice of pedal system is the final step in creating a complete, knee-friendly ecosystem. By combining the right hardware with a well-trained neuromuscular system and an understanding of your personal cadence, you can transform your relationship with the bike from one of conflict to one of harmony and pain-free power.