The debate ends here: Correctly applied, chain waxing is not just a cleaner alternative to oil—it is a systematic upgrade that can double your drivetrain’s lifespan and cut long-term costs by nearly 50%.
- It creates a solid, dry barrier that repels dirt, eliminating the « abrasive paste » that grinds down components.
- The process extends chain life dramatically, meaning fewer replacements for chains, cassettes, and chainrings.
Recommendation: Treat your chain not as a part to lubricate, but as a component to be decontaminated and tuned for peak performance and longevity.
For any performance-focused cyclist, the drivetrain is a sacred space. It’s the heart of the machine, yet it’s perpetually under assault from dirt, moisture, and the relentless friction of its own operation. The traditional solution, a bottle of wet or dry lube, seems simple enough. But it’s a flawed solution. It creates what is effectively an « abrasive paste »—a sticky concoction of oil and road grit that relentlessly grinds away at your chain, cassette, and chainrings. This is the source of the dreaded « cyclist tattoo » and the primary reason your components wear out prematurely.
The conversation around chain waxing often gets polarized. As Škoda We Love Cycling notes, « Chain waxing seems to be a polarizing topic. Some cyclists swear by it while others don’t understand why bother when oil-based lubes seem to work just fine. » But this frames the debate incorrectly. Waxing isn’t just another lubricant; it’s a fundamentally different approach to drivetrain management. It is a systematic process of decontamination and protection designed to create a solid, slick, and completely dry barrier against the elements.
This guide abandons the superficial « cleaner vs. dirtier » argument. Instead, we will approach this as a friction-obsessed performance tuner would. We will dissect the science of why wax works, the precise methodology for perfect application, and the quantifiable benefits in watts, component life, and cost. The goal is not merely to have a cleaner chain, but to achieve a state of near-frictionless efficiency where the drivetrain becomes a silent, optimized system. It’s a commitment, but the rewards are measured in speed, longevity, and mechanical harmony.
This article provides a complete methodology for mastering the art of chain waxing, moving from initial preparation to long-term maintenance and troubleshooting. Explore the sections below to transform your approach to drivetrain care.
Summary: Hot Wax vs. Drip Wax: A Performance Tuner’s Guide
- The Mineral Spirits Bath: How to Strip Factory Grease Completely
- 300km Rule: How to Know When Your Wax Coating Has Worn Off?
- Does Wax Survive a British Winter or Should You Switch Back to Wet Lube?
- Saving the Drivetrain: How Waxing Doubles the Life of Your Chain and Cassette
- Snow on the Chainstay: Why Is Your Wax Flaking Off in Chunks?
- The Water Trap: Why Lube Fails If You Don’t Dry the Cassette Perfectly
- Chain Wear on Mid-Drives: Why You Might Need a New Chain Every 1,000 Miles
- How to Clean a Black Cassette in 10 Minutes Without Making a Mess of the Patio?
The Mineral Spirits Bath: How to Strip Factory Grease Completely
The single most critical step in transitioning to a wax-based system is achieving a surgically clean chain. A new chain is not « clean »; it’s coated in a thick, sticky grease designed for anti-corrosion during shipping, not for optimal performance. This factory grease is the mortal enemy of wax. If even a trace remains, the wax cannot achieve proper internal penetration into the rollers and pins, leading to a failed bond and premature wear. You are not just cleaning the chain; you are performing a systematic decontamination.
The process requires a multi-stage solvent bath. Mineral spirits are the industry standard for the initial strip due to their effectiveness at dissolving heavy greases. The chain must be fully submerged and agitated to force the solvent into every crevice. This is not a quick rinse. It’s a patient process of dissolving and flushing until the solvent remains perfectly clear after a vigorous shake, indicating all grease has been removed. For the truly obsessed, an ultrasonic cleaner can then be used to achieve the ultimate level of clean through cavitation, dislodging particles from surfaces the solvent can’t reach.
Finally, a bath in denatured alcohol serves a dual purpose: it displaces any remaining mineral spirits and, more importantly, any water moisture that could cause flash rust. Only a perfectly bare and dry metal surface can form a strong mechanical bond with the molten paraffin. Skipping or rushing this stage guarantees failure and is the most common mistake newcomers make. It sets the foundation for the entire system.
Action Plan: Achieving a Lab-Grade Decontaminated Chain
- Initial Solvent Soak: Remove the chain and place it in a sealed container with mineral spirits. Agitate for 10-15 minutes to dissolve the bulk of the factory grease.
- Secondary Purity Bath: Transfer the chain to a second, fresh container of mineral spirits. Agitate vigorously and repeat this step with fresh solvent until the liquid remains completely clear after shaking.
- Ultrasonic Deep Clean (Optional): For maximum penetration, place the chain in an ultrasonic cleaner with a degreasing solution for 3-5 minutes. The cavitation process will purge contaminants from inside the rollers.
- Displacement Bath: Immerse the fully degreased chain in a final bath of denatured alcohol. This displaces all remaining solvents and water, ensuring a perfectly prepped surface.
- Immediate Drying: To prevent flash rust, immediately dry the chain. The gold standard is baking in a low-temperature oven (80-90°C) for 10-15 minutes. Alternatively, a thorough air-dry in a warm, low-humidity environment is acceptable.
300km Rule: How to Know When Your Wax Coating Has Worn Off?
Once your chain is perfectly waxed, the question shifts from preparation to maintenance. How do you know when it’s time to re-wax? Vague guidelines like « every few weeks » are useless to a performance tuner. We need clear, evidence-based indicators. The most cited interval from leading manufacturers is around 200 miles (or 322 km) of clean, dry riding. This serves as a solid baseline, but the real answer is: it depends. Riding in wet conditions, on dusty gravel, or with a high-power output will shorten this interval significantly.
Forget the calendar. The most reliable indicator is audible. A correctly waxed chain is virtually silent. The moment you begin to hear a dry, metallic « chirp » or « squeak, » especially under load, the wax inside the rollers has worn away. This is the sound of metal-on-metal contact, and it is your non-negotiable signal to re-wax immediately. Continuing to ride on a dry chain will cause rapid wear, undoing all the benefits of your hard work. This audible cue is the most important piece of feedback your drivetrain will give you.
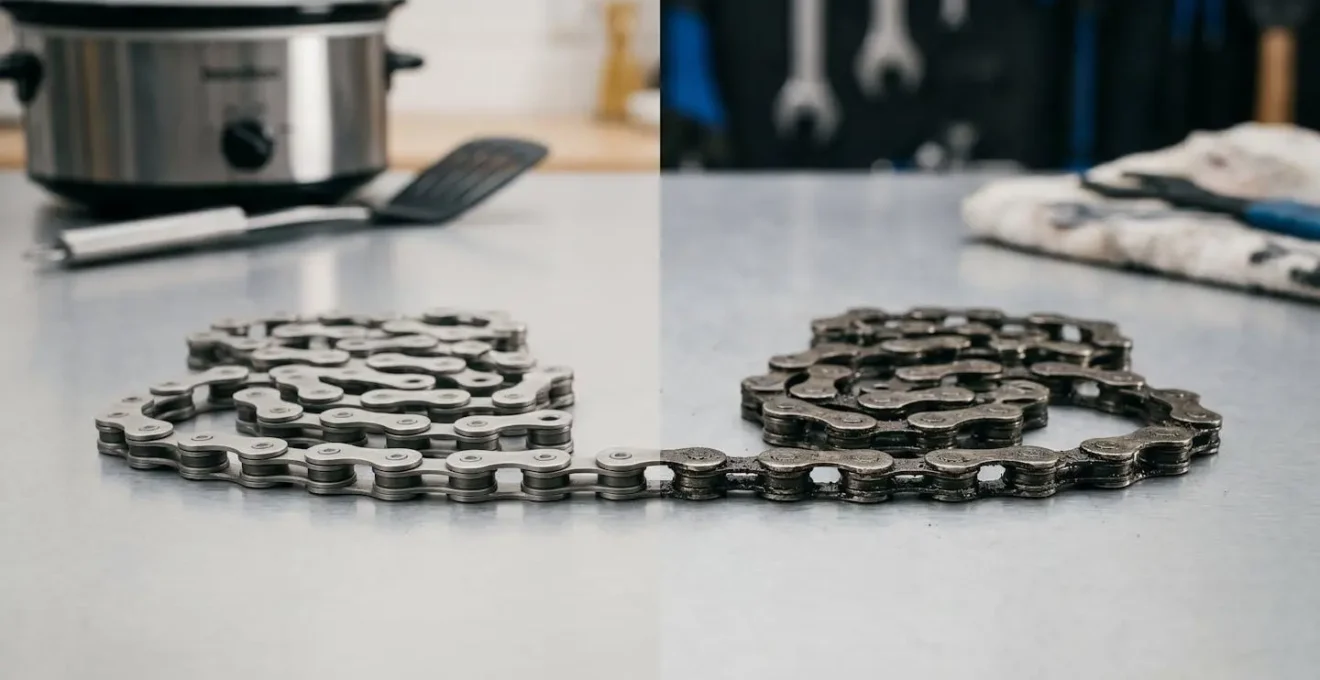
For those who prefer visual confirmation, a close inspection of the chain’s rollers provides the answer. A freshly waxed chain has a matte, opaque finish. As the wax wears, the high-contact surfaces of the rollers will begin to look shiny and metallic again. This contrast between the dull, waxy outer plates and the polished inner rollers is a clear sign that the protective layer is gone.
This macro photograph highlights the visual difference between a properly waxed surface and a worn one. The goal is to re-wax before the shine becomes widespread, using sound as your primary guide.
Ultimately, a combination of distance tracking, audible feedback, and visual inspection will allow you to develop a re-waxing schedule tuned perfectly to your riding style and conditions. The « 300km rule » is a starting point, not a destination.
Does Wax Survive a British Winter or Should You Switch Back to Wet Lube?
A common myth is that chain wax is only suitable for pristine, dry summer roads. The slightest hint of rain or mud, the argument goes, will strip the wax clean off, leaving the drivetrain unprotected. This leads many riders, especially in climates like the UK, to switch back to sticky, heavy wet lubes for winter. From a performance tuning perspective, this is a mistake. Wet lube doesn’t protect the chain; it simply creates a contamination matrix, an abrasive paste of grit and oil that actively grinds down your components.
The solid nature of paraffin wax offers superior protection precisely *because* it is not sticky. Instead of holding grit against the metal, it acts as a physical barrier. Dirt and water cannot penetrate the solid wax inside the rollers. While the outer coating might get dirty, the critical internal contact points remain clean. The wax itself may flake off over time, taking the dirt with it, which is exactly what it’s designed to do. This self-cleaning property is a feature, not a bug.
Real-world testing in the harshest conditions confirms this. In a controlled test during a muddy cyclocross race, the difference in performance was stark and measurable.
Case Study: Cyclocross Race Wax vs. Oil Efficiency Test
A test conducted by CyclingAbout measured the drivetrain efficiency of six riders before and after a one-hour cyclocross race. Three riders used immersion-waxed chains, and three used traditional oil lubes. The results showed that the wax-treated chains experienced only a 0.7% efficiency loss after being caked in mud. In stark contrast, the oil-treated chains, which became a grinding paste of dirt and lube, lost 1.7% of their efficiency. The wax proved to be a more resilient and efficient system even in extreme wet conditions.
The takeaway is clear: wax is not just for fair weather. It is a more robust, more efficient, and ultimately cleaner system for year-round riding. The re-waxing interval will be shorter in winter—perhaps every 100-150km—but the core benefit of preventing abrasive wear remains, and is in fact amplified when conditions are at their worst.
Saving the Drivetrain: How Waxing Doubles the Life of Your Chain and Cassette
The most compelling argument for waxing, beyond the silent operation and clean aesthetics, is economic. A properly maintained waxed drivetrain can dramatically extend the life of your components. The primary cause of chain « stretch » (actually pin and roller wear) is the abrasive paste created by wet lubes. By creating a solid, dry barrier, wax effectively eliminates this grinding compound. A cleaner chain is a longer-lasting chain, with many cyclists reporting chains lasting up to 3 times longer than their oil-lubricated counterparts.
This longevity has a significant cascading effect on your entire drivetrain. A worn chain has increased pitch between its rollers, which no longer meshes perfectly with the teeth of your cassette and chainrings. This mismatch causes rapid wear on these much more expensive components. Neglecting to replace a worn chain in time is a costly error; in the UK, this can lead to a surprise bill where neglecting chain maintenance can cost cyclists £150-300+ when the cassette and chainrings also need replacement.
By drastically slowing chain wear, waxing preserves your entire system. You’ll replace chains far less often, and your cassette and chainrings will last significantly longer. While there is an initial time and equipment investment, the long-term total cost of ownership is substantially lower.
The following analysis breaks down the typical costs over 20,000km of riding, demonstrating the clear financial advantage of the waxing method. The time investment is also factored, though many find the « set and forget » nature of waxing less demanding than the constant cleaning required by oil.
| Component/Factor | Hot Wax Method | Traditional Oil Method |
|---|---|---|
| Initial Equipment | £45 (slow cooker + wax) | £15 (quality oil + degreaser) |
| Chain Replacements | 2 chains @ £25 = £50 | 5 chains @ £25 = £125 |
| Cassette Replacements | 1 cassette @ £80 = £80 | 2 cassettes @ £80 = £160 |
| Chainring Replacement | 0 (minimal wear) | 1 @ £40 = £40 |
| Ongoing Lubricant Cost | £20 (wax refills) | £35 (oil bottles) |
| Time Investment (valued at £15/hr) | 10 hrs = £150 | 15 hrs = £225 |
| Total 20,000km Cost | £345 | £600 |
Snow on the Chainstay: Why Is Your Wax Flaking Off in Chunks?
One of the most common and frustrating failure modes for a home waxer is « flaking. » You go through the entire meticulous process only to find small white chunks of wax, like snow, all over your chainstay after the first ride. This indicates a failure in wax adhesion and penetration. The wax is sitting on the outside of the chain, rather than being locked deep inside the rollers where it’s needed. The cause is almost always a lack of proper thermal control during the waxing process.
Many people assume « hotter is better, » cranking their slow cooker to its highest setting to melt the wax quickly. This is a critical error. Paraffin wax should be melted slowly and held at a precise temperature. According to leading manufacturers, the temperature should not exceed 93°C (200°F). If the wax is too hot, its viscosity drops too low. More importantly, the chain itself, being an excellent heat conductor, becomes super-heated during immersion. When you pull this hot chain out of the pot, the retained heat keeps the wax in a liquid state for longer, causing most of it to drip back into the pot instead of solidifying within the rollers.
The goal is to get the chain hot enough for the wax to flow into the tiny gaps of the pins and rollers, but not so hot that the wax can’t « flash cool » and solidify internally as soon as it’s removed from the pot. This is a delicate balance.
Case Study: SILCA’s Temperature Testing on Wax Retention
In a controlled experiment, the team at SILCA measured how much wax a chain retained when pulled from the pot at different temperatures. As detailed in an analysis by Escape Collective, they tested at 75°C (167°F), 95°C (203°F), and 125°C (257°F). The results were definitive: the chains waxed at the lower 75°C temperature retained significantly more wax internally. The hotter the chain gets, the more lubricant simply drips off upon removal. This confirms that a lower, more controlled temperature is superior for maximum internal lubrication and minimizing external flaking.
To prevent flaking, use a thermometer to keep your wax between 75°C and 90°C. Let the chain soak for 10-15 minutes to reach thermal equilibrium, agitating it to release trapped air. When you remove the chain, let it cool for a moment hanging over the pot, then wipe the excess from the outer plates before it fully hardens. This ensures the wax stays where it matters: inside.
The Water Trap: Why Lube Fails If You Don’t Dry the Cassette Perfectly
The focus on removing grease is paramount, but an equally insidious contaminant is water. After any washing or degreasing step, water becomes trapped in the incredibly tight tolerances between the chain’s rollers and pins. Even a microscopic amount of moisture is a problem. It prevents wax from adhering to the metal surface, and worse, it can lead to flash rust. This unseen corrosion creates fine abrasive particles inside your chain, which will immediately begin to compromise the wax and wear down the metal from the inside out.
This principle extends to the entire drivetrain. Applying any lubricant, be it wax or oil, to a wet cassette or chain is a recipe for failure. Water and oil don’t mix, and water inside the chain will prevent even drip-on wax lubes from penetrating effectively. The lubricant will simply sit on the surface, offering minimal protection and attracting dirt. A perfectly dry drivetrain is a non-negotiable prerequisite for any successful lubrication.
Air drying is often insufficient, especially in humid climates. The time it takes for a chain to air dry is often long enough for that invisible layer of flash rust to form. A more proactive approach is required to guarantee a completely moisture-free chain before it enters the wax pot. The best methods either use heat to evaporate the water or a chemical to displace it entirely. An oven bake on a low setting or an immersion in denatured alcohol are the gold-standard methods for ensuring your chain is in the perfect state to receive its wax coating. This guarantees the strongest possible bond and the longest-lasting protection.
Chain Wear on Mid-Drives: Why You Might Need a New Chain Every 1,000 Miles
The principles of drivetrain preservation become even more critical in the world of e-bikes, particularly those with mid-drive motors. A mid-drive system channels both the rider’s input and the motor’s power through the standard bicycle chain. This places an immense and sustained load on the drivetrain that it was not originally designed for. While a strong amateur cyclist might produce peak torque of 40-50Nm, modern mid-drive e-bikes routinely deliver 50-90Nm of sustained torque. This constant, high-torque load dramatically accelerates chain wear.
A mid-drive motor, placed near the crankset, combines motor power with pedal input, channeling everything through the chain and rear drivetrain. This results in higher torque loads and more frequent strain, accelerating chain wear.
– FIIDO E-Bikes Technical Team
For an e-bike rider using a traditional oil-based lube, this creates a perfect storm for rapid component destruction. The high torque grinds the chain into the cassette and chainrings, while the sticky lube holds a constant supply of abrasive grit at the point of contact. It’s not uncommon for e-bike owners to see significant chain elongation after just 1,000 miles (1,600 km), necessitating frequent and costly replacements to save the rest of the drivetrain.
This is where waxing becomes less of a hobbyist tweak and more of an essential maintenance strategy. By eliminating the abrasive paste from the equation, a waxed chain can withstand the high-torque environment far more effectively. A real-world case study of a commuter using a mid-drive e-bike through a Scottish winter on oily, gritty roads showed measurable chain elongation of 0.8% after nearly 6,000km, but the owner noted that the abrasive paste was a constant battle. The consensus is that a wax protocol would have significantly extended that life by keeping the system clean despite the harsh conditions and high loads. For a mid-drive e-bike owner, waxing is the single best investment to protect the drivetrain from premature failure.
Key Takeaways
- Decontamination is Absolute: The entire system relies on stripping the chain to bare, dry metal. Any remaining grease or moisture will cause the wax to fail.
- Thermal Control is Crucial: Waxing at a lower, controlled temperature (75-90°C) maximizes internal wax retention and prevents the external flaking caused by overheating.
- Wax Excels in All Conditions: The solid barrier of wax prevents abrasive paste from forming, making it a superior lubricant even in wet and muddy conditions, as long as re-application intervals are shortened.
How to Clean a Black Cassette in 10 Minutes Without Making a Mess of the Patio?
The question itself reveals a mindset tied to traditional, oil-based lubricants. A « black cassette » is not just dirty; it’s a symptom of a failing system. That black grime is a mixture of sticky lube, road dirt, and fine metal particles ground from your own components. It is physical proof of the abrasive paste that is actively destroying your drivetrain and robbing you of power. A dirty chain can suffer nearly a 5% power loss from contamination.
So, the fastest way to clean a black cassette is to address the root cause. As the experts at BikeRadar pithily put it:
The best way to clean a black cassette is to never let it get black in the first place.
– BikeRadar Editorial Team
This is the core philosophy of chain waxing. Because a waxed chain is dry, it does not attract or hold onto dirt. Dust and grit may settle on the surface, but they cannot form the sticky, destructive paste. The cassette, chainrings, and jockey wheels remain remarkably clean, ride after ride. The « cleaning » process for a waxed drivetrain is often nothing more than a quick wipe with a dry cloth to remove surface dust. The hours spent on the patio with degreasers, brushes, and chain cleaning tools become a thing of the past.
Adopting a waxing protocol is a paradigm shift. You stop treating the symptom (a black cassette) and start treating the disease (the use of a sticky contamination matrix as a lubricant). The result is a system that not only performs better and lasts longer but also remains perpetually clean. The ten minutes you were going to spend scrubbing your cassette are now ten extra minutes you can spend riding.
By treating your drivetrain not as something to be periodically doused in oil, but as a high-performance system requiring precise tuning, you unlock a new level of efficiency, longevity, and satisfaction. Start by perfecting your decontamination process and embrace the science of a truly friction-free ride.