The relentless pursuit of frame stiffness, a carryover from the pro peloton, is often counterproductive for amateur riders on Britain’s less-than-perfect roads.
- Frame stiffness provides a psychological « feel » of speed but transmits high-frequency vibrations that cause fatigue and can actually slow you down over a long ride.
- True comfort and efficiency come from « system compliance, » where tires, wheels, and contact points have a far greater impact on ride quality than the frame alone.
Recommendation: Shift your focus from chasing the stiffest frame to tuning your entire bike as a system. Start with wider, lower-pressure tires—it’s the single most effective upgrade for conquering rough UK tarmac.
There’s a familiar sensation for any dedicated UK cyclist: the jarring buzz that travels up through your hands and spine as your high-performance carbon bike meets a stretch of freshly laid chip seal or a poorly patched B-road. For years, the industry has sold us on the idea that stiffness equals speed. We’re told that a rock-solid bottom bracket and an unyielding head tube are essential for efficient power transfer, turning every watt of effort into forward motion. This narrative, born from the explosive demands of professional sprinters, has shaped the very DNA of modern road bikes.
The common advice is to simply get wider tires or an « endurance » model bike. But this oversimplifies the issue. It ignores the intricate relationship between the rider, the machine, and the uniquely varied UK tarmac spectrum. We obsess over frame weight and stiffness figures, often overlooking the components that truly define ride quality. What if the key to unlocking real-world speed and all-day comfort isn’t in a stiffer frame, but in a more intelligent, holistic approach? What if the feeling of speed is just that—a feeling—and the harshness is actually holding you back?
This article cuts through the marketing noise. From the perspective of someone who has built and repaired frames for decades, we’ll deconstruct the myth of ultimate stiffness. We will explore the hierarchy of components that genuinely contribute to comfort, analyse the trade-offs between materials like carbon and steel for long UK days, and provide a practical framework for tuning your bike into a machine that floats over rough surfaces instead of fighting them. It’s time to value true ride quality over stiffness buzzwords.
To navigate this complex topic, we will break down the essential elements that define the relationship between your bike and the road. This guide provides a structured look at everything from the psychology of stiffness to the practicalities of knee-saving pedal systems.
Summary: Understanding Stiffness and a Guide to Real-World UK Speed
- Why Does a Stiff Frame Feel Faster Even If You Aren’t Sprinter?
- How to Soften a Harsh Carbon Frame Without Changing the Bike?
- Carbon Repair vs. Replacement: What to Do After a Crash?
- Carbon vs. High-End Steel: Which Is Truly Better for Long UK Days?
- Race Geometry or Endurance: Which Handles Power Transfer Better for Amateurs?
- The Tarmac Drag: How Much Speed Do You Really Lose with 50mm Tyres?
- Cracked Carbon: Why You Cannot Tighten Bolts by « Feel » Anymore
- Look, Shimano, or Speedplay: Which Carbon Pedal System Saves Your Knees?
Why Does a Stiff Frame Feel Faster Even If You Aren’t Sprinter?
The sensation of a stiff frame feeling « fast » is a powerful psychological trick. When you push on the pedals and the bike surges forward with zero perceptible flex, your brain interprets this instant feedback as pure efficiency. Every watt is going into the drivetrain. This creates a feeling of direct connection and responsiveness that is undeniably rewarding. However, this perceived speed often comes at a significant physical cost, especially on the variable surfaces of UK roads. The very rigidity that provides that instant kick also turns the frame into a perfect conductor for high-frequency vibrations.
As former professional cyclist Damien Touzé noted, modern race bikes have become incredibly rigid. He describes the experience vividly: « The bike is now 100% rigid. They are pieces of wood. So, the slightest shock you take from the wheel is amplified by 100 times to the rider. » This amplification of road buzz is not just a comfort issue; it’s a performance inhibitor. Your body is forced to act as the bike’s primary suspension system, constantly tensing muscles to absorb the chatter. This consumes energy that could otherwise be used for pedalling, leading to premature fatigue on longer rides.
This trend towards harsher frames is a measurable phenomenon. An analysis of bike designs over the past decade found that frames have, on average, become significantly more rigid. One study suggests that modern frames can be up to 17% harsher than their predecessors from just ten years ago. For a professional sprinter in the final 200 metres, this trade-off makes sense. For an enthusiast on a three-hour ride through the Cotswolds, that constant, energy-sapping vibration means the « fast-feeling » bike is likely the slower one in reality.
How to Soften a Harsh Carbon Frame Without Changing the Bike?
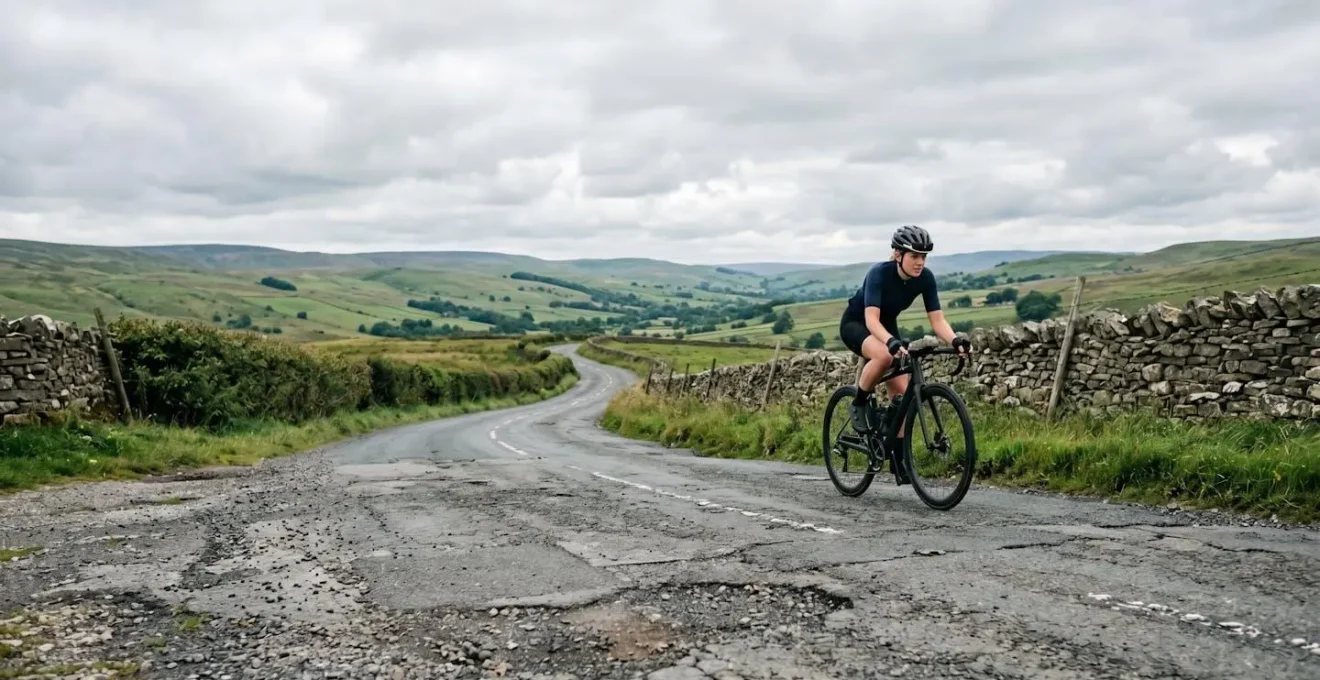
If your ultra-stiff carbon frame is transmitting every imperfection of the road directly into your body, the solution isn’t necessarily a new bike. The secret lies in understanding what I call the « Vibrational Damping Hierarchy. » Ride comfort is a system, and the frame is often the last and least effective component to address. By focusing on the parts of the bike that do the most to absorb road buzz, you can transform a harsh ride into a smooth one without sacrificing the frame’s efficiency.
The single most impactful change you can make is at the point where the bike meets the road: the tyres. Switching to a wider tyre (28-32mm) and running it at a lower pressure dramatically increases the air volume, which acts as your first line of suspension. A wider tyre creates a shorter, broader contact patch, reducing tyre deformation and, counter-intuitively, lowering rolling resistance on imperfect surfaces.
As the image above illustrates, the way the tyre interacts with the road surface is fundamental. After tyres, focus on your three contact points: saddle, handlebars, and pedals. A saddle with a flexible shell and non-carbon rails, or a compliant carbon seatpost, can introduce significant vertical flex that isolates you from bumps. Likewise, carbon handlebars designed with vibration-damping layups can save your hands and wrists from high-frequency buzz. It’s about systematically adding compliance where it counts the most, turning your bike into a tuned system rather than a rigid plank.
Action Plan: The Comfort Component Hierarchy
- Tyres: Switch to 28-32mm width and optimize pressure for your weight and road surface—the single biggest comfort gain available.
- Saddle: Choose a shell with flex properties (nylon or composite) and consider titanium or steel rails over carbon for vibration damping.
- Handlebars: Install carbon bars with vibration-damping layups or ergonomic flared drops, or consider shock-absorbing stems like the Redshift ShockStop.
- Seatpost: Opt for a compliant seatpost design or increase the amount of exposed post by 10-20mm for additional flex.
- Wheels: Select rims with a wider internal width (19-21mm for road) to create a more optimal tyre profile that enhances the benefits of wider rubber.
Carbon Repair vs. Replacement: What to Do After a Crash?
A crash on a carbon bike often brings a sickening feeling, and not just from road rash. The fear is that the expensive, lightweight frame is now a write-off. In the early days of carbon, this was often true. However, the technology of carbon repair has advanced dramatically, especially here in the UK. For many types of damage, a professional repair is not only possible but can restore the frame to its original strength and safety specifications, making it a far more sensible option than replacement.
The key is to distinguish between superficial cosmetic damage and structural failure. Scratches in the paint or clear coat are usually nothing to worry about. However, any sign of cracking, soft spots, or a change in sound when you tap the area (a dull thud instead of a sharp tick) indicates potential structural damage. At this point, you must stop riding the bike immediately and seek a professional assessment. Do not try to bodge a repair yourself; carbon fibre’s strength comes from its continuous fibres and specific layup, which cannot be replicated with a home repair kit.
In the UK, we’re fortunate to have world-leading experts in this field. The national governing body, British Cycling, gives its full endorsement to specialist workshops. In their official guidance, they state, « We are huge fans of ‘Carbon Bike Repair’ and ‘Target Composites’, two of our most trusted expert repairers. » This level of trust from an organisation like British Cycling underscores the reliability of modern repair techniques.
Case Study: Carbon Bike Repair UK’s Robotic Restoration
Carbon Bike Repair, the UK’s largest carbon restoration company, exemplifies the state of the art. They have developed a unique robotic repair system to ensure modern lightweight frames can be safely restored to 100% of their original specifications. By processing over 20 bikes per day, the company had already repaired more than 20,000 bicycles by 2023. Their process involves ultrasonic inspection to precisely map the damage, followed by structural carbon layup restoration and precision paint matching. This technology-driven approach successfully addresses the complexity of repairing modern high-modulus carbon, which requires exact fibre orientation and resin curing protocols to regain its designed strength.
Carbon vs. High-End Steel: Which Is Truly Better for Long UK Days?
The debate between carbon fibre and steel is as old as carbon frames themselves. While carbon has dominated the professional scene for its incredible stiffness-to-weight ratio, high-end steel has enjoyed a major resurgence among discerning enthusiasts, particularly those navigating the demanding conditions of UK roads. For all-day riding, the conversation shifts from pure performance metrics to the more nuanced, and arguably more important, characteristic of ride quality.
Carbon’s primary advantage is its mouldability. Engineers can create complex aerodynamic shapes and tune stiffness in specific areas, resulting in frames that are incredibly light and efficient at transferring power. However, this often results in a « muted » or sometimes « dead » ride feel, where road feedback is filtered out, but high-frequency buzz can still get through. Steel, on the other hand, possesses an innate material property that provides a different experience. As described by experts, « Steel offers a distinctive ‘lively’ or ‘springy’ ride quality that many cyclists prize. The material naturally absorbs road vibrations and provides comfortable feedback to the rider. » This « planing » sensation, where the frame feels like it’s working with the road rather than against it, can be a revelation for comfort on long, rough rides.
When considering a frame for year-round UK riding, factors beyond weight become critical. The following table, based on an in-depth analysis of frame materials, highlights the real-world trade-offs.
| Characteristic | Carbon Fiber | High-End Steel (e.g., Reynolds 853) |
|---|---|---|
| Weight (frame only) | 800-1100g | 1300-1600g (400-500g heavier) |
| Impact Damage Response | Cracks/catastrophic failure | Dents but remains rideable |
| Repairability | Specialist repair required, expensive | Easily welded by local frame builders |
| Ride Feel | Efficient, muted, sometimes ‘dead’ | Lively, ‘planing’ sensation, communicative |
| Weather Resilience | Susceptible to UV degradation, impact-sensitive in cold | Excellent with proper coating, unaffected by temperature |
| Tyre Clearance (typical) | 28-32mm on race models | 32-40mm + mudguards on modern builds |
| Fatigue Life | Limited (stress cycles degrade layup) | Infinite below fatigue limit |
For the UK enthusiast, steel’s resilience to knocks, superior repairability, and inherent comfort can often outweigh the 400-500g weight penalty. The choice isn’t about which is « better, » but which philosophy aligns with your riding: the absolute efficiency of carbon or the resilient comfort and lively feel of modern steel.
Race Geometry or Endurance: Which Handles Power Transfer Better for Amateurs?
In the quest for efficient power transfer, cyclists often fixate on bottom bracket stiffness. However, for amateur riders embarking on long days in the saddle, a far more critical factor is geometry. The distinction between an aggressive « race » geometry and a more relaxed « endurance » geometry isn’t just about comfort—it’s about your body’s ability to generate and sustain power over several hours. An uncomfortable position is an inefficient one, regardless of how stiff the frame is.
Race geometry is defined by a long reach and a low stack height, forcing the rider into a low, aerodynamic profile. This is ideal for flexible pro cyclists maintaining high speeds, but for the average enthusiast, it can lead to an excessively closed hip angle. This pinches the hip flexors, restricts diaphragm movement (hindering deep breathing), and places significant strain on the lower back and hamstrings. After an hour or two, the body starts to fatigue from simply holding the position, and power output inevitably drops.
Endurance geometry, conversely, features a shorter reach and a higher stack. This creates a more upright position, but more importantly, it opens the hip angle. A more open hip angle allows for smoother, more powerful pedal strokes, uninhibited breathing, and far less strain on the lower back. This allows the rider to stay comfortable and produce consistent power for much longer. As veteran industry engineer Corey Lowe states, « fit and geometry are the largest factors in rider comfort, » and by extension, sustained performance.
For an amateur, the small aerodynamic gain from a race position is almost always negated by the loss of power from muscular fatigue and restricted breathing over the course of a long sportive. Therefore, an endurance frame that puts you in a powerful, sustainable position will, in practice, handle your power transfer far better over the duration of your ride.
The Tarmac Drag: How Much Speed Do You Really Lose with 50mm Tyres?
The question of tyre width and its effect on speed has been a long-standing debate. The old-school mentality dictated that narrow, high-pressure tyres were fastest. Today, we know the reality is far more complex, especially on the varied and often rough surfaces we encounter in the UK. While the H2 title’s « 50mm tyres » represents an extreme found more in gravel or adventure riding, the principle it questions is crucial: does going wider automatically mean going slower?
The answer is a definitive no. In fact, on most real-world roads, a wider tyre at the correct pressure is faster than a narrow one. The key concepts are rolling resistance (Crr) and impedance. As the experts at Best Bike Split explain, « A 28mm tire at the right pressure rolls faster than a 23mm tire inflated higher, because the contact patch is shorter and rounder, reducing tire deformation. » On a perfectly smooth velodrome, a narrow tyre might have a slight edge. But on coarse tarmac, a wider, more compliant tyre absorbs imperfections instead of lifting the rider’s weight over them (impedance), saving you significant energy.
The trade-off comes from aerodynamics. A wider tyre presents a larger frontal area, increasing drag. However, this penalty is often smaller than the gains from reduced rolling resistance, especially at the average speeds of most amateur cyclists. The data from a comprehensive rim and tyre width test makes this clear.
| Tire Width | Typical Crr | Rolling Resistance Watts (at 29 km/h) | Aerodynamic Penalty vs 25mm | Optimal Use Case |
|---|---|---|---|---|
| 25mm | 0.0038-0.0045 | 10-12W | Baseline | Smooth roads, high speed (35+ km/h) |
| 28mm | 0.0032-0.0040 | 8-11W | +1-2W drag | Mixed surfaces, speed 25-35 km/h |
| 32mm | 0.0030-0.0038 | 7-10W | +2-3W drag | Rough UK B-roads, chip seal, comfort priority |
| 35mm | 0.0032-0.0042 | 8-11W | +3-4W drag | Very rough surfaces, gravel, wet conditions |
| Note: On rough UK tarmac (chip seal, patches), the impedance reduction from wider tires often saves 8-12W in real-world conditions despite slightly higher Crr values on smooth rollers. Aerodynamic penalty only becomes significant above 35 km/h average speed. | ||||
As the table shows, for typical UK B-roads, a 32mm tyre can be the most efficient choice, saving watts on rolling resistance that far outweigh the minor 2-3W aerodynamic penalty. As you move towards 50mm, the aero drag becomes much more significant and the application shifts firmly to off-road, but the principle holds: for real-world tarmac, wider is often faster.
Key Takeaways
- Frame stiffness is only one small part of the performance equation; system compliance is what matters for real-world speed.
- Focus on optimizing comfort and reducing vibration through your tyres and contact points (saddle, bars) before ever considering the frame.
- For amateur riders on long rides, a comfortable and sustainable position from an endurance geometry is more efficient than an aggressive race geometry.
Cracked Carbon: Why You Cannot Tighten Bolts by « Feel » Anymore
In the workshop, one of the most heartbreaking sights is a beautiful, high-end carbon frame with a crack emanating from a bolt. The cause is almost always the same: over-tightening. The old-school method of tightening bolts by « feel »—a skill honed on steel and aluminium frames—is a recipe for disaster on modern carbon components. Carbon fibre’s strength is directional; it is incredibly strong under tension and compression along its fibres, but it is highly vulnerable to the crushing forces exerted by an over-torqued bolt.
Unlike metal, which will often deform or strip a thread before it fails catastrophically, carbon gives very little warning. A fraction of a turn too far can create micro-cracks in the resin matrix, which then propagate and lead to a complete failure under riding load. This is why a quality torque wrench is not a luxury but an absolutely essential tool for anyone working on a carbon bike. It is the only way to ensure you are applying the precise clamping force specified by the manufacturer, which is often a surprisingly low figure.
Using carbon assembly paste is another non-negotiable step. This gritty paste increases friction between components, allowing you to achieve a secure grip at a much lower torque setting—often reducing the required force by 20-30%. This is especially critical for areas like seatposts and handlebars, the most common victims of over-tightening. A £40 investment in a torque wrench and a £10 tube of paste can prevent damage that could write off a £2000+ frame.
Checklist: Critical Torque Points to Prevent Carbon Damage
- Seatpost Clamp: Most critical failure point. Use carbon assembly paste and torque to 4-6 Nm maximum. Integrated wedge designs often require even lower torque (3-4 Nm).
- Stem Faceplate (carbon handlebars): Torque bolts to 4-5 Nm in a cross-pattern. Never exceed manufacturer specs. Carbon paste is mandatory to reduce the required clamping force.
- Stem Clamp (carbon steerer): Preload the headset with the top cap bolt first (1-2 Nm, just enough to remove play), then torque the stem clamp bolts to 5-6 Nm. This is the second most common DIY carbon failure.
- Bottle Cage Bolts: Often overlooked. Torque to only 3-4 Nm on carbon frames. Over-tightening can create internal delamination that is invisible from the outside.
- Investment Priority: A quality torque wrench covering the crucial 2-10 Nm range is the single best investment you can make to protect your frame.
Look, Shimano, or Speedplay: Which Carbon Pedal System Saves Your Knees?
The final link in the chain of system compliance is the one connecting you, the rider, to the bike: the pedals. A stiff frame transmitting road buzz can exacerbate underlying biomechanical issues, and nowhere is this more apparent than at the knee. Choosing the right pedal system isn’t about brand loyalty; it’s about finding a system whose characteristics—float, stack height, and Q-factor—match your unique physiology. This is a critical step in preventing chronic knee pain.
« Float » is the most discussed feature—it’s the amount of free rotational movement your foot has while clipped in. While important, the *type* of float is more critical than the amount. Some systems (like Shimano and Look) have a self-centering spring action, while others (like Wahoo Speedplay) offer non-centering « free » float. For some riders, too much free float can feel unstable, while for others, a restrictive, self-centering float can cause the knee to be forced into an unnatural tracking path, causing strain.
Even more important, and often overlooked, is the Q-factor or « stance width. » This is the horizontal distance between your feet on the pedals. A stance width that is too narrow or too wide for your specific hip structure is a primary cause of medial or lateral knee pain. Pedal systems like Wahoo Speedplay excel here, offering multiple spindle lengths to precisely tune your stance width. The following table, adapted from an expert guide to bike stiffness and components, breaks down the key differences.
| Pedal System | Float Range | Float Type | Q-Factor Adjustability | Stack Height | Best For |
|---|---|---|---|---|---|
| Look Keo (standard) | 0° to 9° | Fixed center, free float | None (standard width only) | 13.5mm | Riders with established cleat position, prefer fixed reference |
| Shimano SPD-SL | 0° to 6° | Fixed center, limited float | None (standard width only) | 13.0mm | Lower stack, prefer stability over float, lighter riders |
| Wahoo Speedplay Zero/Comp | 0° to 15° | Free-floating, no center bias | High (multiple spindle lengths: 53-59mm) | 11.5mm (lowest) | Knee issues, need stance width tuning, prefer completely free rotation |
| Time Xpresso | 5° fixed | Pre-release before disengagement | None (standard width only) | 11.0mm | Road feel priority, prefer some float with spring return |
| Note: Float amount is less critical than float TYPE and Q-factor matching to your anatomy. Excessive uncontrolled float can cause knee instability; insufficient float can cause binding. Most knee pain is resolved by stance width adjustment (Q-factor) rather than float changes. | |||||
Ultimately, there is no single « best » pedal system for knee health. The ideal choice is the one that allows your knee to track naturally throughout the pedal stroke. If you suffer from knee pain, experimenting with cleat position, stance width, and different float types is far more likely to yield results than changing your frame.
Frequently Asked Questions About Pedal Choice and Knee Pain
I have pain on the outside of my knee (lateral side) – what adjustment should I try?
Move cleats inward (toward the bike’s centerline) by 2-3mm, or rotate your heel outward by 2-3 degrees. This narrows your stance. If you are using Speedplay pedals, consider trying shorter spindles. This type of pain often indicates that your stance is too wide for your natural hip width.
I have pain on the inside of my knee (medial side) – what should I change?
Move your cleats outward (away from the centerline) by 2-3mm, or rotate your heel inward. This widens your stance. With Speedplay pedals, you could try longer spindles. Pain on the inside of the knee suggests your stance is too narrow, causing your knee to track inward during the pedal stroke.
My knee feels unstable or ‘wobbly’ during the pedal stroke – is more float the answer?
Probably not. Instability is often a sign of too much float or, more commonly, worn cleats that are allowing excessive play. Try reducing the amount of float to a 4-6° range and ensure your cleats are not worn out. True pedalling efficiency and knee health come from a controlled, repeatable movement, not maximum freedom.