A loaded bike’s stability isn’t about the bags; it’s about the frame’s geometric DNA dictating its response to weight.
- Touring bikes use long chainstays, low bottom brackets, and specific trail figures not for aesthetics, but to physically manage the leverage and inertia of luggage.
- Race bike geometry is optimized for explosive power transfer and agility, making it inherently unstable and dangerous when subjected to loads it was never designed for.
Recommendation: Stop fighting your bike. Understand the geometry numbers to choose a frame that works *with* your load, not against it.
You’ve felt it. That moment when the responsive, agile bike you love suddenly transforms into an unpredictable beast. You clip on a set of panniers for a weekend trip, and every turn becomes a negotiation, every gust of wind a threat. The bike sways, weaves, and feels terrifyingly disconnected from your inputs. It’s a common experience for anyone who has tried to press a race or endurance bike into touring service. The standard advice is often to « pack your weight low » or « check your tyre pressure, » and while not wrong, this advice barely scratches the surface.
This ignores the fundamental truth: a bicycle is a complete, dynamic system. Its handling characteristics are not an accident; they are the direct result of a series of deliberate design choices encoded in its geometry. The difference between a stable, load-carrying touring bike and a twitchy, nervous race bike isn’t just the material or the components—it’s the physics baked into its very skeleton. Trying to make one act like the other is a recipe for frustration and failure.
But what if you could understand the « why »? As a frame designer, my world revolves around how subtle changes in angles and lengths translate into a tangible on-road feel. The key isn’t in mystical ‘ride quality’ but in understanding the interplay of forces. It’s a game of trade-offs between stability and agility, comfort and efficiency. This article isn’t about telling you which bike is ‘better’; it’s about giving you the designer’s lens to decode a bike’s DNA. We’ll dissect the crucial geometric elements that dictate how a bike behaves under load, so you can finally understand why your race bike feels so terrifying with heavy panniers and make an informed choice for your next adventure.
This guide breaks down the essential design principles that govern a bike’s handling when loaded. We will explore each key geometric aspect to reveal why a dedicated touring bike is an entirely different machine from its racing counterpart.
Summary: Decoding the Geometric Blueprint for Bike Handling
- Long Chainstays: Why You Need Them to Avoid Heel Strike and Wheelies?
- Low Trail vs. High Trail: Which Handles a Front Load Better?
- Steel is Real? Why Touring Bikes Still Use Chromoly for Comfort
- Heads Up: Why a Tall Head Tube Is Vital for Multi-Week Comfort?
- Lower Center of Gravity: How BB Drop Affects Stability When Loaded?
- Race Geometry or Endurance: Which Handles Power Transfer Better for Amateurs?
- Heavy Items Low: Why Putting Your Cooker in the Seat Pack Is a Mistake?
- Carbon Frame Stiffness: Is It Ruining Your Ride on Rough British Tarmac?
Long Chainstays: Why You Need Them to Avoid Heel Strike and Wheelies?
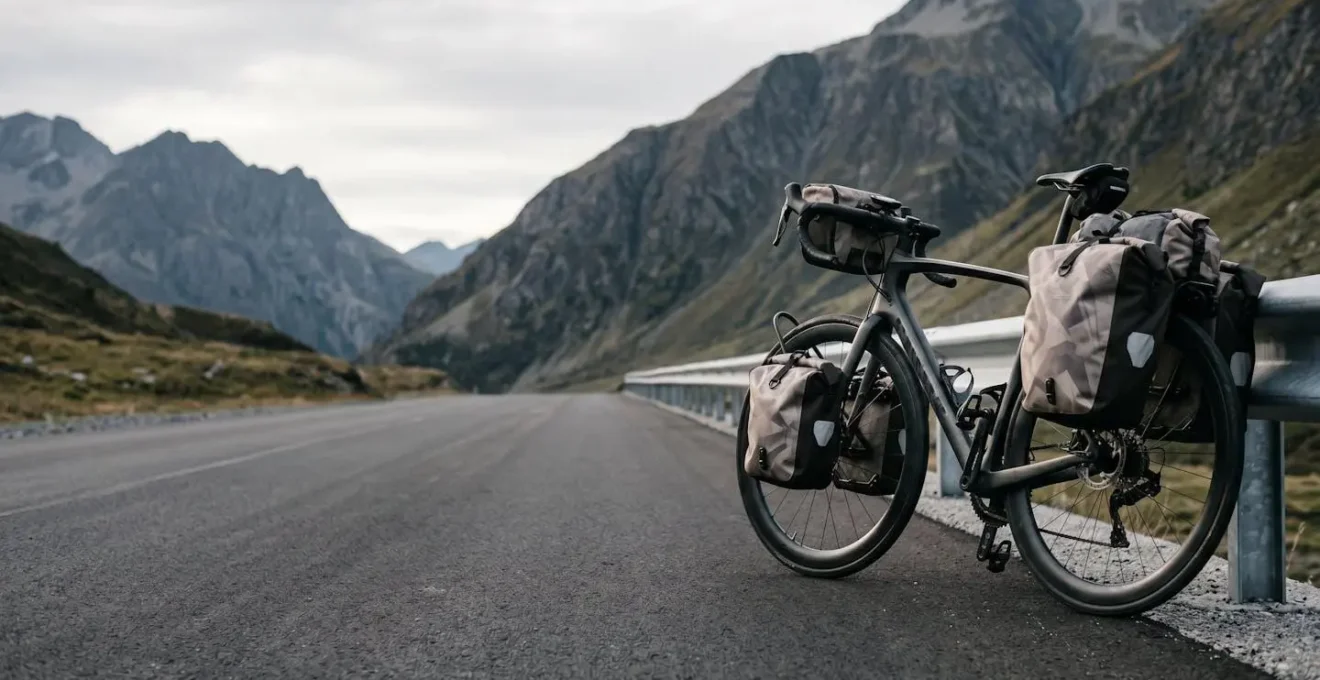
The chainstays—the tubes running from the bottom bracket to the rear axle—are a foundational element of a bike’s handling personality. In the world of racing, the goal is to make them as short as possible for stiffness and rapid acceleration. However, when you add luggage into the equation, this design philosophy becomes a liability. A dedicated touring bike’s geometry tells a different story; road bikes typically feature 405-415mm chainstays compared to touring bikes’ 435-450mm. This isn’t a minor tweak; it’s a fundamental shift in design priority.
This extra length serves two critical functions. First, it provides physical clearance. Shorter stays place the rear panniers directly in the path of your pedalling motion, leading to the infuriating ‘heel strike’ with every rotation. Longer stays simply move the bags further back, solving the problem. Second, and more importantly for stability, it lengthens the bike’s wheelbase. A longer wheelbase creates a larger, more stable platform, making the bike less susceptible to being deflected by bumps or crosswinds. It also shifts the combined center of gravity (rider + luggage) forward, away from the rear axle. This prevents the front wheel from lifting or ‘wheelying’ on steep, loaded climbs—a common and dangerous issue on bikes with short rear-ends.
As the Adventure Cycling Association notes in its guide, « Long chainstays keep the rear panniers away from a rider’s heels and increase the overall wheelbase, further increasing stability. » For a frame designer, this is a non-negotiable trade-off: we willingly sacrifice a fraction of snappy acceleration to gain the predictability and safety required for carrying a load over long distances. It’s the first and most obvious piece of a touring bike’s stability-focused DNA.
Low Trail vs. High Trail: Which Handles a Front Load Better?
If chainstay length governs rear-end stability, the ‘trail’ figure is the master controller of a bike’s steering behaviour. Trail is a geometric measurement derived from the head tube angle and fork offset, defining how the front wheel interacts with the ground. It dictates whether the steering feels quick and darty (low trail) or self-centering and stable (high trail). A race bike is designed for high-speed agility, so it uses a high trail number to feel planted and confident during aggressive cornering. But when you add a heavy load to the front, like in a traditional randonneuring setup with a handlebar bag, this high-trail stability turns into a negative trait known as ‘wheel flop’. The weight exacerbates the wheel’s tendency to fall to one side at low speeds, making the bike difficult to control.
This is where dedicated touring and randonneuring bikes diverge from racing logic. They are often designed with a ‘low trail’ geometry. While counterintuitive, a lower trail figure reduces wheel flop, allowing the bike to handle a front load with grace and predictability. The steering becomes lighter and more neutral, without the heavy, self-wrestling feeling of a loaded high-trail bike. It’s a specific design choice for a specific purpose, and the numbers reflect this; typical trail values are around 65 mm for touring and 55 mm for road bikes, though dedicated front-load carriers can go even lower.
Understanding this concept visually helps. The diagram below illustrates the relationship between the steering axis, the fork, and where the tire contacts the ground—the core elements that create the trail figure.
As the image demonstrates, trail is the distance between the point where the steering axis hits the ground and the center of the tire’s contact patch. A low-trail design minimizes this distance, which in turn minimizes the leverage that a front-mounted bag can exert on the steering. This is why a bike designed for a front load feels so much more intuitive to handle; its geometry is actively working to neutralize the destabilizing effect of the weight, rather than fighting against it.
Steel is Real? Why Touring Bikes Still Use Chromoly for Comfort
The debate over frame materials is as old as cycling itself, with the mantra « steel is real » often touted by traditionalists. While modern carbon fiber and aluminum have enabled lighter and stiffer designs, high-quality steel, particularly chromoly (chrome-molybdenum), remains the material of choice for a vast number of touring bikes. The reason isn’t just nostalgia; it’s a pragmatic engineering decision rooted in comfort, durability, and repairability.
Steel possesses a natural elasticity and vibration-damping quality that other materials struggle to replicate without complex engineering. On a long tour, road buzz from imperfect pavement is a primary source of rider fatigue. A steel frame acts as a filter, absorbing these high-frequency vibrations before they reach the rider, leading to a smoother, less fatiguing ride. Furthermore, steel is exceptionally durable and forgiving. It tends to bend or dent before it catastrophically fails, and unlike carbon, it can be repaired by a welder in almost any corner of the world—a crucial consideration when you are days from the nearest bike shop.
However, the modern perspective, and one I hold as a designer, is more nuanced. As Krysztof from Cycling About argues, « Component choice matters more than frame material when it comes to vibration reduction. » A bike’s comfort is a system. Tire width, pressure, saddle choice, and even handlebar tape play enormous roles. But the frame remains the core of that system. A scientific look into the matter, such as a comparative laboratory study on vibration transmissibility in handlebars, confirms that material properties significantly influence how vibrations are managed. Steel’s inherent damping provides a robust foundation upon which a truly comfortable long-distance machine can be built.
Heads Up: Why a Tall Head Tube Is Vital for Multi-Week Comfort?
A rider’s position is the single most important factor for long-distance comfort. A race bike is designed to put the rider in a low, aerodynamic tuck to cheat the wind. This is achieved with a short head tube, forcing the handlebars down. While efficient for a two-hour race, this aggressive posture places significant strain on the neck, shoulders, and lower back. After days or weeks on the road, this position becomes unsustainable and a primary source of pain and fatigue.
Touring bikes take the opposite approach. They feature a significantly taller head tube, often combined with a more angled or even upward-sloping stem. This raises the handlebars, allowing for a more upright and relaxed riding posture. This isn’t about being ‘less serious’; it’s a calculated design choice that prioritizes biomechanical efficiency and sustainable comfort over pure aerodynamics. An upright position takes weight off the hands, reduces strain on the spine, and improves the rider’s field of vision—all critical factors for safety and enjoyment on a multi-day tour.
But the benefit of a taller head tube goes beyond just ergonomics. It’s also a key lever in managing the bike’s overall weight distribution. A more upright posture naturally shifts the rider’s center of mass rearward. Frame designers account for this. As the experts at Calfee Design note, ideally, a rider should have 45% of the bike + rider’s weight on the front wheel and 55% on the rear wheel for balanced handling. The combination of a tall head tube, longer chainstays, and the appropriate seat tube angle are all carefully orchestrated to achieve this ideal balance, ensuring the bike remains predictable and planted whether climbing, descending, or cruising on the flats.
Lower Center of Gravity: How BB Drop Affects Stability When Loaded?
In the physics of a moving object, a lower center of gravity almost always equals greater stability. Think of a sports car versus a truck; the lower vehicle is more resistant to rolling over. The same principle applies to bicycles. The « bottom bracket drop » (or BB drop) is the vertical distance between the center of the wheel axles and the center of the bottom bracket. A larger BB drop means the bottom bracket—and therefore the rider’s feet and much of their mass—sits lower to the ground. This is one of the most powerful yet subtle tools a designer has to influence a bike’s stability.
Race bikes often have a higher bottom bracket (less BB drop) to improve cornering clearance and prevent pedal strike during aggressive leaning. Touring bikes, however, prioritize stability. By increasing the BB drop, we effectively lower the entire mass of the rider and luggage. This makes the bike feel more planted and « in » the bike rather than « on » it. It’s less susceptible to being pushed around by crosswinds or the shifting weight of its cargo. The difference is palpable; a bike with a low bottom bracket feels inherently more secure and confidence-inspiring, especially when navigating tricky descents with a full load.
This still-life composition represents the core idea: a lower weight is inherently more stable than a higher one. It’s a simple metaphor for a profound handling principle.
Interestingly, this stability doesn’t come at the cost of agility. As BikeRadar points out, « A lower bottom bracket improves stability in much the same way as a longer wheelbase. Counterintuitively, a lower bottom bracket also makes the bike more agile when turning. » By lowering the rider’s mass, it becomes easier to initiate a lean, allowing the bike to carve through turns with a fluid, predictable motion. It’s a win-win for the touring cyclist: more stability on the straights and more confident handling in the corners.
Race Geometry or Endurance: Which Handles Power Transfer Better for Amateurs?
When the goal is raw speed, every watt of power must be transferred to the rear wheel as directly as possible. This is the entire philosophy behind race bike geometry. The key to this is stiffness, particularly in the rear triangle of the frame. Designers achieve this by using oversized tubes and, most critically, by shortening the chainstays. As typical road cycling specifications show, most road bikes feature chainstays between 405mm and 425mm. This creates a very compact, rigid rear triangle.
When a rider stomps on the pedals, the force wants to flex the frame. A shorter, stiffer rear end resists this flex more effectively, meaning more of the rider’s energy is converted into forward motion and less is wasted as frame deformation. The difference is measurable. According to research on the topic, shorter chainstays can accelerate up to 10% faster than their longer counterparts under similar conditions. For an amateur or professional racer, this immediate, snappy response is the desired feeling. It’s the sensation of the bike leaping forward with every pedal stroke.
Endurance bikes often represent a middle ground. They may have slightly longer chainstays and a more relaxed geometry than a pure race bike, but they are still fundamentally designed for an unloaded, performance-oriented experience. They prioritize vertical compliance for comfort over the sheer, uncompromising stiffness of a race machine. However, both geometries share the same fatal flaw when it comes to load-carrying: they are optimized for power transfer and agility in an *unloaded* state. The very features that make them feel fast and responsive—short wheelbase, stiff rear end, high bottom bracket—are the same features that make them feel terrifyingly unstable when you introduce the leverage and inertia of heavy panniers.
Heavy Items Low: Why Putting Your Cooker in the Seat Pack Is a Mistake?
You’ve chosen the right bike, with geometry built for stability. But how you load that bike is just as critical as its design. The cardinal rule of packing for cycle touring is simple: keep heavy items low and centered. Violating this rule is the fastest way to ruin your bike’s handling, regardless of its geometry. The reason lies in a physics principle called the moment of inertia—the resistance of an object to changes in its rotational motion.
Placing a heavy object, like a camp stove or a full water bladder, high up in a seat pack or on top of a rear rack dramatically raises the bike’s center of gravity. This creates a pendulum effect. Every time you lean the bike or it gets pushed by a gust of wind, that high-up weight swings with greater leverage, trying to pull the bike off its line. It makes the bike feel top-heavy and wanting to « fall » into turns, requiring constant correction from the rider. This is physically and mentally exhausting.
This image of hands holding weights illustrates the principle perfectly. A weight held low and close to the center is easy to control. A weight held high and far away is unstable and requires immense effort to manage.
Conversely, placing dense, heavy items in low-rider front panniers or a frame bag keeps the mass close to the bike’s roll axis. This minimizes the moment of inertia, allowing the bike to feel nimble and responsive despite the extra weight. The bike can be leaned and corrected with minimal effort because the weight is not fighting you with leverage. This is why a well-packed touring bike can feel surprisingly agile, while a poorly-packed one feels like a barge. Mastering this hierarchy of packing is the final step in achieving a stable, confidence-inspiring ride.
Action Plan: The Hierarchy of Packing
- Keep weight close to the center of gravity: Frame bags and downtube locations are optimal for dense items like tools, food, and water.
- Use low-rider front panniers for heavy gear: Mounting heavy equipment like a stove or spare parts low on the fork improves bike handling, even when rolling heavy.
- Distribute load between front and rear: Avoid placing all your weight on the rear rack, which significantly raises the center of mass and can make the front end feel light and unstable.
- Reserve high mounting points for lightweight, bulky items: Sleeping bags, sleeping pads, and clothing are perfect for seat packs and handlebar rolls.
- Manage volume across multiple bags rather than concentrating mass: The touring philosophy is about balanced distribution, which differs from the minimalist, centralized approach of bikepacking.
Key Takeaways
- Long chainstays are essential for rear stability, heel clearance, and preventing the front wheel from lifting on loaded climbs.
- Low-trail geometry is specifically designed to counteract ‘wheel flop’ and provide neutral, predictable steering with a front load.
- A lower bottom bracket (more BB drop) directly lowers the bike’s center of gravity, dramatically increasing stability without sacrificing agility.
Carbon Frame Stiffness: Is It Ruining Your Ride on Rough British Tarmac?
Carbon fiber is the wonder material of the modern cycling industry. Its high stiffness-to-weight ratio allows designers to create incredibly light and efficient frames. However, the pursuit of stiffness can be a double-edged sword, especially on the variable and often rough surfaces found on roads across the globe, like the infamous « British tarmac. » An overly stiff frame transmits every single road imperfection directly to the rider, leading to a harsh, chattering ride that is not only uncomfortable but also saps energy and confidence.
As a designer, the beauty of carbon is its ‘tunability.’ Unlike metals, which have uniform properties, carbon composites can be laid up in specific orientations to be stiff in one direction (for power transfer) and compliant in another (for comfort). A well-designed carbon frame is not just ‘stiff’ or ‘compliant’; it’s a meticulously engineered filter. However, many mass-market carbon frames are overbuilt for stiffness to pass stringent lab tests and appeal to marketing narratives, neglecting real-world comfort. As one contributor in a Bike Forums discussion noted, « Composites will allow you to manipulate the aspects a little more individually… but the interplay is still there. »
Case Study: Design Intent Trumps Material
A field test by CyclingAbout provides a stark real-world example. It pitted an « exceptionally overbuilt » Kona Honzo ST hardtail, noted for its harsh and stiff ride, against a boutique Neuhaus Metalworks steel frame. The steel frame, designed with compliance in mind, proved far more comfortable, especially when the rider was out of the saddle and their body could no longer act as suspension. This demonstrates a crucial point: the designer’s intent and execution are more important than the raw material. An overbuilt, harsh frame is harsh, whether it’s made of steel, aluminum, or carbon. Conversely, a thoughtfully designed frame can be comfortable, regardless of material.
This brings us back to the core idea: a bike is a system. It’s not about carbon vs. steel or stability vs. agility in isolation. It’s about how all these elements—geometry, material, and load—are orchestrated by the designer to fulfill a specific purpose. A race bike is a finely tuned instrument for unloaded speed. A touring bike is a robust, reliable platform for carrying a load in comfort and safety. Using one for the other’s purpose is like asking a sprinter to run a marathon; the underlying DNA is simply not programmed for the task.
So, the next time you look at a bicycle, don’t just see a collection of parts. Look at its geometry chart. See the story it’s telling, and choose the bike whose story matches the adventure you want to have.