The common belief that simply adding flared bars will fix descending instability is a critical misunderstanding.
- True control comes not from the flare itself, but from systematically re-engineering your entire cockpit—stem, levers, and stack height—to work with it.
- Ignoring the « ergonomic cascade » caused by flare often leads to new problems, like poor brake reach and wrist strain, negating any potential benefits.
Recommendation: Instead of a simple swap, approach flared handlebars as a full ergonomic system audit to unlock true comfort and confidence on rough terrain.
You know the feeling. The gravel track points downwards, the surface gets loose, and your hands instinctively tighten on the bars. It’s a white-knuckle ride, one where confidence is eroded by every jarring impact and the nagging ache building in your wrists. The common advice you’ll hear is simple: « Get some flared handlebars. » It’s presented as the panacea for gravel control and comfort, a quick fix for descending woes.
While well-intentioned, this advice only scratches the surface. Many riders adopt wide, 24-degree flared bars and find themselves in a new world of discomfort, unable to comfortably reach their brake levers or suffering from a different kind of hand numbness. They’ve addressed one symptom but ignored the underlying system.
But what if the secret wasn’t the flare itself, but how that flare forces a complete re-evaluation of your entire cockpit? As an ergonomic designer, I see the handlebar not as an isolated component, but as the primary interface of a complex system connecting you to your bike. Changing its shape triggers an ergonomic cascade, altering lever position, wrist angle, weight distribution, and steering dynamics. The real gain in confidence doesn’t come from just bolting on a new bar; it comes from understanding and optimizing this entire system.
This article will deconstruct that system. We will move beyond the superficial discussion of « more flare equals more control » and delve into the biomechanical trade-offs. We will explore how flare impacts lever access, how bar diameter and tape choices form a vibration damping system, and how the relationship between bar width and stem length is the true foundation of your downhill confidence.
This guide breaks down the essential ergonomic factors to consider when adopting flared handlebars. By understanding these interconnected elements, you can transform your cockpit from a source of pain and instability into a finely tuned system for ultimate control.
Summary: Mastering Cockpit Ergonomics for Flared Handlebars
- 12 vs. 24 Degrees: How Much Flare Is Too Much for Road Riding?
- Angled Hoods: How Flare Affects Your Brake Lever Position and Comfort?
- Gel or Foam: Increasing Bar Diameter to Reduce Hand Numbness
- Short Reach: Why You Can’t Reach the Brakes on Flared Bars and How to Fix It?
- Width Matters: How Flared Drops Create Space for Larger Bar Bags?
- Bar Width and Stem Length: Is Your Cockpit Killing Your Downhill Confidence?
- Low Trail vs. High Trail: Which Handles a Front Load Better?
- Stability vs. Agility: Why a Race Bike Feels Terrifying with Heavy Panniers?
12 vs. 24 Degrees: How Much Flare Is Too Much for Road Riding?
The first decision in the ergonomic cascade is the degree of flare, and it’s a game of significant trade-offs. A modest 12-degree flare offers a subtle increase in control in the drops without drastically altering the hood position. This is often the sweet spot for all-road riding. A dramatic 24-degree flare, however, fundamentally changes the bike’s handling profile and aerodynamic efficiency. While this wider stance provides a powerful lever for control on technical singletrack, it comes at a cost on open roads. The wider your arms, the more you act like a parachute. In fact, independent wind-tunnel testing shows that a mere 20mm reduction in handlebar width can save 15-25 watts at 50 km/h.
This illustrates the core conflict: stability vs. speed. Pro teams and performance-oriented brands understand this delicate balance. For instance, Trek’s design for the Madone SLR features handlebars with a subtle flare, precisely engineered to provide an aerodynamic improvement by narrowing the hood position while still offering a wider, more stable platform in the drops. Their testing found this optimized shape yields a significant advantage without the full penalty of an ultra-wide bar.
For the gravel rider concerned with both technical descents and long, fast flats, the choice isn’t about what’s « best » but what’s optimal for the majority of their riding. A 24-degree flare is a specialist tool for maximizing off-road control, while a 12-16 degree flare represents a more versatile compromise, enhancing stability without completely sacrificing aerodynamic performance and traditional road ergonomics. Choosing your flare is the first step in defining your bike’s overall purpose.
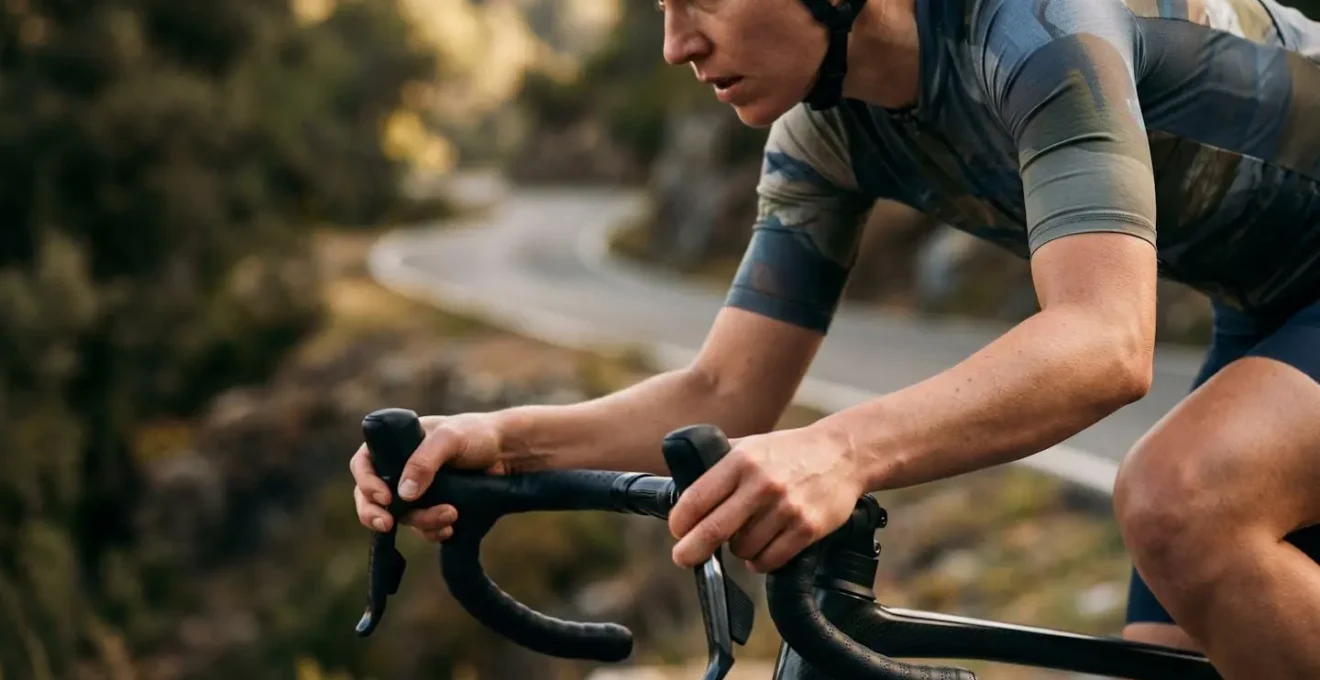
Angled Hoods: How Flare Affects Your Brake Lever Position and Comfort?
Perhaps the most immediate and impactful consequence of a high-flare handlebar is the change to the brake hood and lever position. As the drops flare outwards, the hoods are canted at an angle. This can be a double-edged sword. For some riders, this angled position can feel more natural, but for many, it creates a new ergonomic problem: ulnar deviation, or the outward bending of the wrist. This unnatural angle puts pressure on nerves and tendons, leading to the very wrist pain you sought to eliminate.
As bike fitting specialists at MyVeloFit emphasize, the goal is always a neutral wrist. They state, « For any of these issues it is important to make sure your hands and wrists are in a neutral position with minimal ulnar or radial deviation and minimal wrist extension. » A flared bar can easily disrupt this neutrality. The key is to recognize that the hood angle is now a critical setup variable. You may need to rotate the hoods slightly inward on the bar to counteract the outward flare and restore a straight line from your forearm through your wrist to your fingers.
This neutral position is essential for both long-term comfort and immediate control, ensuring you can apply consistent pressure to the brakes without straining your joints.
As you can see in the alignment, a proper setup ensures the force from the road is transmitted up the arm’s bone structure, not through sensitive tissues in the wrist. The lever axis must be accessible and comfortable. If reaching the levers requires you to bend or strain your wrist, you’ve traded one problem for another. The angle of your hoods is not an accident of flare; it is a critical adjustment that demands your full attention.
Gel or Foam: Increasing Bar Diameter to Reduce Hand Numbness
Hand numbness, often called « cyclist’s palsy, » is a direct result of two factors: sustained pressure and high-frequency vibration. Physiotherapist and bike fitter Nicole Oh explains that it « usually stems from contact at the handlebar and compression of the ulnar nerve. » While a flared bar can help by offering more hand positions, it doesn’t solve the core issue of road and trail chatter traveling up the fork and into your hands. This is where we must think of the handlebar not as a simple pipe, but as a component within an integrated vibration damping system.
The first line of defense in this system is the bar tape. Modern tapes go far beyond simple grip, incorporating gel or foam compounds designed to absorb and dissipate vibrations before they reach the ulnar nerve. Increasing the effective diameter of the handlebar by using thicker tape (3-5mm) or adding gel pads underneath accomplishes two things. First, it provides more cushioning. Second, it allows you to grip the bar more lightly with a more open hand, reducing the constant pressure that compresses nerves and restricts blood flow. The choice between gel (excellent pressure distribution) and foam (superior vibration damping) depends on whether your pain comes from pressure points or road buzz.
Some riders even « double wrap » their bars for maximum diameter and cushioning on extreme terrain. While gloves are part of the equation, scientific research on vibration transmission shows that bar tape provides a significantly larger drop in transmitted power compared to gloves alone. Therefore, treating your bar tape as a tunable suspension component, rather than a cosmetic afterthought, is a fundamental step in designing a comfortable and confidence-inspiring cockpit.
Short Reach: Why You Can’t Reach the Brakes on Flared Bars and How to Fix It?
You’ve installed your new 24-degree flared bars, and on the first descent, you realize the terrifying truth: your brake levers feel a million miles away. This is the most common and dangerous consequence of the ergonomic cascade. The flare not only moves the drops outwards but also effectively increases the « reach » to the brake lever from the drop position. Your fingers, which used to comfortably curl around the lever, now struggle to make contact. This compromises control, delays reaction time, and kills descending confidence.
Fixing this is not about stretching your fingers; it’s about systematically adjusting the cockpit’s geometry to bring the levers back to you. This is a multi-step process that involves re-evaluating the entire control triangle of your setup. Simply changing the handlebar is not enough; you must now tune the stem and levers in response. A shorter stem, for example, brings the entire handlebar assembly closer to your body, often solving the problem more effectively than a « short reach » handlebar alone.
Before making expensive component changes, a thorough audit of your current setup’s adjustment potential is essential. Many of these reach issues can be mitigated or solved entirely with the tools you already have. The key is to be methodical.
Action Plan: Optimizing Brake Reach on Flared Bars
- Assess Cockpit Geometry: Measure your current stem length, handlebar reach, and stack height. Understand your baseline before making changes.
- Prioritize Stem Length: Consider reducing stem length first. A 10mm shorter stem can have a more profound and positive impact on reach and overall body position than a new handlebar.
- Utilize Lever Adjustments: Use the often-ignored reach adjustment screws on your Shimano, SRAM, or Campagnolo brake levers. This can bring the lever blade 2-5mm closer to the bar, which can make all the difference.
- Fine-Tune Hood Angle: Experiment with rotating the hoods slightly inward on the bars. This can compensate for the outward cant caused by flare and improve the lever’s accessibility from both the hoods and the drops.
- Test and Validate: After any adjustment, perform a test ride on varied terrain. Comfort on the flats does not guarantee control on a steep, bumpy descent. Verify your setup under real-world conditions.
Width Matters: How Flared Drops Create Space for Larger Bar Bags?
While the primary driver for flared handlebars is ergonomic control, a significant and highly practical side-effect is the creation of usable space. For bikepackers and long-distance tourists, handlebar « real estate » is a precious commodity. Traditional drop bars offer very limited width, making it difficult to mount a handlebar bag without interfering with hand positions or brake and shifter cables. This is another area where a wide, flared bar transforms the bike’s capability.
The flare angle creates a wider, more stable platform between the drops, providing ample clearance for larger roll-style handlebar bags. This allows riders to carry more gear—like a sleeping system or cooking equipment—on the front of the bike. According to the technical team at Redshift Sports, this wider stance does more than just hold gear; it improves control *with* that gear. They note that the flared drops allow for « easy access to the brakes and keeps the center of gravity low which means more control. » Mounting a bag lower, between the flared drops, is inherently more stable than strapping a tall, narrow bag on top of a standard road bar.
This creates a virtuous cycle: the flare that adds control also adds carrying capacity, and it allows you to carry that load in a more stable manner.
The geometric space created is undeniable. This additional volume is not just for bags; it also provides more room for mounting lights, GPS computers, and other accessories without crowding the primary hand positions. For the adventure-oriented cyclist, this transformation of the handlebar from a simple steering interface to a load-bearing structure is one of the most compelling reasons to embrace flare.
Bar Width and Stem Length: Is Your Cockpit Killing Your Downhill Confidence?
If the handlebar is the steering wheel, the stem is the steering column. Their relationship is the absolute core of your bike’s handling characteristics, especially when descending. A common mistake is to change one without considering the other. A wide handlebar paired with a long stem—a common setup on older road or touring bikes—creates slow, sluggish steering and places your weight too far forward, a recipe for instability on steep, technical terrain. Conversely, a narrow bar with a short stem results in twitchy, unpredictable handling. Your descending confidence is directly tied to getting this pairing right.
The principles are clear, and research on cockpit geometry demonstrates that shorter stems (50-70mm) create quicker, more agile steering, while longer stems (90-130mm) provide more stability at speed. When you add a wider, flared handlebar, you are increasing the leverage you have over the front wheel. To prevent this increased leverage from feeling unwieldy, it must be paired with a shorter stem. This brings your hands back towards the steering axis, preserving the quick, responsive feel needed for navigating obstacles while benefiting from the stability of the wider stance.
This principle was perfected in another discipline, offering a clear lesson for gravel riders.
Case Study: The Mountain Bike Evolution
Modern trail and enduro mountain bikes have universally adopted the combination of ultra-wide bars (780-800mm) and very short stems (30-50mm). This specific pairing was developed for one primary reason: to maximize control and confidence during aggressive descending on rough, unpredictable surfaces. The wide stance provides a stable platform and immense leverage for steering inputs, while the short stem keeps the handling direct and responsive, preventing the « tiller effect » of a wide bar/long stem combo. This allows riders to perform the dynamic weighting and quick line corrections that are essential for high-speed descending.
The lesson for gravel riders is clear: as your bar width increases, your stem length should decrease. This isn’t just a trend; it’s a fundamental principle of steering geometry. Finding the right balance in this bar-to-stem ratio is arguably the single most important factor in building a bike that feels stable and confidence-inspiring when the trail points down.
Low Trail vs. High Trail: Which Handles a Front Load Better?
As we move deeper into the ergonomic system, we must look beyond the cockpit to the frame’s geometry itself, specifically the « trail » figure. Trail is a complex geometric measurement involving head tube angle and fork offset, but its effect is simple: it determines how the front wheel wants to self-center. A high-trail bike (common on race bikes) is very stable at high speeds in a straight line but can feel « floppy » and resistant to turning at low speeds, especially when loaded. A low-trail bike (common on traditional randonneuring bikes) feels nimble and easy to steer at low speeds and has a unique ability to self-center even with a heavy front load in a handlebar bag.
So, how does this interact with your flared handlebar? A wide bar gives you more leverage. As the team at bike-components notes, « More width means more leverage and thus more control. » This leverage can be used to your advantage. On a high-trail bike, the added leverage from a wide bar helps you « muscle » the front wheel into turns at lower speeds, overcoming its desire to flop. It makes a stable but sometimes stubborn bike feel more manageable.
On a low-trail bike, the effect is even more pronounced. The combination of a geometry designed to carry a front load and a wide, flared bar giving you maximum control over that load is the holy grail for many bikepackers and tourists. The wide bar provides the leverage needed to easily manage the weight of a front bag, while the low-trail geometry ensures the bike doesn’t try to wrest control from you. Understanding your bike’s trail figure helps you understand why a certain handlebar setup might feel great on one frame and terrible on another. It’s a key piece of the stability puzzle.
Key Takeaways
- Handlebar flare is not a component; it’s a system-wide change that triggers an « ergonomic cascade » affecting reach, comfort, and control.
- True descending confidence is built on the relationship between bar width and stem length—wider bars demand shorter stems to maintain responsive handling.
- Comfort is an engineered outcome, achieved by treating bar tape, gel, and gloves as a tunable vibration damping system to protect the ulnar nerve.
Stability vs. Agility: Why a Race Bike Feels Terrifying with Heavy Panniers?
Anyone who has tried to load a featherlight carbon race bike with heavy panniers has experienced a terrifying lesson in physics. The bike, designed for pure agility and power transfer, suddenly becomes a wobbly, unpredictable mess. This is because it was designed as a closed system for one purpose: going fast with an unencumbered rider. Its steep angles, short wheelbase, and high-trail geometry prioritize responsiveness over stability under load. Trying to force it into a touring role is fighting against its very nature.
This same principle applies to your cockpit. A gravel bike’s cockpit is an open system, designed to be adapted for control, comfort, and carrying capacity. The introduction of wider, flared handlebars is a key enabler of this adaptability. As measurements from bikepacking handlebar analysis show, typical gravel handlebars range from 42-48cm wide with 10-30 degree flare angles, a stark contrast to the 38-44cm classic road bars. This extra width is a direct response to the need for greater stability and leverage when riding on unpredictable surfaces, often with a load.
As the editors at BIKEPACKING.com point out, this « additional width creates a more natural position… and adds stability and leverage while climbing and descending. » A wider « control triangle »—the space between your hands and your core—gives you a more stable platform from which to pilot the bike. It allows for the subtle, dynamic weight shifts that are crucial for maintaining traction and control on loose gravel or dirt. A narrow race bar, by contrast, restricts this movement, forcing you into a rigid position that is easily unsettled. The stability you gain from a properly set-up flared bar is the very reason a race bike feels so terrifyingly agile when used outside its intended purpose.
By viewing your cockpit not as a collection of parts but as an integrated ergonomic system, you move from merely reacting to discomfort to proactively engineering confidence. The process starts with a single choice—the handlebar—but it only succeeds when you follow the cascade of adjustments to its logical conclusion.