The key to your first bikepacking trip isn’t buying the most expensive gear; it’s deciding what kind of adventurer you want to be.
- Your gear choices are a series of trade-offs between weight, comfort, and cost, not a simple shopping list.
- Success depends more on skills like navigation and finding shelter than on owning ultralight equipment.
Recommendation: Start by defining your personal « comfort threshold » and use that to build flexible gear systems, rather than aiming for a perfect, one-size-fits-all kit.
You’ve seen the photos: a bike silhouetted against a mountain sunset, loaded with sleek bags, promising ultimate freedom. As a road cyclist, you understand endurance, but the leap to multi-day, off-road bikepacking feels like a chasm. The internet screams at you with endless lists of ultralight tents, titanium stoves, and complex GPS units. The barrier to entry seems to be a four-figure spending spree and a PhD in logistics. This overwhelming focus on *what* to buy completely misses the point.
Most guides present bikepacking as a gear-intensive puzzle, where the only solution is to acquire more, lighter, and more expensive equipment. They differentiate it from traditional, on-road touring by its minimalist, off-road ethos, but then immediately push a maximalist shopping list. This creates a paradox that paralyzes many would-be adventurers before they even pedal a single metre off-road.
But what if the fundamental question wasn’t « What gear do I need? » but rather, « What is my personal adventure style? » The choice isn’t a simple binary between a plush B&B (credit card touring) and a freezing night in a ditch (hardcore camping). It’s a spectrum. The secret to a successful first trip lies not in owning the ‘perfect’ kit, but in understanding this spectrum and building a decision framework that works for you. It’s about balancing your personal comfort threshold with your appetite for risk.
This guide will walk you through the key decisions that define your bikepacking philosophy. We won’t give you a shopping list. Instead, we’ll equip you with the strategic questions to ask yourself, helping you build systems for sleeping, cooking, and navigating that match your ambitions, whether you’re tackling a challenging route or finding a quiet spot for the night.
To help you navigate these choices, this article breaks down the core dilemmas every new bikepacker faces. The following summary outlines the key decisions we will explore, from route difficulty to essential survival skills.
Summary: A Decision Framework for Your First Bikepacking Adventure
- The King Alfred’s Way: Is It Too Hard for Your First Bikepacking Trip?
- Bottles or Bladder: How to Carry 3 Litres of Water on a Full-Suspension Bike?
- Bivvy Bag vs. Tent: Which Offer the Best Sleep in Wet British Weather?
- Stealth Camping: How to Find a Spot Where You Won’t Be Disturbed?
- The Wet Wipe Shower: Staying Clean When You Are 2 Days from a Bathroom
- Jetboil or Alcohol Stove: Which Works Best on a Windy Mountain Top?
- No Signal in the Valleys: Why Offline Maps Are Essential for Welsh Adventures
- Highlands Survival: Preparing for Remote Solo Bikepacking in Scotland
The King Alfred’s Way: Is It Too Hard for Your First Bikepacking Trip?
The King Alfred’s Way (KAW) is often marketed as an accessible, multi-day introduction to British bikepacking. It conjures images of rolling hills and historic landscapes. But accessibility in bikepacking doesn’t mean « easy. » For a road cyclist accustomed to smooth tarmac and predictable gradients, the off-road reality can be a shock. The challenge isn’t a single, brutal climb; it’s the cumulative effect of rough surfaces, steep, punchy ramps, and the mental load of navigation over several days.
The route itself is a significant undertaking. Covering a distance of 353km (219 miles) with varied stages, it demands consistent effort. One cyclist’s account of their first bikepacking trip on the KAW serves as a powerful case study. They described Day 1 as one of their « top ten toughest rides, » citing the « unrelenting hills » after Farnham. Their conclusion is a critical piece of wisdom for any beginner: « the King Alfred’s Way is certainly not a route for the inexperienced. »
This highlights a core principle: your physical fitness as a roadie is just one part of the equation. You must also account for the friction of the unknown. A 100km day on the road is worlds away from a 100km day on bridleways, navigating gates, and pushing your bike through mud. The KAW can be a fantastic first trip, but only if you approach it with the right mindset: plan for shorter days (50-60km), accept that you will be slower, and see it as a test of your systems and resilience, not just your legs.
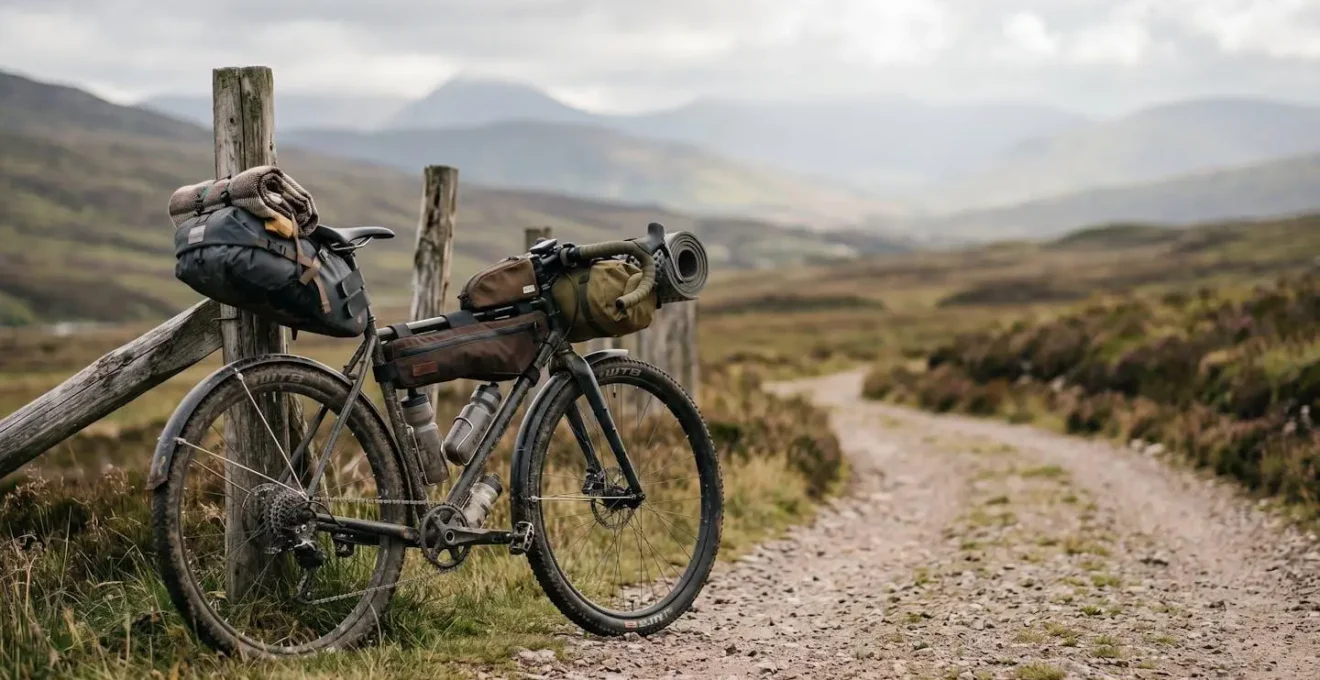
Bottles or Bladder: How to Carry 3 Litres of Water on a Full-Suspension Bike?
On the road, two 750ml bottles are usually sufficient. Off-road, especially in remote areas, carrying 3 litres or more becomes a necessity. This presents a major challenge on full-suspension bikes where the frame’s main triangle, your go-to bottle spot, is compromised by the rear shock. This is where you must shift from thinking about individual items to designing a holistic water-carrying system.
Simply strapping bottles everywhere is a recipe for poor handling and lost equipment. The goal is to keep the weight low, and centred, and distribute it logically. A hydration bladder, or reservoir, becomes a powerful tool. As noted by the experts at BIKEPACKING.com, a one or two-litre bladder can often fit snugly inside a frame bag on most medium or large mountain bikes, keeping the centre of gravity low and stable.
As the image above suggests, the technology of these systems is robust, but integrating them is an art. A hybrid approach is often the most effective solution for carrying significant volume on a full-suspension frame. This involves combining different methods to optimize access and weight distribution. Consider this strategy:
- Bulk Storage: A 2-litre hydration bladder inside your frame bag serves as your main reservoir.
- Quick Access: A single 750ml bottle mounted on the downtube (often possible even with a rear shock) for sips on the move or for mixing electrolyte drinks.
- Expansion: Fork-mounted cages or a small backpack can carry an additional bottle for exceptionally long, dry stretches.
- Processing: Instead of carrying all your water, carry less volume but pack a lightweight filter (like a Sawyer Squeeze). This transforms streams and taps into refuelling stations, drastically reducing your total system weight.
Bivvy Bag vs. Tent: Which Offer the Best Sleep in Wet British Weather?
Your sleep system is the heart of your overnight kit and the source of endless debate. The choice between a minimalist bivvy bag and a small tent is a classic bikepacking dilemma, especially in the notoriously damp UK. This decision is a perfect example of a risk-vs-reward calculation, where you trade weight and bulk for psychological comfort and weather protection. There is no single ‘best’ answer; there is only the right answer for your trip and your personal comfort threshold.
A bivvy bag is essentially a waterproof, breathable sack for your sleeping bag. Its primary advantages are its tiny pack size and incredibly low weight (300-600g). However, its major drawback in wet weather is condensation. As one community expert on Bike Forums wisely noted, « In wet, cool weather, your own breath is the biggest challenge. » Without proper ventilation, moisture from your breath and body can condense inside the bag, leaving your sleeping bag damp and compromising its insulating properties.
A tent offers a sanctuary. Even a small, one-person bikepacking tent (800-1500g) provides « livable space » to sit up, change clothes, organize gear, and mentally reset while the rain drums down outside. A double-wall design is particularly effective at managing condensation. The following table breaks down the key trade-offs, based on an in-depth analysis of shelter systems.
| Factor | Bivvy Bag | Tent |
|---|---|---|
| Condensation Management | Higher risk – sleeping bag touches inner surface; requires breathable fabrics (Gore-Tex) and strategic ventilation | Better air circulation; double-wall designs separate breath moisture from outer shell |
| Setup Speed | 30-90 seconds | 5-15 minutes |
| Psychological Comfort | Cocoon security but claustrophobic in rain; no living space | Livable space to wait out storms; can sit up and organize gear |
| Wind Resistance | Excellent – low profile, minimal flapping | Vulnerable to flapping canvas anxiety in high winds |
| Weight (typical) | 300-600g | 800-1500g |
Stealth Camping: How to Find a Spot Where You Won’t Be Disturbed?
Finding a place to sleep is perhaps the most intimidating part of wild camping. In the UK, where approximately 70% of land is privately owned, you can’t just pitch a tent anywhere. « Stealth camping » is the art of finding a discreet spot, setting up late, leaving early, and leaving absolutely no trace. It’s a skill, not a gear purchase, that unlocks true freedom. Success hinges on observation, timing, and respect.
The ideal spot is invisible and unobtrusive. Look for « soft edges »—transition zones between different types of land, like the border of a forest and a field, or a patch of forgotten woodland between two farms. These areas are less likely to be actively managed or visited. Use digital tools like satellite views on Google Maps or Gaia GPS during the day to scout these potential zones from afar, looking for natural cover and access points away from roads and houses.
As the landscape above illustrates, the best locations use natural topography and vegetation for concealment. The key is not to hide, but simply not to be seen. This requires a disciplined timeline and a commitment to the principles of Leave No Trace. The goal is for no one to ever know you were there.
Your Action Plan: The Stealth Camping Timeline
- Afternoon Reconnaissance: Use digital maps to identify potential « soft edge » zones. Look for tree cover, natural depressions, and areas away from paths and buildings.
- Golden Hour Evaluation: Ride past your primary choice around sunset. Assess its visibility from any nearby roads or houses and check for signs of recent activity (tyre tracks, litter).
- Dusk Setup: Return to your chosen spot just as the light is fading. Set up your shelter quickly and quietly. Avoid using bright headtorches and keep noise to an absolute minimum.
- Dawn Departure: Pack up completely before the sun rises. Be on your bike and riding away as it gets light, leaving your spot exactly as you found it.
- Zero-Impact Presence: Ensure every piece of litter is packed out. Avoid breaking branches or disturbing vegetation. Your goal is to be a ghost.
The Wet Wipe Shower: Staying Clean When You Are 2 Days from a Bathroom
When you’re miles from the nearest shower, hygiene becomes about more than just social acceptability; it’s a cornerstone of morale and health. Chafing, saddle sores, and low spirits can end a trip faster than a mechanical failure. Forgoing a shower doesn’t mean forgoing cleanliness. A disciplined field hygiene routine is a non-negotiable part of your daily bikepacking system.
The « wet wipe shower » is a well-known technique, but a truly effective hygiene system is more comprehensive. It involves a three-part kit and a preventative strategy. The goal is a quick, efficient routine that leaves you feeling human again before you climb into your sleeping bag. Experienced bikepackers consistently highlight the immense psychological benefit of this simple act. As one testimony on multi-day trips notes, a simple 5-minute routine of washing your face, brushing your teeth, and changing into clean socks provides a critical « mental reset » that dramatically improves sleep quality and overall trip morale.
Think of it as a Field Hygiene Protocol, broken down into distinct kits:
- Body Kit: A small bottle of biodegradable soap, a lightweight microfibre towel, and a pack of thick, unscented biodegradable wet wipes form your core « shower. »
- Dental Kit: Chewable toothpaste tabs eliminate messy tubes, and a folding toothbrush saves space. Keep this kit accessible for quick use.
- Clothes Kit: Your clothing is part of your hygiene system. Merino wool’s natural antibacterial properties are invaluable. Implement a sock rotation system (one pair to wear, one drying, one clean) and dedicate a « sleeping-only » base layer that never sees the outside of your tent. This creates a clean sanctuary for sleep.
- Preventative Care: The best cure is prevention. Apply anti-chafe cream before every ride and take every opportunity to air out your bib shorts, even if it’s just for 15 minutes during a lunch stop.
Jetboil or Alcohol Stove: Which Works Best on a Windy Mountain Top?
The moment you decide to cook your own meals, you enter another classic bikepacking debate: canister stove vs. alcohol stove. This choice is a microcosm of the entire bikepacking philosophy, pitting speed and convenience against simplicity and low weight. On a calm evening, both work fine. But on a windy, exposed mountaintop—a common scenario in the UK—their differences become starkly apparent.
A canister stove system, like a Jetboil, is an integrated unit that excels at one thing: boiling water fast. It’s convenient and powerful, but its performance degrades in cold and wind as canister pressure drops. An effective windscreen is essential to maintain efficiency. An alcohol stove, by contrast, is a triumph of minimalist engineering—often just a tiny metal burner weighing as little as 15g. It’s silent, simple, and the fuel is readily available. However, its low heat output makes it extremely vulnerable to wind, which can easily extinguish the flame or drastically increase boil times.
The decision shouldn’t just be about the stove itself, but the total system weight for your trip’s duration. For a short trip, the heavier canister stove might actually be the lighter option overall once you factor in the integrated pot. For a longer trip, the lighter alcohol stove and the high energy density of its fuel can pull ahead. A detailed weight comparison for a 3-day trip illustrates this perfectly:
| System | Stove Weight | Fuel Weight (3 days) | Pot/Accessories | Total System Weight | Wind Performance |
|---|---|---|---|---|---|
| Jetboil (Canister) | 200g | 230g (full canister) | Integrated (windscreen needed) | ~430g | Good with windscreen; reduced efficiency in cold/wind as canister pressure drops |
| Alcohol Stove | 15g | 180g (60ml/day) | Pot 150g + windscreen/stand 50g | ~395g | Poor without integrated windscreen system; low heat output struggles in wind |
| No-Cook/Cold-Soak | 0g | 0g | Wide-mouth jar 100g | ~100g | Perfect – completely unaffected by wind, cold, or altitude |
No Signal in the Valleys: Why Offline Maps Are Essential for Welsh Adventures
In the city, your smartphone is a reliable navigator. In the steep-sided valleys of Wales or the rolling downlands of Southern England, it’s often just a camera with a dead signal. Relying on a live data connection for navigation in the British backcountry is not just risky; it’s reckless. Cellular dead zones can last for hours, and it’s in these moments of isolation that a simple wrong turn can escalate into a serious situation. Offline maps are not a backup; they are your primary navigation tool.
Routes like the King Alfred’s Way are a case in point, with riders regularly reporting 4-6 hour stretches with zero mobile signal through its more remote sections. This isn’t an inconvenience; it’s a fundamental parameter of the environment you must plan for. This is where the concept of navigation redundancy becomes critical. You should always have three layers of navigation, ensuring that if one system fails, you have another ready to go.
This « Three-Layer System » is a professional safety protocol adapted for bikepacking:
- Primary Navigation: A dedicated GPS cycling computer (like a Garmin or Wahoo). The route should be pre-loaded and tested. Its key advantage is its long battery life (15-20 hours) and rugged, weatherproof design.
- Secondary Backup: Your smartphone. Before you leave, download the entire route for offline use in an app like Komoot, Gaia GPS, or OS Maps. Keep the phone in airplane mode to conserve battery and protect it in a waterproof case.
- Tertiary Emergency: A paper map and a simple compass. This analogue system is immune to battery failure or electronic glitches. At a minimum, carry a waterproofed printout of the day’s route section. Know how to use it to identify your last known position and orient yourself.
Key takeaways
- Your first trip is an experiment to discover your personal balance between comfort and minimalism.
- Core skills like navigation, finding shelter, and field hygiene are more valuable than owning the ‘best’ gear.
- Build your kit around flexible ‘systems’ (sleep, cook, water) that can adapt to different conditions and trip lengths.
Highlands Survival: Preparing for Remote Solo Bikepacking in Scotland
Venturing into the Scottish Highlands solo is the ultimate expression of bikepacking self-sufficiency. Here, the landscape is vast, the weather is famously fickle, and help can be hours, or even days, away. While Scotland’s « Right to Roam » laws make wild camping legal and encouraged (when done responsibly), this freedom comes with a profound responsibility for your own safety. Preparation is not just about packing the right gear; it’s about having robust mental and communication protocols.
Psychological challenges are often more demanding than physical ones in such remote areas. A simple mechanical issue or a bout of bad weather can quickly lead to decision fatigue and loneliness. Experienced solo adventurers develop « mental first aid » strategies to cope. This can include downloading podcasts for evening companionship, keeping a simple journal to process the day, or setting small, achievable goals (e.g., « just reach that next loch ») to maintain momentum. These small routines provide an essential psychological anchor.
Your most important piece of survival gear is your communication plan. Before you leave, you must establish a clear protocol with a trusted contact at home. This is not optional.
- Pre-Trip Documentation: Leave a detailed document with your contact, including your planned route (GPX file), daily waypoints, and emergency numbers for local services like mountain rescue.
- Check-In Schedule: Establish a strict daily check-in time (e.g., « I will text by 8 PM each night »). If you miss it, this is the trigger for your contact to act.
- Panic Protocol: Define a clear escalation procedure for your contact (e.g., « If you don’t hear from me by 10 AM the next day, start calling these numbers »).
- Satellite Communication: In the Highlands, a satellite messenger like a Garmin inReach is not a luxury; it’s essential safety equipment, allowing for check-ins and an SOS signal far beyond mobile coverage.
- Bail-Out Points: For every day of your route, identify and mark potential escape routes on your map—the nearest road, village, or train station. Knowing you have an ‘out’ provides a massive psychological safety net.
Your journey into bikepacking begins not with a credit card, but with a series of questions. Start by planning a simple overnighter close to home. Test your systems, find your comfort threshold, and begin to define your own unique style on the wide spectrum between fully supported comfort and minimalist survival. The adventure is waiting.