Success in the Highlands isn’t about the lightest gear; it’s about mastering robust survival systems and making critical decisions before you’re in trouble.
- Your mindset and decision-making frameworks for weather, repairs, and navigation are more valuable than any single piece of kit.
- Survival is built on redundancy. Key systems for communication, water, and navigation must have reliable backups.
Recommendation: Shift your focus from what you pack to how you think. Internalise the frameworks for self-reliance before you even leave home.
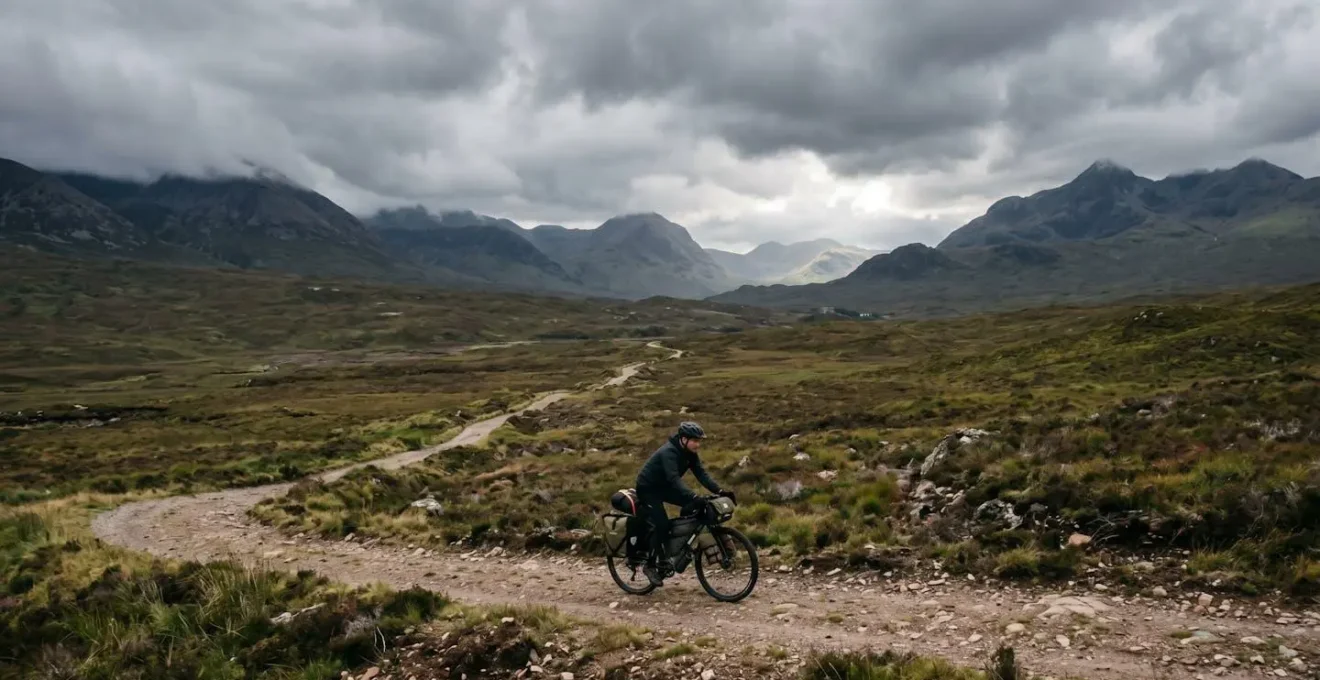
The image of a solo rider silhouetted against a vast, empty Highland glen is a powerful one. It speaks of freedom, resilience, and a deep connection with the wild. Many experienced cyclists, drawn by this promise, spend months planning their gear, meticulously shaving grams off their setup and debating the merits of different tyre widths. They arrive with the best kit money can buy, believing they are prepared for anything the Scottish mountains can throw at them. Yet, as a veteran of mountain rescue, I know that preparation goes far beyond the gear list.
The common advice focuses on what to pack: waterproofs, a good tent, a reliable stove. While essential, this is merely the entry ticket. It doesn’t teach you how to think. It doesn’t prepare you for the moment a sideways sleet storm pins you down on an exposed bealach, miles from the nearest track. It doesn’t help when a simple mechanical failure becomes a trip-ending, potentially dangerous, long walk out. The real key to survival in remote terrain isn’t found in a catalogue; it’s forged in a mindset of self-reliance, systems thinking, and sober decision-making.
This guide deliberately steps away from generic gear lists. Instead, we will focus on the decision frameworks and hard-won lessons from the field. We will deconstruct the specific challenges of the UK’s wild spaces, from the persistent damp and ferocious winds to the unique mechanical stresses of coastal touring. You will learn not just what to do, but why you’re doing it, and how to make the right call when you are cold, tired, and completely on your own. This is about building the resilience to not just survive your trip, but to truly master it.
To navigate these critical topics, this guide is structured around the key decisions and challenges you will face in the field. From emergency communication and responsible wilderness practice to knowing when to turn back, each section provides a framework for thinking like an expedition leader.
Summary: A Veteran’s Guide to Solo Bikepacking Survival in the Highlands
- Spot vs. InReach: Do You Need a Satellite Tracker for UK Wilderness?
- Jetboil or Alcohol Stove: Which Works Best on a Windy Mountain Top?
- Cat Holes and Trowels: How to Deal with Human Waste Responsibly?
- The Spare Hanger: Essential Repairs You Must Know Before Leaving Civilization
- Escaping the Storm: When to Bail Out on a Mountain Route?
- Backcountry Survival: The 3 Spares You Must Carry on Remote Welsh Trails
- The Salt Air Factor: Why You Need to Rinse Your Bike Daily on Coastal Trips?
- Salt, Wind, and Hills: The Specific Challenges of Touring the UK Coast
Spot vs. InReach: Do You Need a Satellite Tracker for UK Wilderness?
Let’s be clear: in the vast, signal-free expanses of the Scottish Highlands, your mobile phone is a camera and a GPS device, not a communication tool. For a solo rider, a satellite tracker or messenger isn’t a luxury; it’s a fundamental part of your safety system. The question isn’t *if* you need one, but *which* system aligns with your risk tolerance. These devices have become an increasingly common sight in the backcountry, providing a vital link when all other options fail. The primary decision boils down to one-way versus two-way communication.
A one-way device like a SPOT Gen3/4 allows you to send pre-set « I’m OK » messages and, critically, trigger an SOS that sends your location to emergency services. It’s a simple, reliable beacon. However, you receive no confirmation that your message has been sent or that help is on its way. An InReach device, using the global Iridium satellite network, provides two-way text messaging. This is a game-changer. In an emergency, you can communicate the nature of your incident, coordinate with rescue teams, and receive confirmation that help is coming. This ability to provide context— »I have a broken ankle, I’m stable and sheltered »—is invaluable for both your morale and the efficiency of a rescue.
The following table, based on a detailed bikepacking gear comparison, breaks down the key differences to help you make an informed decision. The trade-off is typically cost and subscription fees versus the immense psychological and practical benefit of two-way communication.
| Feature | SPOT Gen 3/4 | Garmin InReach Mini |
|---|---|---|
| Communication Type | One-way messaging | Two-way messaging |
| Weight | ~115g | ~100g (half the size of Explorer) |
| Battery Life | Up to 3 weeks | Up to 20 days |
| Message Confirmation | No confirmation | Sent message confirmation |
| Custom Messages | Pre-set messages only | Custom text messages |
| Satellite Network | Globalstar | Iridium (global coverage) |
| Price Point | Lower (~$150) | Higher (premium device) |
| SOS Function | Basic SOS button | SOS with two-way coordination |
Jetboil or Alcohol Stove: Which Works Best on a Windy Mountain Top?
A hot meal at the end of a long, wet day in the Highlands is more than just calories; it’s a critical morale booster. But getting a stove to perform on a gusty, exposed campsite is a real challenge. Your stove choice shouldn’t be based on weight alone, but on its performance within a « hot meal system » designed to function in adverse conditions. The single biggest enemy of any stove is wind. It doesn’t just blow the flame out; it strips heat away from the pot, dramatically increasing boil times and fuel consumption. In fact, windy conditions can easily slash cooking times by 30% or more if the stove is not properly shielded.
An alcohol stove, like a Trangia, is simple, silent, and has no moving parts to fail. This is its strength. Its failure point, however, is wind. While often integrated into an effective windshield system, it struggles in strong, swirling gusts. A canister stove system, like a Jetboil or MSR WindBurner, is designed as an integrated unit where the pot and burner lock together, creating a highly efficient and wind-resistant system. These are heavier and more complex, but their reliability in poor weather is unmatched. For solo travel in Scotland, where you can’t rely on a partner to build a human windbreak, this is a major consideration. The key is to create shelter for your stove, no matter the type.
As the image shows, using natural features like rocks or a depression in the ground is the first line of defence. For canister stoves, design makes a huge difference. As the experts at CleverHiker note when testing various models, a recessed burner design is paramount for performance in the wind.
The WindMaster outperforms other stoves in windy conditions because the recessed burner has a lip around it, and there’s very little open space between the burner head and the pot.
– CleverHiker Gear Testing Team, Best Backpacking Stoves Testing Review
Cat Holes and Trowels: How to Deal with Human Waste Responsibly?
Riding solo through Scotland’s magnificent landscapes comes with a profound responsibility to leave them exactly as you found them. The Scottish Outdoor Access Code grants us the right to wild camp, a privilege that depends on impeccable conduct. This is especially true when it comes to human waste. A brightly coloured piece of toilet paper snagged on heather can ruin the wild experience for everyone who follows. « Leave No Trace » is not a suggestion; it’s a strict protocol, and getting it right is a non-negotiable part of backcountry expertise.
The primary method is the « cat hole ». This is more than just digging a random pit. It’s a systematic process designed to maximise decomposition and minimise visual and environmental impact. You need a lightweight trowel—don’t try to use a tent peg or the heel of your boot, as you won’t be able to dig an adequate hole in tough, peaty soil. The location is the most critical factor: you must be well away from water sources, trails, and your campsite. The rule of thumb is a minimum of 30 meters (or about 100 feet), but in areas with grazing animals like sheep or deer, it’s wise to increase that distance to 50 meters or more.
Most importantly, all toilet paper must be packed out. It biodegrades incredibly slowly in the cool, damp Scottish soil and is visually jarring. Carry a dedicated zip-lock bag (or a dry bag with an opaque colour) for this purpose. In some areas, particularly the rocky plateaus of the Cairngorms, digging a proper hole is impossible. In these fragile environments, you must be prepared to use commercial « WAG bags » and pack out all solid waste. This is the gold standard of responsible wilderness travel.
Your Checklist for Proper Cat Hole Protocol
- Location First: Before digging, identify a spot at least 30-50 meters from any water source, trail, or camp. Look for rich, dark organic soil which aids decomposition.
- Dig Deep: Use your trowel to dig a hole 15-20cm (6-8 inches) deep. The goal is to reach the microbially active soil layer, not just the surface vegetation.
- Pack It Out: All toilet paper and sanitary products must be placed in your designated waste bag to be carried out. No exceptions.
- Refill and Disguise: After use, backfill the hole with the original soil, then cover the spot with natural material like leaves or pine needles to make it invisible.
- Sanitise: Clean your hands thoroughly with hand sanitiser immediately after. Your trowel should also be cleaned away from water sources.
The Spare Hanger: Essential Repairs You Must Know Before Leaving Civilization
On a remote track, a mechanical failure is never just an inconvenience. It can be the start of a serious situation. Self-reliance is the core of solo bikepacking, and nowhere is this more critical than in your ability to perform essential field repairs. Your repair « system » isn’t just the multi-tool you carry; it’s the combination of the right spares, the correct tools, and—most importantly—the practiced knowledge of how to use them under pressure. You must know how to fix the most common trip-ending failures before you leave civilisation, not hope to learn from a YouTube video with no signal.
While a puncture is the most frequent issue, it’s rarely a disaster. The real show-stoppers are the failures that immobilise your drivetrain or compromise your bike’s structure. As field data from long-distance bikepacking events shows, a few key failures occur time and time again. Mastering the fixes for these is your highest priority. A spare derailleur hanger, a chain quick-link, and a tyre boot are not optional extras; they are as essential as your sleeping bag. Without them, you face a long walk.
Case Study: Common Bikepacking Mechanical Failures and Field Solutions
An analysis of bikepacking race data shows the most common failures requiring field repair include: derailleur hanger snaps (solvable with a spare hanger or single-speed conversion), chain breaks (requires quick-link or chain tool mastery), tire sidewall tears (fixable with tire boot and duct tape), and rack mount failures (manageable with zip ties and improvisation). Every year many bikepackers lose critical equipment due to inadequate securing methods – pre-trip testing of repair skills and mounting systems is essential for remote Highland routes where rescue can take hours.
Before your trip, you should practice these repairs at home: swap a derailleur hanger, break and rejoin a chain using a quick-link, and patch a tyre sidewall. This practice builds muscle memory and confidence, so you’re not fumbling with cold hands and a sinking feeling in your stomach. Your repair kit should be built around these specific tasks. Don’t just carry a generic multi-tool; ensure it has the chain breaker you need and that you have the correct Allen keys for your specific rack and bottle cage bolts.
Escaping the Storm: When to Bail Out on a Mountain Route?
Of all the skills required for solo travel in the mountains, the hardest one to master is knowing when to turn back. Ego, summit fever, and a reluctance to « waste » a day can all lead to poor decisions. In the Highlands, the weather is the ultimate arbiter, and it must be respected. A forecast is a statement of probability, not a guarantee. Your most important tool is a finely tuned sense of observation, combined with a sober, pre-defined decision-making framework. The decision to bail out should be made early, while you still have plenty of energy and daylight, not when conditions have already deteriorated into an emergency.
Your Go/No-Go framework should be based on a constant assessment of three factors: the weather, your physical and mental state, and your position relative to an escape route. Before you even set off, you should have studied your Ordnance Survey (OS) map and identified potential bailout routes for every leg of your journey—a stalker’s path leading down to a glen, a fire road, or a track leading to a bothy or shelter. These are your safety valves. You need to know where they are at all times.
The moment you notice conditions worsening faster than predicted is a major red flag. Is the wind speed preventing you from making forward progress? Has visibility dropped to below 50 meters, obscuring your route? Are you starting to shiver uncontrollably, an early sign of hypothermia? These are not signs to « push through »; they are objective signals telling you to activate your bailout plan. The mountain will still be there tomorrow. The critical thing is to ensure that you are too. Making the call to turn back isn’t a failure; it’s the mark of an experienced and disciplined mountaineer.
Go/No-Go Decision Framework for Highland Weather:
- Forecast vs. Reality: Is the weather deteriorating faster than the forecast predicted? This is your primary warning sign.
- Energy & Time Check: Objectively assess your energy levels. Do you have the reserves and the minimum two hours of daylight needed to reach your planned destination or the nearest safe bailout point?
- Escape Route Proximity: Check your map. How far are you from the nearest pre-identified escape route? Is it safely accessible in the current conditions?
- Physiological Red Flags: Be honest with yourself. Are you experiencing uncontrollable shivering, confusion, or extreme fatigue? These are urgent signs to descend immediately.
- Environmental Dangers: Are water levels in streams rising, making crossings dangerous? Is the wind so strong it’s forcing you off balance? If the environment becomes objectively hazardous, the decision is made for you.
Backcountry Survival: The 3 Spares You Must Carry on Remote Welsh Trails
While this section title references Welsh trails, the principles of backcountry survival are universal across the UK’s wild places. Survival isn’t about a single magic item, but about robust, redundant systems. When you are truly alone, you need to think in terms of systems for your three most critical needs: navigation, hydration, and energy. If any one of these systems fails without a backup, you are in a serious situation. Forget the fancy gadgets and focus on these fundamentals. Your entire trip’s safety rests on them.
First is your navigation system. Relying solely on a GPS device or smartphone is a rookie mistake. The failure point is the battery. Your primary system should be a paper OS map of the area and a compass. You must have the skills to use them. Your backup is your electronic device, but it must be supported by its own system: a fully charged battery bank (minimum 10,000mAh) and pre-downloaded offline maps. One is useless without the other.
Second is your water purification system. The Highlands are blessed with abundant water, but not all of it is safe to drink, especially downstream from grazing animals. Your primary system might be a hollow-fibre filter like a Sawyer Squeeze. What’s your backup for when it clogs, freezes, or gets lost? A small bottle of chemical purification tablets or drops weighs almost nothing and provides a crucial secondary method. Knowing how to identify safer water sources—fast-flowing streams high up the mountain, far from livestock—is the knowledge part of this system.
Third is your emergency calorie system. This is not your planned daily food. This is a 2000+ calorie dense food cache that you do not touch unless it’s an emergency. It lives at the bottom of your pack and consists of items that don’t need cooking: nuts, dense energy bars, chocolate. This is your fuel to stay warm and think clearly if you are benighted or have to spend an unplanned night out on the hill. In the Highlands, a midge net is also a crucial piece of psychological survival gear in the summer months.
The Salt Air Factor: Why You Need to Rinse Your Bike Daily on Coastal Trips?
Bikepacking along the rugged UK coast offers breathtaking views but introduces a silent, relentless enemy to your bike: salt. The fine, salty mist carried on the wind gets into every nook and cranny of your machine. It’s not just about obvious rust on the chain; it’s a highly corrosive agent that attacks bolts, seizes brake pistons, and degrades fabrics. Ignoring it for even a day or two can lead to significant mechanical issues. A daily de-salting routine isn’t obsessive; it’s essential preventative maintenance.
The key is to focus on the corrosion hotspots. Brake caliper pistons, bolt heads (especially those for racks and bottle cages), cable ferrules where the housing meets the frame stops, and spoke nipples are all prime targets. Your chain is the most obvious victim and requires daily attention. The salt air works its way into the rollers, accelerating wear and causing stiffness. Even non-metallic components suffer; salt can degrade the fabric of your panniers and, more critically, seize the zippers, locking you out of your own gear.
You don’t need to carry gallons of water for this. The « minimal water » technique is highly effective. A small 500ml spray bottle filled with fresh water and a microfibre cloth are all you need. At the end of each day, systematically spray and wipe down the critical components. Pay special attention to the drivetrain and brakes. After rinsing the chain, let it dry, then apply a fresh coat of lube. This simple, ten-minute routine is one of the highest-value investments you can make in your bike’s longevity and reliability on a coastal tour. A pre-trip application of a marine-grade corrosion inhibitor like Boeshield T-9 on the frame and components can also provide a valuable protective barrier.
Daily De-Salting Routine:
- Targeted Rinse: Use a spray bottle to apply fresh water directly to brake calipers, the derailleur, bolt heads, and the entire chain.
- Wipe Down: Use a microfibre cloth to wipe away the salt and grime. A separate, dirtier rag should be used for the chain.
- Chain Care: After wiping the chain clean and dry, apply one drop of high-quality lube to each roller. Cycle the drivetrain and wipe off any excess.
- Inspect Hidden Areas: Briefly check under fenders and around the bottom bracket shell for salt build-up.
- Protect Zippers: Lightly spray and wipe the zippers on your bike bags to prevent them from seizing.
Key Takeaways
- Think in Systems, Not Items: Your safety relies on robust, redundant systems for communication, navigation, and repairs, not on a single piece of gear.
- Master the Decision Framework: Knowing when to turn back from a storm is a more critical skill than any repair. Make the call early, while you still have safe options.
- Prevention is a Discipline: Daily bike maintenance on coastal routes and meticulous adherence to Leave No Trace principles are not optional chores; they are core components of expert-level bikepacking.
Salt, Wind, and Hills: The Specific Challenges of Touring the UK Coast
Touring the UK’s coastline, particularly in places like the Scottish Highlands, presents a unique and demanding set of challenges that go beyond those of inland routes. It’s not just one thing; it’s the combination of three relentless environmental stressors that creates a unique « energy equation » you must constantly manage: salt, wind, and hills. Underestimating this cumulative effect is a common mistake that can drain a rider’s physical and mental reserves far faster than anticipated. Success here requires a different strategy for planning, pacing, and gear.
The wind is often the dominant factor. A demoralising headwind off the sea can easily reduce your speed by 40% and turn a flat section into an exhausting grind. Unlike inland, there is often little shelter. This constant battle drains not just physical energy but also mental resolve. The hills, while perhaps not as long as alpine climbs, are frequently short, brutally steep, and relentless. A route that looks manageable on a map can involve thousands of feet of climbing in a series of sharp « bealachs » or coastal rollers. Finally, the pervasive, salty damp saps warmth and morale. Equipment that performs when wet, like synthetic insulation and fully waterproof packing systems, becomes critical.
The Highland Coast Energy Equation
Highland coastal touring combines relentless short, steep climbs, demoralising headwinds, and pervasive damp. Successful coastal bikepackers budget both physical and mental energy. They add at least 30% more time to standard distance calculations and plan for shorter daily distances (e.g., 40-60km vs. 80-100km inland). Route planning becomes a tactical exercise, using topographical analysis to ride in the lee of hills during prevailing winds and timing exposed sections for favourable weather windows. Gear strategy must prioritise equipment that can be deployed and packed away in high winds and that maintains performance when soaked.
Managing this energy equation means adjusting your entire approach. Daily distances must be more conservative. Your nutrition and hydration strategy needs to account for the higher energy output. Most importantly, your mental strategy must be robust. You have to accept that some days you will make slow progress, and that’s okay. The goal is not to conquer the coast, but to move with it, using smart route planning and pacing to conserve energy for the long haul. It is the ultimate test of an all-round bikepacker.
The journey to becoming a self-reliant solo bikepacker is a process of shifting your focus from equipment to expertise. It’s about cultivating a mindset that prioritises sober assessment, preventative action, and a deep respect for the mountain environment. Start building these decision-making frameworks now, long before you pack your bags.