In summary:
- True flow comes from a system of proactive control, not just releasing the brakes.
- Master the « Now-Next-Later » vision technique to read the trail far ahead of your front wheel.
- Your attack position, with heels down and light hands, is the foundation for stability on rough terrain.
- Tune your suspension for control and balance, focusing on rebound and air volume, not just softness.
- Know your gear and trail etiquette to ride with confidence and respect.
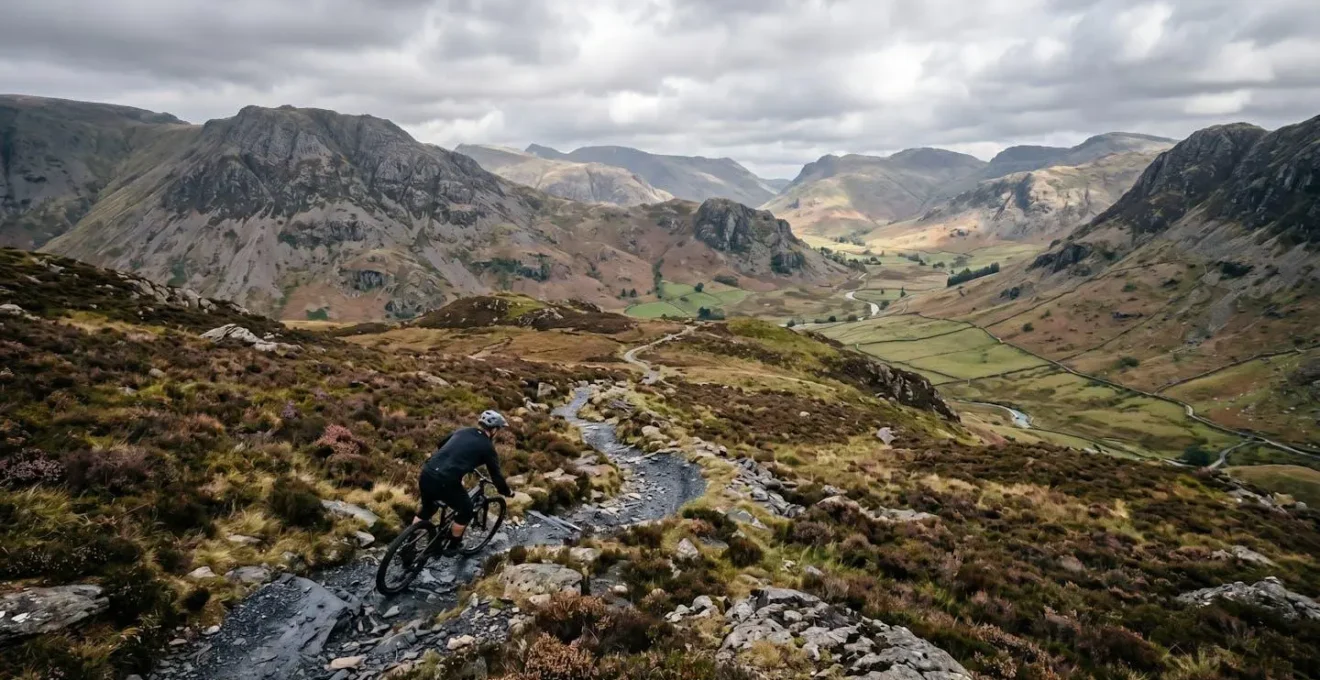
We’ve all been there. You’re on a stunning piece of natural singletrack in the Lakes, the kind of trail that looks incredible on video. But instead of flowing, you feel like a passenger in a pinball machine. It’s a constant battle of grabbing the brakes, getting knocked off-line by a rock, and stalling out, only to pedal furiously to regain speed before the next obstacle. Your riding feels choppy, inefficient, and frankly, less fun than it should be. You’ve heard the usual advice: « just look further ahead » or « let go of the brakes, » but on a jagged, unpredictable trail, that feels like a recipe for disaster.
This feeling of being reactive, constantly on the back foot, is what separates intermediate riders from those who seem to float over technical terrain. But what if the secret wasn’t about being braver or simply braking less? What if the key to unlocking that smooth, effortless momentum was a complete system? A system that combines how you see the trail, how you position your body, and how your bike is set up to work for you, not against you. This is the philosophy of proactive control, where braking becomes a conscious, deliberate choice rather than a panicked, flow-killing reaction.
This guide isn’t about telling you to just « send it. » It’s about giving you the tools of a local legend—the techniques to become so prepared for the trail ahead that the need for constant braking simply melts away. We will deconstruct this system piece by piece, starting with the most critical element: your vision. Then, we’ll build your foundation with body position and finally, fine-tune your machine to be the perfect partner for the challenging, rewarding trails the UK has to offer.
In this comprehensive guide, we’ll break down the essential components that transform a choppy ride into a masterclass in flow. Follow along as we explore each element of this system, giving you the practical knowledge to conquer the rockiest of trails.
Summary: A System for Unlocking Effortless Trail Flow
- Looking Ahead: The Vision Technique That Adds 10% to Your Speed Instantly
- Attack Position: Why Your Heels Should Be Down When the Trail Gets Rough?
- Backcountry Survival: The 3 Spares You Must Carry on Remote Welsh Trails
- Beyond the Trail Centre: How to Find Legal Bridleways Worth Riding in the UK?
- Hikers and Horses: How to Share Narrow Trails Without Causing Conflict?
- Bucking Bronco: How to Tame Your Rebound for Controlled Landings?
- High Line or Low Line: Where to Place Your Tyres on Off-Camber Roots?
- How to Tune Your Rear Shock for Rooty British Woods Without Losing Pop?
Looking Ahead: The Vision Technique That Adds 10% to Your Speed Instantly
The single biggest difference between a rider who stalls and one who flows is where their eyes are. If you’re staring at the rock directly in front of your wheel, you’re already too late. You’re constantly reacting to problems. Proactive control begins with your eyes. You need to be processing the trail in multiple stages, giving your brain enough time to make smooth, calculated decisions about line choice and speed. This isn’t just about glancing up; it’s a disciplined scanning process. As one professional MTB coach puts it in his advice for riders, the challenge is multilayered: « Knowing to look ahead and actually knowing how to look ahead and then actually looking ahead are three different things. » This highlights the gap between knowledge and application.
This focused gaze allows you to absorb information about the upcoming terrain while your peripheral vision handles the immediate obstacles. You’re not ignoring the rock in front of you; you’re just not fixated on it. By looking 20 feet down the trail, you’re already deciding where you’ll be in two seconds, allowing you to set your entry speed and line choice far in advance. To make this a habit, you need a structured framework.
Your Action Plan: The Now-Next-Later Scanning Framework
- NOW Zone: Process the trail 3-5 feet ahead. This is for immediate hazard avoidance and micro-adjustments to your line. Your peripheral vision largely handles this.
- NEXT Zone: Scan 10-15 feet ahead. This is your primary focus for setting up for the next corner, root garden, or drop. You’re positioning the bike based on what’s in the NEXT zone.
- LATER Zone: Look 20+ feet ahead. This is for strategic planning. You’re identifying the fastest line, anticipating gradient changes, and managing your overall speed for the entire section.
- Actively scan between zones: Your focus should shift fluidly. On fast, open sections, you’ll spend more time in the LATER zone. In tight, technical sections, you’ll focus intently on the NEXT zone until you’re committed, then immediately look to the NEXT feature.
- Drill this on familiar trails: Consciously call out « Next! » and « Later! » as you ride, forcing your eyes up and away from your front wheel until it becomes second nature.
Attack Position: Why Your Heels Should Be Down When the Trail Gets Rough?
Once your vision is sorted, the next piece of the system is your body. Your bike can have the best suspension in the world, but the most effective suspension you own is your arms and legs. The « attack position » is your ready-state for anything the trail throws at you, and the secret to a stable one is in your feet. Dropping your heels when the trail gets rough is a game-changer. It does two critical things: it lowers your centre of gravity, making you vastly more stable, and it drives your weight into the pedals, loading the tyres for maximum grip. This creates the feeling of « heavy feet, light hands, » which is the essence of proactive control. You’re supporting your body mass with your strong leg muscles, freeing up your arms to be supple and steer with precision, rather than acting as rigid props.
When your heels are down, your weight is braced against the bike’s acceleration and deceleration. As the bike pitches forward over rocks or under braking, this position prevents you from being thrown over the handlebars. It allows the bike to move freely underneath you while your core remains stable and balanced. This is the physical key to staying calm and composed. Instead of being a rigid passenger getting bounced around, you become a dynamic pilot, absorbing impacts and guiding the bike where your eyes have already decided to go. It’s the foundation upon which all other skills are built.
Here are the key elements to check for a strong, dynamic attack position:
- Position your weight evenly over the bottom bracket when on flat ground.
- Level your pedals (cranks horizontal), with the ball of your foot on or slightly ahead of the pedal spindle.
- Drop your heels towards the ground, maintaining a slight but powerful bend in your knees.
- Support your core mass with your legs. Think heavy feet, light hands.
- Stand tall, with knees bent and open, creating a large space for the bike to move beneath you.
- Keep your head up (looking ahead!) and maintain a straight line from your hips to your head.
- Maintain a slight bend in your arms with elbows wide, and always keep one finger covering each brake lever.
Backcountry Survival: The 3 Spares You Must Carry on Remote Welsh Trails
Flow is not just about technique; it’s about confidence. And nothing shatters confidence faster than the fear of a mechanical failure miles from the nearest road. A simple puncture or a snapped chain can turn an epic day in the remote Welsh hills into a very long, frustrating walk home. Having the right spares and the knowledge to use them is your insurance policy for flow. It frees your mind from the « what if » scenarios, allowing you to focus 100% on the trail ahead. This isn’t about carrying an entire workshop, but about a smart, lightweight kit that covers the most common trailside disasters. This isn’t just paranoia; trail data shows that approximately 70% of all trailside mechanicals are tire-related, making a solid repair kit your best insurance policy.
Your « Flow Insurance Kit » should be built around three critical systems on your bike: air system integrity, drivetrain failures, and cockpit/control loss. For tires, you need to be able to fix a puncture that sealant won’t handle. For the drivetrain, a broken chain is a ride-ender without the right tool. And for your cockpit, a loose bolt can lead to a total loss of control. Having a spare derailleur hanger specific to your frame is a lesson many riders learn the hard way—it’s a small, fragile part that can end your ride in an instant if it bends or breaks. Investing in these few key items is one of the smartest upgrades you can make.
Your essential spares should cover these three categories:
- Air System Integrity: A tubeless repair kit (bacon-strip style) with an insertion tool is essential. Also carry a spare inner tube, at least two good tire levers, and a patch kit for good measure. For speed, a CO2 inflator gets you back on the trail fastest.
- Drivetrain Failures: Always carry 2-3 quick links that match your chain’s speed (e.g., 12-speed). A chain breaker tool is non-negotiable, and a small spare section of chain is a pro move.
- Cockpit & Control Loss: A quality multi-tool with 2, 2.5, 4, 5, 6mm hex keys and a T25 Torx will handle most bolts. Crucially, carry a spare derailleur hanger that is specific to your bike frame. Zip ties and a small roll of duct tape can perform miracles for all other emergencies.
Beyond the Trail Centre: How to Find Legal Bridleways Worth Riding in the UK?
While trail centres offer guaranteed fun, the true spirit of adventure riding in the UK lies in exploring its vast network of public rights of way. However, navigating this network can be a minefield. The reality of UK trail access can be frustrating; official figures show that cyclists are excluded from 78% of public rights of way in England, as we are generally restricted to bridleways and byways. Finding the good stuff—the legal, flowing singletrack disguised as a bridleway—requires some detective work. Relying on luck is a recipe for ending up on boggy, unrideable paths or, worse, trespassing on footpaths and creating conflict.
Your best tools are digital. Ordnance Survey (OS) maps are the definitive source, clearly marking bridleways with green dashed lines. Apps like Komoot, Strava, and Trailforks layer this data with user-generated content, allowing you to see which bridleways are popular with other riders—a strong indicator of ride quality. Look for « heatmap » features to see where people are actually riding. When scouting a new route, pay close attention to the contour lines on the map. Tightly packed contours indicate steep, technical terrain that could be either an epic descent or an unrideable climb. Cross-referencing a potential route on multiple platforms is the best way to build a picture of the trail before you even leave the house.
Case Study: The Walla Crag Bridleway Claim
A powerful example of rider-led access improvement happened right in the Lake District. In Keswick, local riders successfully secured legal access to a popular trail on Walla Crag by claiming it as a public bridleway. Using Strava heatmap data as evidence of over 20 years of public use, they presented their case to the Lake District National Park Authority. This landmark case was the first time the authority accepted Strava data to prove usage and resulted in the creation of a new bridleway on prime mountain bike terrain, setting a powerful precedent for future data-driven access claims across the UK.
Hikers and Horses: How to Share Narrow Trails Without Causing Conflict?
The freedom we enjoy on the UK’s bridleways is a shared privilege, not an exclusive right. As the faster-moving users, the responsibility falls squarely on us, the mountain bikers, to ensure every encounter with hikers, dog walkers, and horse riders is a positive one. A single negative interaction can fuel anti-cycling sentiment and jeopardize access for everyone. Being a « local legend » isn’t just about skill; it’s about being an ambassador for the sport. This means adopting a protocol of proactive courtesy, where you yield early, predictably, and with a friendly attitude. The goal is to be seen not as a threat, but as a considerate and welcome member of the outdoor community.
When you encounter a horse, the stakes are even higher. A startled horse is a danger to itself, its rider, and to you. Always stop completely, move to the downhill side of the trail if possible, and speak to the rider in a calm, clear voice. This allows the horse to recognize you as a human and not a silent, fast-approaching predator. For all trail users, slowing down to a walking pace well in advance is the most important first step. A bell can be a useful tool, but a friendly « Hello there! » from a distance is often more effective and personal. Remember, we are all out there to enjoy the same beautiful spaces.
Adopt this simple protocol for every encounter to ensure a positive interaction:
- Announce your presence early: Use a friendly verbal greeting (« Hi there, just coming by when you’re ready! ») from 20-30 feet away.
- Make yourself predictable: Slow to a walking pace long before you reach them. No sudden movements or sounds.
- Execute a full stop: Be prepared to stop completely and pull off the trail, especially for horses or on narrow paths.
- Create a visual connection: Make eye contact and offer a genuine smile or a nod. This non-verbal cue instantly diffuses tension.
- Use reassuring language: Phrases like « Take your time » or « No rush at all » show respect and remove any feeling of pressure.
- Wait patiently: Remain stationary until hikers or horses have completely passed and have space.
- Offer thanks: A simple « Thank you! » or « Have a great day! » as they pass reinforces the positive encounter.
Bucking Bronco: How to Tame Your Rebound for Controlled Landings?
You’ve hit a drop perfectly, but on the landing, the rear of the bike kicks back violently, feeling like a bucking bronco and throwing your weight forward. This uncontrolled feeling is a classic sign of your rebound damping being set too fast. Rebound is the setting that controls how quickly your shock or fork extends after being compressed. If it’s too fast, the spring energy is released without control, literally bouncing you off the ground. If it’s too slow, the suspension can’t recover in time for the next hit; it « packs down, » getting harsher with each consecutive impact. Finding the right balance is crucial for maintaining traction and control. As professional MTB skills instructor Gene Hamilton notes, this imbalance is a common culprit for sketchy riding: « For downhill riders it is usually poor suspension set up, often too soft in the front to stiff in the back and/or really imbalanced rebound. »
Taming the bucking bronco is about finding that Goldilocks setting where the suspension tracks the ground without kicking back or packing down. This isn’t a setting you can find in the car park. You need to test it on the trail, on a section with repeated hits like a root garden or a series of small ledges. The goal is for the wheel to feel like it’s sticking to the ground, with the shock absorbing the impact and returning just fast enough to be ready for the next one. A well-tuned rebound provides a calm, composed, and quiet ride, transforming a chaotic experience into a controlled one and giving you the confidence to let the bike work.
Use this on-trail method to dial in your rebound perfectly:
- Find a test section: Locate a trail segment with 4-6 consecutive, similarly sized roots or rocks.
- Establish a baseline: Start with the manufacturer’s recommended rebound setting for your weight. This is usually a good starting point.
- Run the section: Ride through at a moderate, consistent speed in your attack position, focusing solely on how the suspension feels.
- Assess for ‘packing down’: If the bike feels progressively harsher and sits lower in its travel on the later hits, your rebound is too slow. Speed it up (turn the dial towards the rabbit) by one click.
- Assess for ‘kicking back’: If the bike feels bouncy or like it’s pushing you up and forward after hits, your rebound is too fast. Slow it down (turn towards the turtle) by one click.
- Adjust and re-test: Make single-click changes and ride the same section again. Repeat until the bike feels calm and composed, tracking the terrain smoothly without any drama.
High Line or Low Line: Where to Place Your Tyres on Off-Camber Roots?
You’re approaching a corner and there it is: a lattice of wet, off-camber roots right across the main line. This is a classic flow-killer. Where you choose to place your tires in this situation is a split-second decision that determines whether you rail the corner or slide out. As skills writer Blundar points out, your vision is paramount here: « Look at where you want to go, not at what you are trying to avoid. » Fixating on the slippery root is a surefire way to hit it. Instead, you need to make a conscious choice between the high line, the low line, or, for experts, going straight over.
The high line (going above the root) often allows you to maintain more momentum but offers less grip and carries a higher risk of your tires sliding down the root. The low line (ducking below the root) is generally safer and provides a better surface for your tires to bite into, but it often requires you to slow down more and re-accelerate out of the turn. The choice depends entirely on what comes next. Is the exit a fast straight where you need every bit of speed? The high line might be worth the risk. Does the exit lead into another tight, technical feature where control is paramount? The safer low line is the smarter play. Reading the trail isn’t just about seeing obstacles; it’s about seeing the consequences of your line choice a few seconds into the future.
This table breaks down the risk versus reward of each line choice when dealing with off-camber roots. As this analysis from trail experts shows, the best line depends entirely on your goal for the next section of trail.
| Line Choice | Speed Retention | Grip Level | Risk Factor | Best Used When |
|---|---|---|---|---|
| High Line (above root) | High – maintains corner momentum | Medium – less contact patch | Higher – sliding risk increases | Exit leads to straightaway or climb where maintained speed pays off |
| Low Line (below root) | Low – requires re-acceleration | High – more tire contact | Lower – safer, more predictable | Exit leads to technical section requiring control and precision |
| Over the Root (expert) | Highest – uses root as micro-ramp | N/A – wheel unweighted | Highest – requires timing | Root is isolated and you have unweighting/pre-hop skills mastered |
Key Takeaways
- Flow is a system: It’s the seamless integration of predictive vision, a stable body position, and a correctly tuned bike.
- Master the ‘Now-Next-Later’ scanning process. Your eyes dictate your speed and your line.
- Your foundation is a dynamic attack position with dropped heels, giving you « heavy feet, light hands » for ultimate control.
- Suspension tuning is a game of balance. Use rebound to control the chassis and volume spacers to get both small-bump sensitivity and end-stroke support.
How to Tune Your Rear Shock for Rooty British Woods Without Losing Pop?
Here lies the holy grail of suspension setup: creating a bike that is supple and forgiving over chattery, rooty sections, yet still feels supportive and « poppy » when you want to pump through a compression or launch off a lip. Often, these two traits feel mutually exclusive. If you lower your air pressure to absorb roots, the bike wallows and feels sluggish. If you increase the pressure for more pop, it becomes harsh and skitters across small bumps. For the classic terrain of British woods, where you can encounter a root-laced traverse followed immediately by a jump or a bermed corner, solving this paradox is key to unlocking maximum flow.
The secret lies in separating the behaviour of the shock’s initial stroke from its end stroke. This is achieved using volume spacers (also called tokens). By adding spacers inside your shock’s air can, you reduce the air volume. This makes the spring rate more progressive, meaning it’s still soft at the beginning of the travel (for root sensitivity) but ramps up significantly towards the end (to prevent bottoming out and provide that supportive, poppy feel). This allows you to run slightly lower air pressures for that initial plushness without sacrificing big-hit performance. It’s a relatively simple, reversible adjustment that can completely transform your bike’s character, turning it into a machine that is perfectly adapted to the varied demands of natural trails.
Follow this method to solve the plush vs. pop paradox:
- Add volume spacers: Start by installing one or two volume spacers into your rear shock’s air can according to the manufacturer’s instructions.
- Reduce air pressure slightly: Drop 5-10 PSI from your previous setting. This regains the small-bump sensitivity and suppleness for the roots.
- Test the initial stroke: Ride a chattery section. The shock should now feel more active and plush over small bumps.
- Test the end stroke: Push hard into a big compression, berm, or landing. The bike should now feel much more supportive and resist bottoming out. It will feel like it has more ‘pop’.
- Fine-tune compression: If the bike still feels a bit wallowy when pumping, you can add a few clicks of low-speed compression damping to provide a more stable platform.
This entire process isn’t about a one-time fix. It’s about developing a new relationship with your bike and the trail. Stop being a passenger and start being the pilot. Take these concepts, apply them one at a time on your local trails, experiment, and feel the flow return. The smoothest rider out there is simply the one who is best prepared for what’s next.