The secret to never running out of power isn’t the light you buy, but the charging ecosystem you build.
- Treat charging as a weekly routine with a dedicated station, not a last-minute panic.
- Understand that USB ports, battery aging, and cold weather are your system’s biggest failure points.
Recommendation: Shift from chasing lumens to building systemic reliability for total peace of mind on your commute.
That sinking feeling. You’re halfway through your dark, rainy commute home when your front light sputters and dies. We’ve all been there. The common advice is a simple-sounding upgrade: « Just get a USB-C light. » Or perhaps the classic, « You just need to remember to charge it. » While well-intentioned, this advice misses the point. For a daily commuter, reliability isn’t a feature; it’s the entire product.
The real issue isn’t the type of USB port alone. It’s the lack of a cohesive strategy, a personal charging ecosystem that anticipates failure. Relying on last-minute charges or a tangled mess of different cables is a recipe for being left in the dark. The true solution is a system-based approach that turns power management from a constant worry into a simple, automated habit. But what if the key to never having a dead light again wasn’t about the light itself, but about building a robust, personal power infrastructure around it?
This guide will walk you through creating that fail-proof charging ecosystem. We’ll move beyond the simplistic USB-C debate and dive into creating a weekly charging ritual, understanding the true lifecycle of your batteries, preparing for environmental failure points like rain and cold, and decoding what manufacturers’ performance claims really mean for your daily ride.
This article details the crucial elements for establishing a dependable bike light system. Explore the table of contents below to navigate through the key strategies and technical insights that will transform your approach to cycling illumination and power management.
Contents: A Commuter’s Guide to Eliminating Bike Light Power Anxiety
- The Sunday Charge: How to Organize Your Week So You Never Run Out of Power
- Built-in vs. Replaceable: What Happens When Your Internal Battery Dies?
- Low Power: Which Lights Automatically Dim to Save the Last 15 Minutes?
- Rubber Seals: Why USB Ports Are the Weakest Link in Heavy Rain?
- Charging on the Go: Can You Run Your Light While Plugged into a Dynamo?
- 1000 Lumens for How Long? Decoding Battery Life Claims on High Power
- Cold Weather blues: Why Your Range Drops 30% in January and How to Fix It
- Lumens vs. Lux: What Do You Actually Need to See Potholes in the Dark?
The Sunday Charge: How to Organize Your Week So You Never Run Out of Power
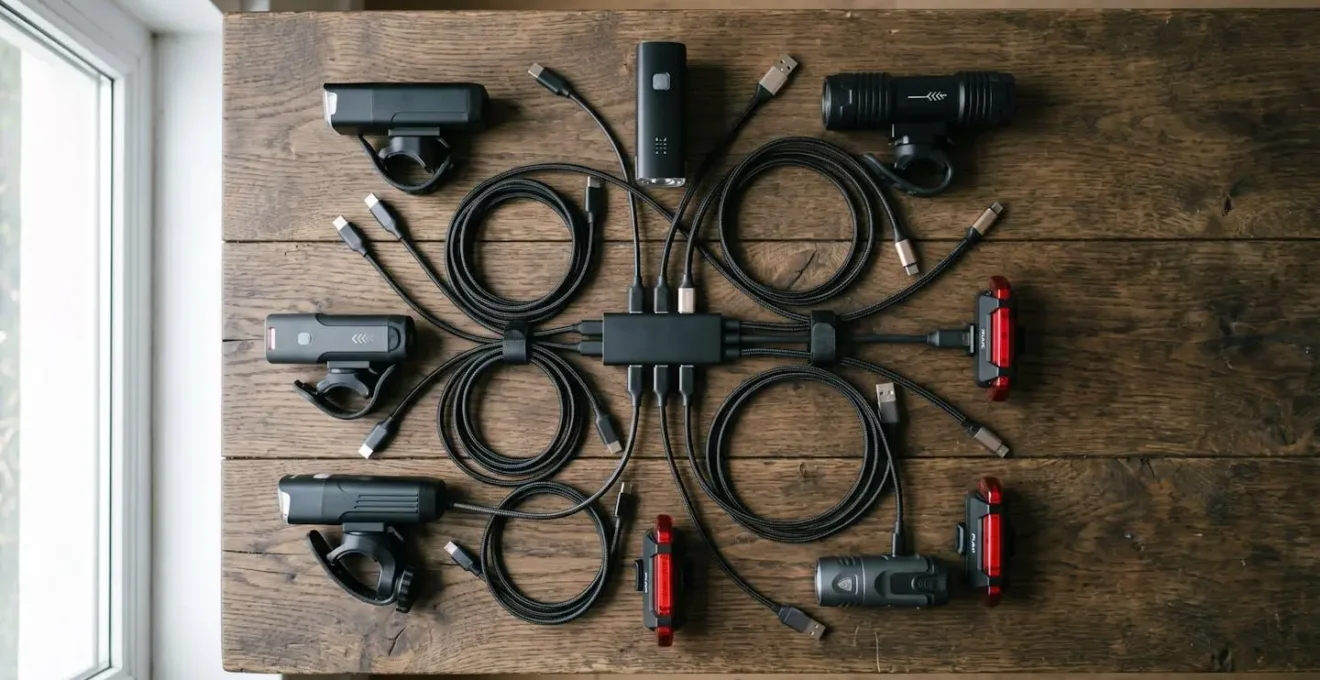
Power anxiety is the direct result of a chaotic charging process. The solution is to stop treating charging as a desperate, last-minute task and transform it into a predictable, weekly ritual. The « Sunday Charge » is a mindset: you dedicate a specific time each week to top off all your cycling electronics. This eliminates guesswork and ensures you start every Monday with a full suite of power. To make this work, you need to build a dedicated charging station. This isn’t just a random power strip; it’s a centralized hub for your entire cycling tech stack.
Case Study: The Unified Charging Station Strategy
To combat cable chaos, savvy commuters are creating dedicated home charging setups. This involves using a multi-port GaN charger that supports both USB-C and USB-A. By pairing this with color-coded cables for each device—front light, rear light, GPS, phone—you create an unmistakable, streamlined weekly routine. This approach, detailed in an analysis of modern multi-port charging station strategies, eliminates the frustration of hunting for the right cable and ensures every device is ready for the week ahead.
This system also forces you to confront battery health. Can you overcharge a modern bike light? Generally, no. Modern lithium-ion batteries have built-in circuits to prevent overcharging. However, constant trickle charging can generate heat, which degrades the battery over time. A core principle of battery care is to remove the light from the charger once it’s full. A weekly charging routine, where you actively monitor the process, is far superior to leaving devices plugged in indefinitely. Always fully charge a new light before its first use to calibrate the battery management system.
Built-in vs. Replaceable: What Happens When Your Internal Battery Dies?
Every rechargeable battery has a finite lifespan, typically 300-500 charge cycles before its capacity significantly degrades. This is the ticking clock on your investment. The critical question for a tech-savvy commuter is not *if* the battery will die, but what happens *when* it does. This consideration is central to the light’s Total Cost of Ownership (TCO), a concept that extends far beyond the initial purchase price. For lights with sealed, built-in batteries, a dead battery often means a dead light, contributing to electronic waste.
Lights with user-replaceable batteries, while often having a higher initial cost, align with « right to repair » principles and can be more economical and sustainable in the long run. The challenge, however, is the lack of industry standardization. As lead mechanic Ryan Waddell notes, repair knowledge is scarce:
There’s no training on battery repair, that I know of, within the bike industry. If something happens with a name-brand manufacturer [battery], they’ll usually want the battery shipped back so it can be replaced.
– Ryan Waddell, Lead mechanic at GoodTurn Cycles nonprofit e-bike shop
This highlights the gap in the market: even with replaceable batteries, finding the right cell and having the confidence to swap it can be a hurdle. This makes the initial choice even more critical, as the long-term viability of your light is determined on day one.
The table below breaks down the long-term financial implications, demonstrating how a more expensive initial purchase can sometimes result in a lower TCO over the typical lifespan of a commuter’s gear.
| Light Type | Initial Cost | Battery Replacement Cost | Replacement Frequency | 6-Year Total Cost | Sustainability |
|---|---|---|---|---|---|
| Budget Built-in Battery Light | $50 | N/A (replace entire unit) | Every 2 years | $150 (3 units) | Low – Creates e-waste |
| Premium Replaceable Battery Light | $200 | $40 per battery | Every 4 years | $240 (1 unit + 1 battery) | High – Right to repair compliant |
| Mid-Range Rechargeable | $100 | $60 (unofficial repair) | Every 3 years | $220 (1 unit + 1 repair) | Medium – Requires DIY skills |
| Note: Costs based on average market prices as of 2026. Premium lights often offer official battery replacement services while budget options are effectively disposable. | |||||
Low Power: Which Lights Automatically Dim to Save the Last 15 Minutes?
One of the most valuable features in a modern bike light, and a key component of a reliable lighting ecosystem, is a « get-me-home » mode. This intelligent function automatically drops the light’s output to a very low, power-sipping level when the battery reaches a critical threshold—typically the last 10-15% of its charge. Instead of an abrupt and dangerous shutdown, you get an extended period of low-level visibility. This is your system’s built-in safety net, providing just enough light to get you to your destination safely or to pull over and deploy a backup.
This feature is a direct countermeasure to power anxiety. A simple red/green battery indicator offers little nuance; it can switch from « good » to « dead » with unnerving speed. In contrast, models featuring multi-stage battery indicators showing clear 100-75-50-25% levels are far more effective at managing rider expectations and preventing surprises. When selecting a primary light, look for explicit mentions of a « reserve mode, » « emergency mode, » or « limp-home mode. » This demonstrates that the manufacturer has considered real-world failure scenarios. When this mode activates, it’s a clear signal to immediately implement your get-me-home protocol.
Your Get-Me-Home Protocol: Reacting to Reserve Mode
- Immediately reduce your riding speed to conserve remaining battery power and extend the reserve mode duration.
- Change your route to better-lit roads or paths where reduced light output is less critical for safety.
- Activate your backup light (a sub-50-lumen secondary ‘to be seen’ light) as a redundant safety measure.
- After the ride, note the performance. Regularly inspect lights for flickering or dimming signs that may indicate battery degradation before it becomes a critical failure.
A good lighting system isn’t just about having one powerful light; it’s about having a primary light with intelligent safeguards and a secondary backup for absolute redundancy. The automatic dimming feature is the brain that makes this system work seamlessly.
Rubber Seals: Why USB Ports Are the Weakest Link in Heavy Rain?
For a daily commuter, your light’s greatest enemy isn’t darkness; it’s water. While manufacturers prominently advertise IP (Ingress Protection) ratings like IPX6 or IPX7, these ratings are tested under controlled lab conditions. In the real world of grit, road spray, and daily wear, the single most common point of failure is the USB charging port. The small rubber or silicone bung meant to protect this opening is the Achilles’ heel of your light’s weatherproofing. After months of being pried open and pressed shut, these seals can lose their tight fit, tear, or get caked with dirt, creating a direct path for water to reach the sensitive electronics inside.
Is it okay for a bike light to get wet? Yes, if it’s properly sealed. But you can’t trust the seal forever. This is where the debate between Micro-USB and USB-C becomes more nuanced. While USB-C is often lauded for its reversible connector and faster charging potential, the fundamental weakness of the rubber seal remains. In fact, the industry’s slow adoption of USB-C, driven by manufacturing costs, means the majority of lights still use the more fragile Micro-USB port, exacerbating the problem. A compromised port doesn’t just risk the light; charging a wet device can lead to short circuits and permanent damage to both the light and the charger.
Therefore, proactive port maintenance is non-negotiable for any all-weather commuter. Your post-ride routine after a wet journey is just as important as your charging routine. A few simple steps can dramatically extend the life of your light and prevent a costly, water-induced failure.
Action Plan: Post-Wet-Ride Port Maintenance
- Inspect the Port: After a wet ride, immediately open the rubber seal and check for any moisture or debris inside the USB port.
- Dry Thoroughly: Gently blow out any visible water using your breath or a can of compressed air. Crucially, never use cotton swabs, as they can leave behind fibers that cause connection issues.
- Air It Out: Let the light air dry completely indoors for several hours with the port cover open. Do not attempt to charge it until you are certain it is 100% dry.
- Seal Enhancement: For extreme conditions, consider applying a tiny amount of dielectric grease to the rubber seal itself. This helps maintain its suppleness and creates a more effective barrier against water intrusion.
- Store Disconnected: If storing the light for an extended period, especially after a wet season, disconnect it from any external battery packs to prevent accidental discharge and potential corrosion.
Charging on the Go: Can You Run Your Light While Plugged into a Dynamo?
For the ultimate off-grid reliability, especially for long-distance touring or bikepacking, some cyclists look to dynamo hubs. These systems generate electricity from the rotation of the front wheel, offering a theoretically endless power source. The dream is to run a powerful front light directly while simultaneously charging a power bank. However, the reality is constrained by physics. The core issue is a mismatch between power generation and consumption. Can you do it? Yes, but with significant limitations.
The central problem is output. The technical specifications show that a standard 3W dynamo hub outputs approximately 5V/0.5A. A high-power, 1000-lumen light can easily draw 5V/2A or more on its highest setting. The dynamo simply can’t produce enough power to run the light at full blast and charge another device simultaneously. Trying to do so will result in the light flickering, dimming, or rapidly draining the internal battery faster than the dynamo can replenish it.
A more viable strategy is to use the dynamo to charge a separate power bank during the day. Then, at night, you run your light from its internal battery or directly from the fully charged power bank. This decouples the acts of generating and consuming power. Some advanced lights feature « pass-through charging, » allowing them to run while being charged. This is the key feature to look for if you intend to power your light from an external source. However, even with pass-through charging, you still need to ensure your power source (the dynamo or power bank) can supply more current than the light is consuming to actually gain charge.
Key Takeaways
- A disciplined weekly charging ritual with a dedicated station is far more effective for ensuring reliability than sporadic, last-minute charging.
- The true cost of a bike light must include its long-term serviceability, considering battery degradation and the potential for replacement, not just the initial price.
- Environmental factors are a primary threat; the integrity of your USB port’s rubber seal in the rain and the chemical nature of batteries in the cold are your system’s weakest links.
1000 Lumens for How Long? Decoding Battery Life Claims on High Power
The lumen number is the headline feature for most bike lights, but it’s often the most misleading. Manufacturers are in a « lumen war, » pushing ever-higher numbers to attract buyers. However, the claimed lumen output is rarely what you get for the duration of your ride. There are two main reasons for this: optimistic marketing and a physical phenomenon known as thermal throttling. First, the marketing: independent testing reveals that many lights’ claimed lumens are 10-40% higher than actual brightness measured in a controlled setting. They are often theoretical maximums, not sustained, real-world outputs.
Second, and more importantly for a tech-savvy user, is thermal throttling. High-power LEDs generate a significant amount of heat. To protect the electronics from damage, all modern lights have a thermal management system that reduces the power (and thus the brightness) as the light’s internal temperature rises. As Herrmans Bike Components explains:
All LED bike lights, regardless of brand, will be brightest when just turned on, and shine less bright when they get hot. Depending on the construction and cooling of the light, the output will decrease gradually until a stable level is reached.
– Herrmans Bike Components, Bike Light Buying Guide: Comparing Light Values
This means that the « 1000 lumens for 1.5 hours » claim on the box is often only true in ideal conditions, such as high airflow on a cold night. On a warm, still evening or a slow climb, the light will likely dim itself to a lower, stable output of perhaps 700-800 lumens to manage heat. This isn’t a defect; it’s a necessary self-preservation feature. Therefore, a better-designed light with a larger aluminum body and cooling fins will maintain a higher « stable » output than a compact plastic light, even if both claim the same peak lumens.
Cold Weather blues: Why Your Range Drops 30% in January and How to Fix It
If you’re a year-round commuter, you’ve likely noticed that your lights and other electronics seem to die much faster in the winter. This isn’t your imagination; it’s a fundamental limitation of lithium-ion battery chemistry. Cold temperatures dramatically increase the internal resistance of the battery, which slows down the chemical reaction that produces electricity. The battery isn’t actually losing its charge, but its ability to deliver that charge is severely hampered. This results in a significant, albeit temporary, drop in available capacity.
The numbers are stark. According to performance testing, at 0°C (32°F), a lithium-ion battery can lose 20-30% of its rated capacity. This means your 2-hour runtime in the summer might become just 1 hour and 24 minutes on a freezing day. The effect is even more pronounced at lower temperatures; cold weather performance data indicates that a battery providing 100% capacity at 27°C (80°F) will typically deliver only 50% at -18°C (0°F). This is a critical failure point in any commuter’s lighting ecosystem.
So, how do you fix it? You can’t change the chemistry, but you can manage the conditions. The solution is to keep your batteries warm. Before the ride: Store your lights indoors at room temperature, not in a cold garage or shed. Charge them indoors as well, as charging a frozen battery can cause permanent damage. During the ride: If you use an external power bank, keep it in an inside pocket of your jacket, close to your body heat, rather than strapped to your frigid bike frame. For the lights themselves, the heat generated by the LED will provide some internal warmth once running, but starting them warm gives you a significant head start. By managing temperature, you can mitigate the worst effects of the cold and reclaim a large portion of that lost winter range.
Lumens vs. Lux: What Do You Actually Need to See Potholes in the Dark?
In the world of bike lights, the conversation is dominated by one number: lumens. While lumens measure the total amount of light emitted in all directions (the « power »), they don’t tell you where that light is going. For a commuter trying to spot a pothole 10 meters down the road, a much more important metric is lux. Lux measures the intensity of light falling on a specific surface (the « effectiveness »). A 1000-lumen light with a wide, unfocused beam might illuminate the treetops beautifully but place very little lux on the road ahead, while a well-engineered 600-lumen light with a focused beam could be far superior for actual navigation.
The key is the beam pattern. A trail rider needs a wide, conical beam to see around corners. A road commuter, however, benefits most from a beam with a sharp horizontal cutoff, similar to a car’s dipped headlights. This pattern, often referred to as StVZO-compliant (named after German road traffic regulations), concentrates the light on the road where you need it and prevents dazzling oncoming drivers and cyclists. This efficiency means more of your precious lumens are converted into useful lux on the pavement.
So, what do you actually need? It depends entirely on your speed and environment. A slow ride through a well-lit park requires very little, while a fast descent on an unlit road demands high intensity far ahead. The following table provides a practical guide to connect your riding style with the real-world illumination required to be safe.
| Riding Type | Speed Range | Minimum Lux at 10m | Recommended Lumens | Beam Pattern Priority |
|---|---|---|---|---|
| City Commuting | 10-15 mph | 20-60 lux | 200-600 lumens | Wide with horizontal cutoff (StVZO-compliant preferred) |
| Fast Road Riding | 20+ mph | 60-100 lux | 600-1000 lumens | Focused beam with sharp horizontal cutoff to avoid dazzling traffic |
| Technical Trail Riding | Variable (5-20 mph) | 150+ lux | 1000+ lumens | Wide conical MTB beam for peripheral vision around corners |
| Gravel/Mixed Terrain | 12-18 mph | 80-120 lux | 800-1200 lumens | Balanced wide beam with moderate throw distance |
| Note: Lux measurements taken at 10 meters distance on vertical screen per German StVZO standard. Actual requirements may vary based on ambient light conditions. | ||||
Start building your personal charging ecosystem today. By implementing a weekly charging ritual and understanding the real-world failure points of your gear, you can transform your relationship with your bike lights from one of constant anxiety to one of absolute confidence, ensuring you’re never left in the dark again.